
There’s a moment every engineer faces, the point where learning stops being about checking boxes and starts being about building something real. For me, that moment is now.
I’m stepping into a Personal Challenge on Azure DevSecOps journey, a hands-on exploration of modern cloud infrastructure, security automation, and intelligent FinOps practices powered by Terraform, Azure Pipelines, and AI Foundry.
This isn’t just a learning sprint. It’s my commitment to grow from a practitioner into an MVP, capable of designing, automating, and scaling secure platforms for financial systems that demand precision, resilience, and transparency.
Why I’m Doing This
My path has always leaned toward systems, automation, and cloud architecture. But in today’s landscape, understanding the cloud isn’t enough, you need to understand how to secure, automate, and optimize it. That’s the heart of DevSecOps, and it’s where I want to deepen my craft.
Through this challenge, I’ll build, break, and rebuild across Azure’s ecosystem, deploying infrastructure as code, integrating CI/CD pipelines, applying FinOps strategies, and eventually fusing AI to bring smarter decision-making to cloud operations. Feel Free to Follow along.
Objective
Think of this as setting up your “workshop” before building something. We need:
- VS Code = Your coding workspace (like Microsoft Word, but for code)
- Azure CLI = A tool to talk to Microsoft Azure (cloud services)
- Terraform = A tool to create cloud resources automatically
- Git = A tool to save and track your work
- Azure DevOps = A platform to manage your projects online
Before We Start
What operating system are you using?
- Windows
- Mac
- Linux (Ubuntu/Debian)
This matters because installation commands differ. I’ll be using Windows steps primarily, with notes for other systems.
STEP 1: Install VS Code (Your Coding Editor)
What is VS Code?
It’s a free text editor made by Microsoft, perfect for writing code. Think of it as a super-powered Notepad.
Installation:
- Go to the VS Code website:
- Open your browser and visit: https://code.visualstudio.com/download
- Download the installer:
- Click the big blue button for your operating system (Windows, Mac, or Linux)
- For Windows: Download the
.exefile - Wait for the download to complete
- Run the installer:
- Double-click the downloaded file
- Accept the license agreement
- Important checkboxes to select:
- “Add to PATH” (makes it easier to use from command line)
- “Create a desktop icon” (optional, but helpful)
- Click “Next” then “Install”
- Wait for installation to complete
- Click “Finish”
- Launch VS Code:
- Open VS Code from your desktop or Start menu
- You should see a welcome screen

STEP 2: Install VS Code Extensions (Add Superpowers)
Extensions are like apps for VS Code – they add helpful features.
How to Install Extensions:
- Open VS Code
- Click the Extensions icon on the left sidebar (looks like 4 squares, with one separated)
- OR press
Ctrl+Shift+X(Windows/Linux) orCmd+Shift+X(Mac)
- OR press
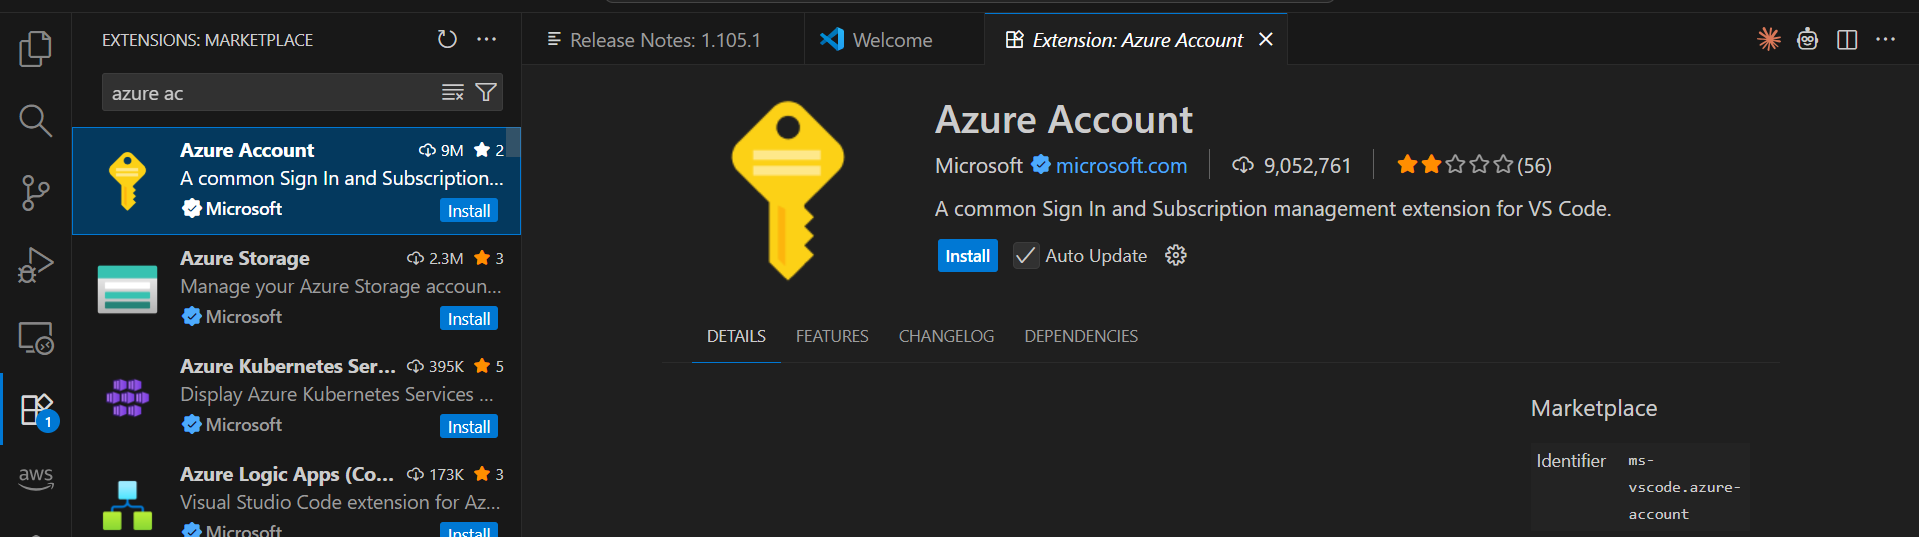
- Install these extensions one by one: Type each name in the search box and click “Install”:
- HashiCorp Terraform – Helps write Terraform code
- Azure Account – Connect to your Azure account
- Azure CLI Tools – Makes Azure commands easier
- YAML – For configuration files
- GitLens – Makes Git easier to use
- Prettier – Code formatter – Makes your code look neat
- Wait for each to install (you’ll see a green checkmark when done)


STEP 3: Install PowerShell or Terminal Access
Windows Users:
You already have PowerShell! Here’s how to open it:
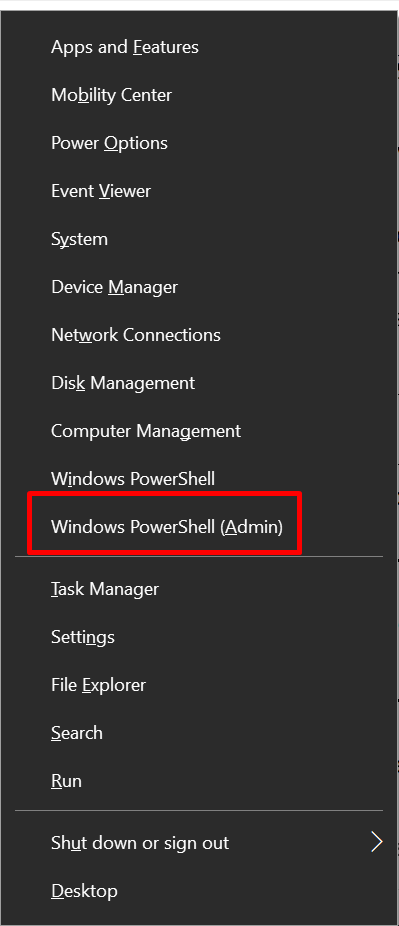
- Press
Windows key + X - Select “Windows PowerShell (Admin)” or “Terminal (Admin)”
- If it asks “Do you want to allow this app to make changes?” click Yes
Verify PowerShell:
Type this and press Enter
$PSVersionTable.PSVersion
You should see version information. If it’s version 5.0 or higher, you’re good!
Mac/Linux Users:
You have Terminal by default:
- Mac: Press
Cmd + Space, type “Terminal”, press Enter - Linux: Press
Ctrl + Alt + T

STEP 4: Install Azure CLI (Talk to Azure Cloud)
Windows Installation:
- Open PowerShell as Administrator (from Step 3)
- Copy and paste this command, then press Enter:
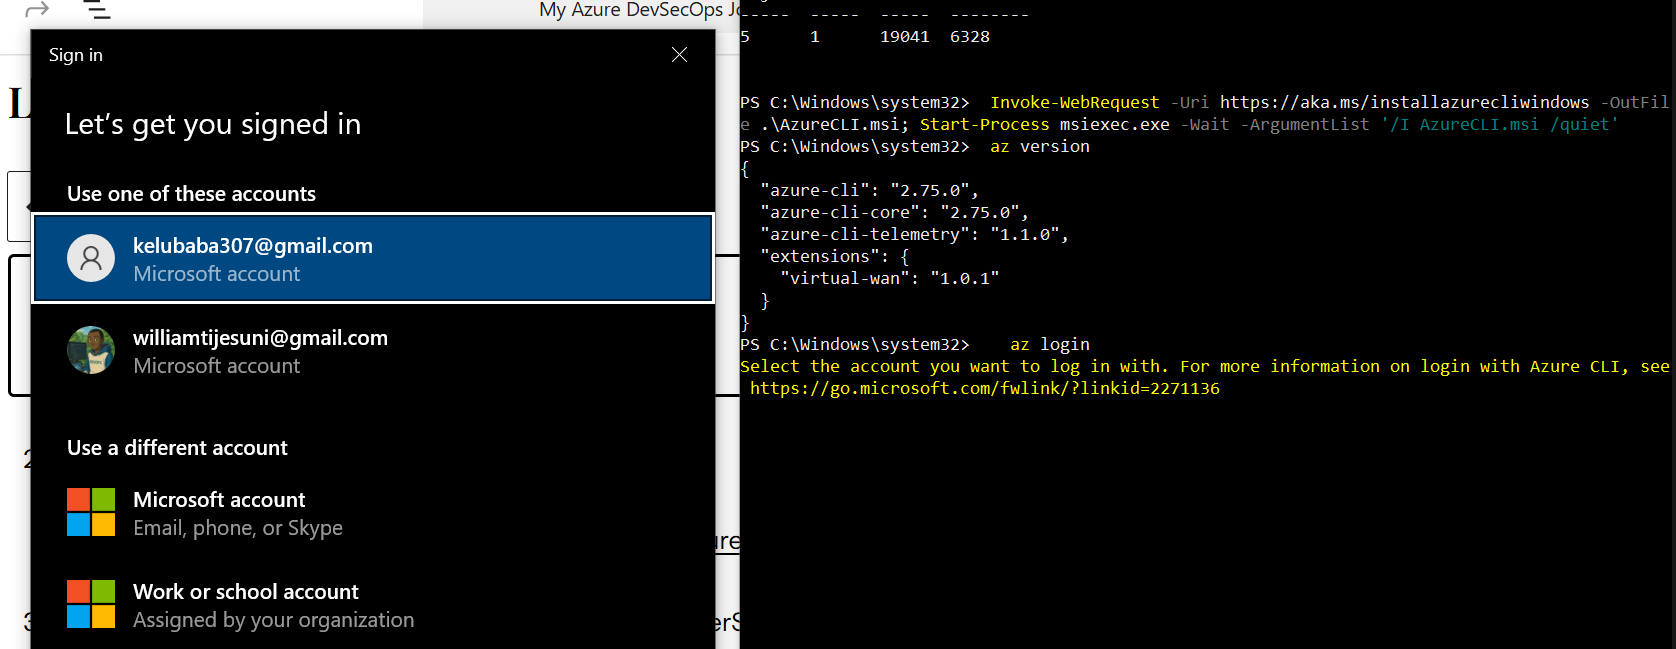
Invoke-WebRequest -Uri https://aka.ms/installazurecliwindows -OutFile .\AzureCLI.msi; Start-Process msiexec.exe -Wait -ArgumentList '/I AzureCLI.msi /quiet'
- Wait 2-5 minutes for installation to complete (you won’t see much happening)
- Close PowerShell completely and reopen it (this is important!)
- Verify installation:
az version
You should see version information in JSON format.
Mac Installation:
brew update && brew install azure-cli
(Requires Homebrew – if you don’t have it, visit https://brew.sh first)
Linux (Ubuntu/Debian):
curl -sL https://aka.ms/InstallAzureCLIDeb | sudo bash
Login to Azure:
- Type this command:
az login
- Your browser will open asking you to sign in to Microsoft
- Use your Azure account credentials
- If you don’t have an Azure account yet, visit https://azure.microsoft.com/free to create a free account
- After signing in, close the browser tab and return to PowerShell
- You should see a list of your Azure subscriptions


STEP 5: Install Terraform (Infrastructure as Code Tool)
Windows Installation (using Chocolatey):
First, we need to install Chocolatey (a Windows package manager):
- Open PowerShell as Administrator
- Check if you already have Chocolatey:
choco --version
- If you see a version number, skip to step 4
- If you see an error, continue to step 3
- Install Chocolatey (copy and paste this entire command):
Set-ExecutionPolicy Bypass -Scope Process -Force; [System.Net.ServicePointManager]::SecurityProtocol = [System.Net.ServicePointManager]::SecurityProtocol -bor 3072; iex ((New-Object System.Net.WebClient).DownloadString('https://community.chocolatey.org/install.ps1'))
- Wait for installation to complete (1-2 minutes)
- Close and reopen PowerShell as Administrator
- Install Terraform:
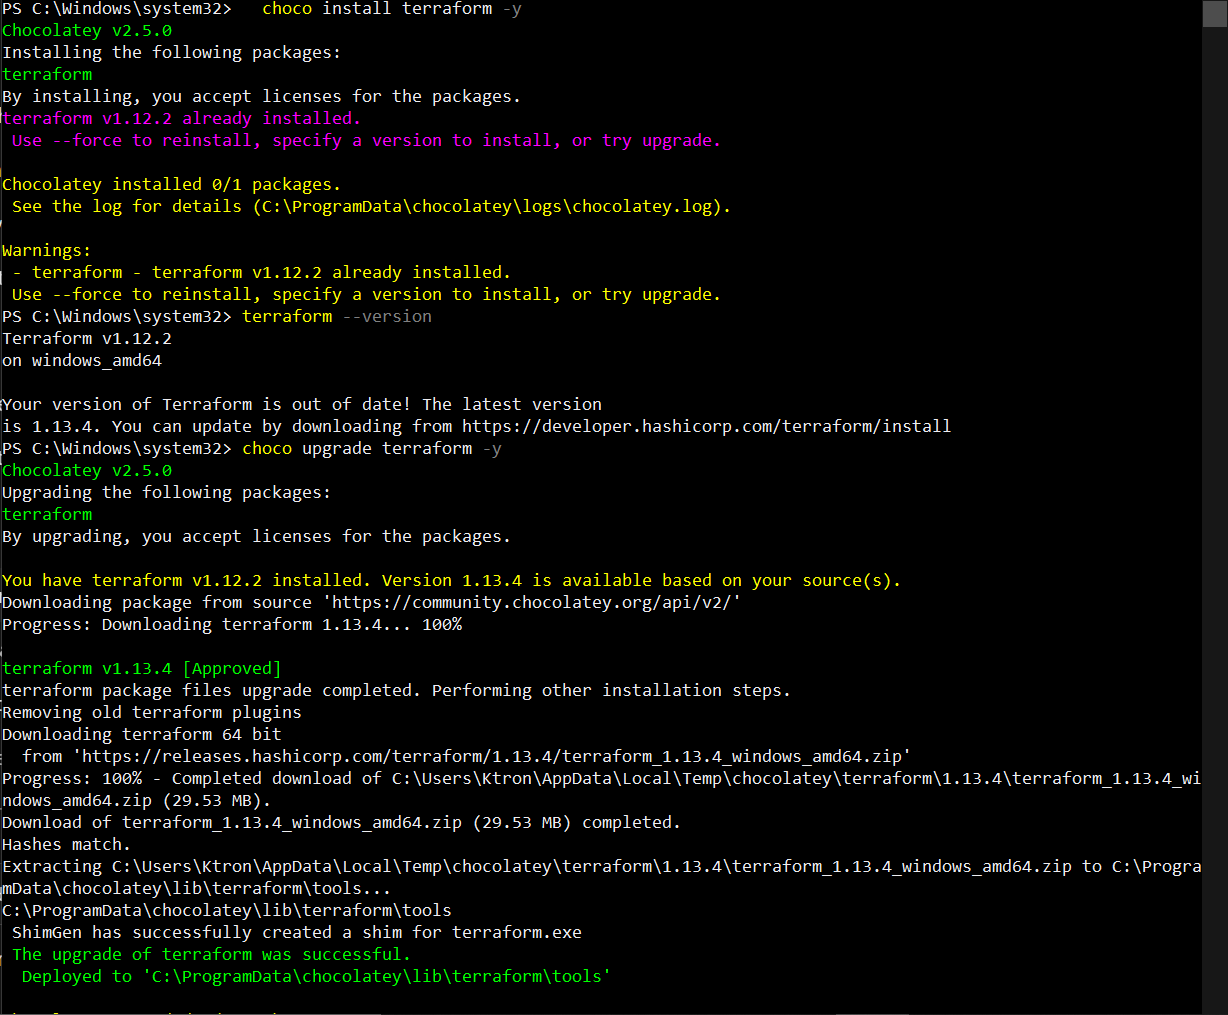
choco install terraform -y
- Wait for installation (1-2 minutes)
- Close and reopen PowerShell (important for PATH updates)
- Verify Terraform installation:
powershell
terraform -version
You should see something like: Terraform v1.x.x
Mac Installation:
brew tap hashicorp/tap
brew install hashicorp/tap/terraform
Linux Installation:
wget -O- https://apt.releases.hashicorp.com/gpg | sudo gpg --dearmor -o /usr/share/keyrings/hashicorp-archive-keyring.gpg
echo "deb [signed-by=/usr/share/keyrings/hashicorp-archive-keyring.gpg] https://apt.releases.hashicorp.com $(lsb_release -cs) main" | sudo tee /etc/apt/sources.list.d/hashicorp.list
sudo apt update && sudo apt install terraform
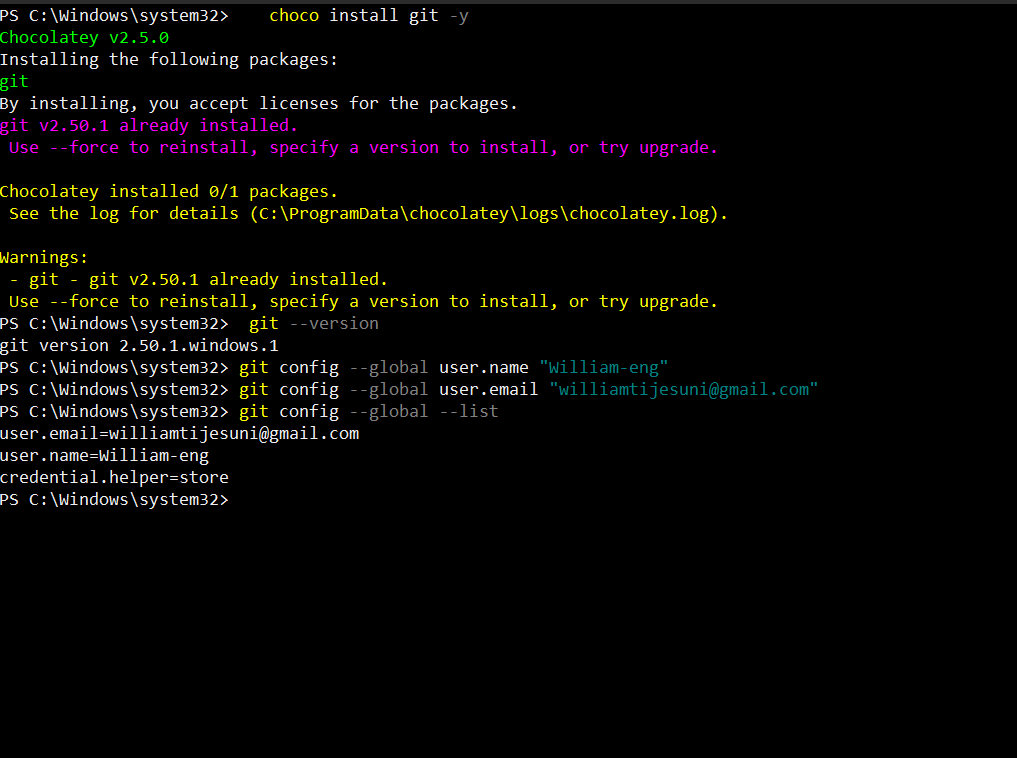
STEP 6: Install Git (Version Control)
Windows Installation:
- In PowerShell (as Administrator), type:
choco install git -y
- Wait for installation (1-2 minutes)
- Close and reopen PowerShell
- Verify Git:
git --version
You should see: git version 2.x.x
Mac Installation:
brew install git
Linux Installation:
sudo apt update
sudo apt install git -y
Configure Git (Everyone needs to do this):
Tell Git who you are:
git config --global user.name "Your Full Name"
git config --global user.email "youremail@example.com"
Replace “Your Full Name” and “youremail@example.com” with your actual name and email.
Verify your configuration:
git config --global --list
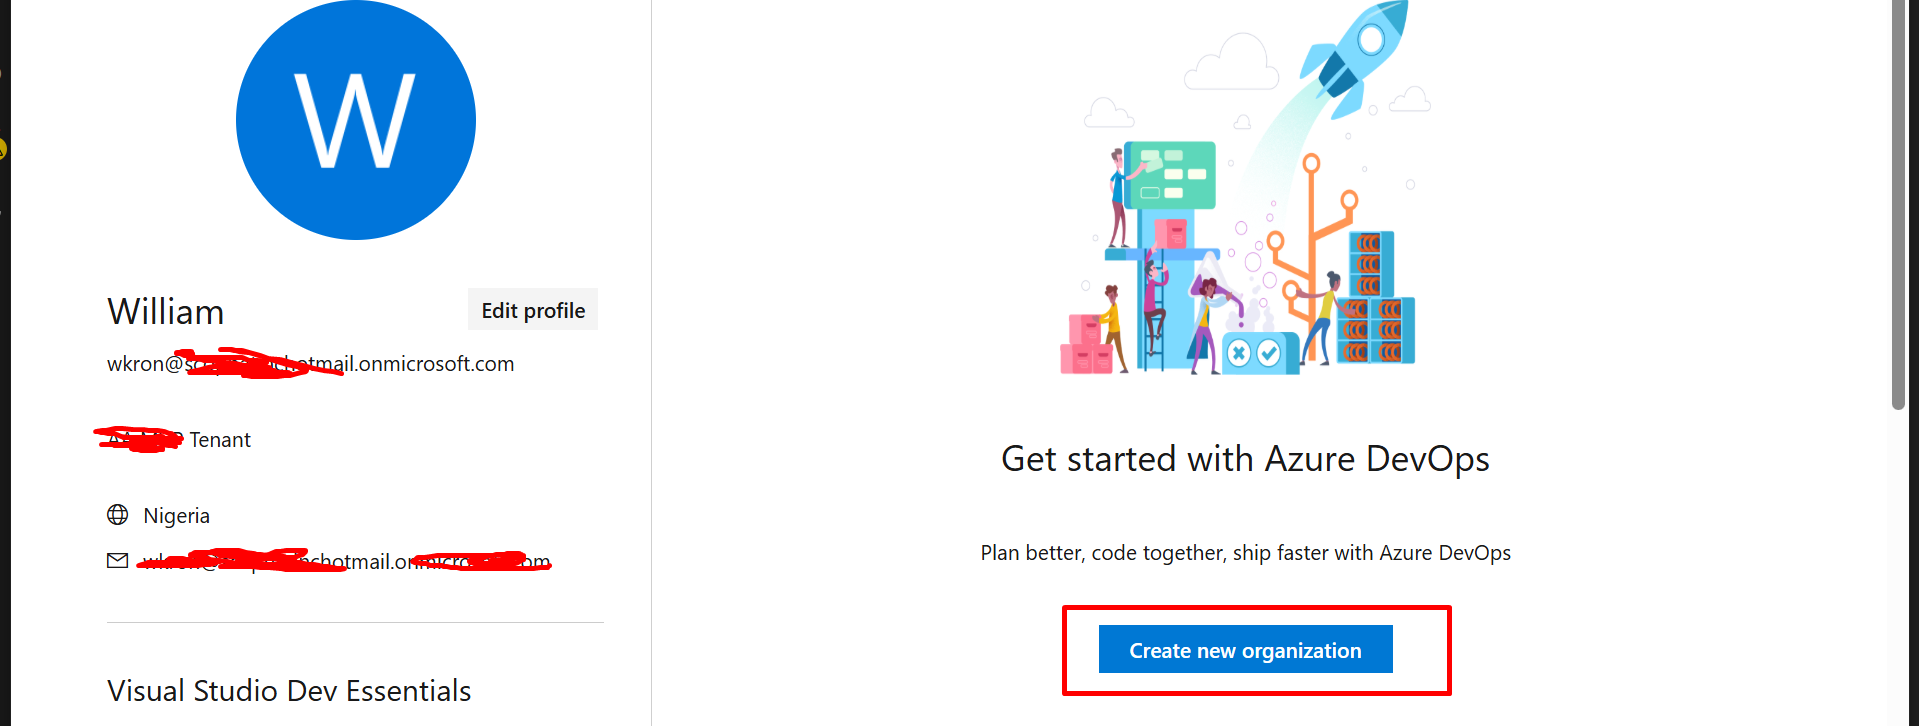
STEP 7: Set Up Azure DevOps
Azure DevOps is where you’ll store your code online and set up automation.
Create Your Azure DevOps Account:
- Go to: https://dev.azure.com
- Sign in with your Microsoft account (same one you used for Azure)
- Create a new organization:
- Click “Create new organization” or “Start free”
- Give it a name (e.g., “mycompany-devsecops”)
- Choose a region close to you
- Click “Continue”
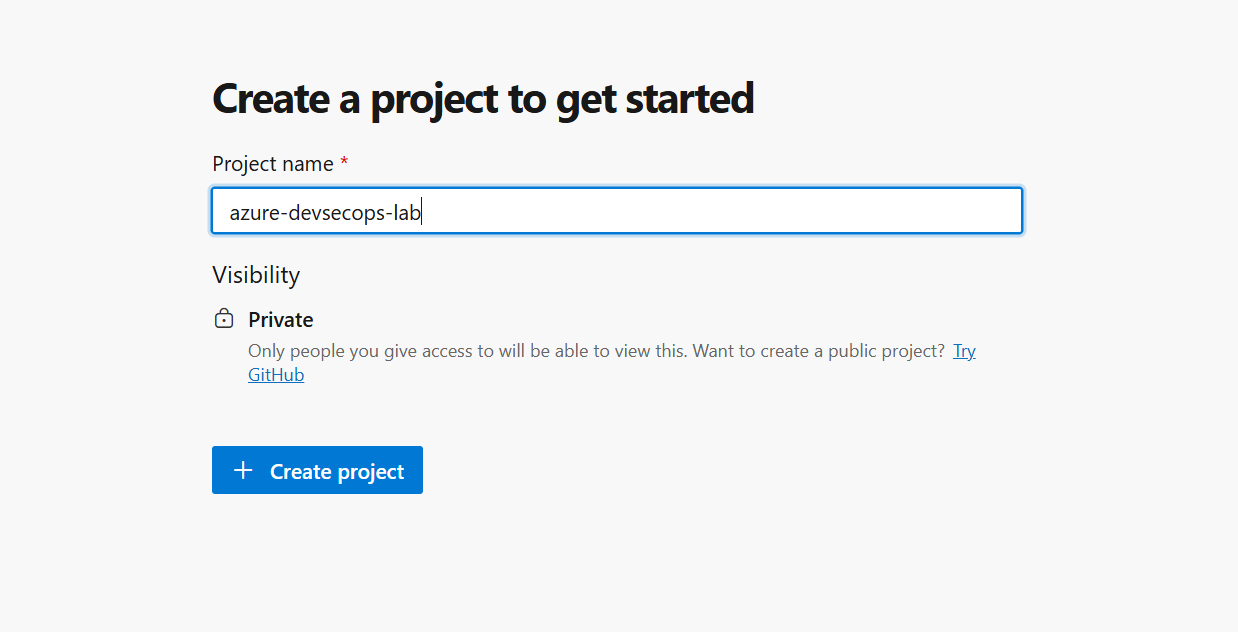
- Create a new project:
- Project name:
azure-devsecops-lab - Visibility: Private (recommended for learning)
- Click “Create project”
- Project name:
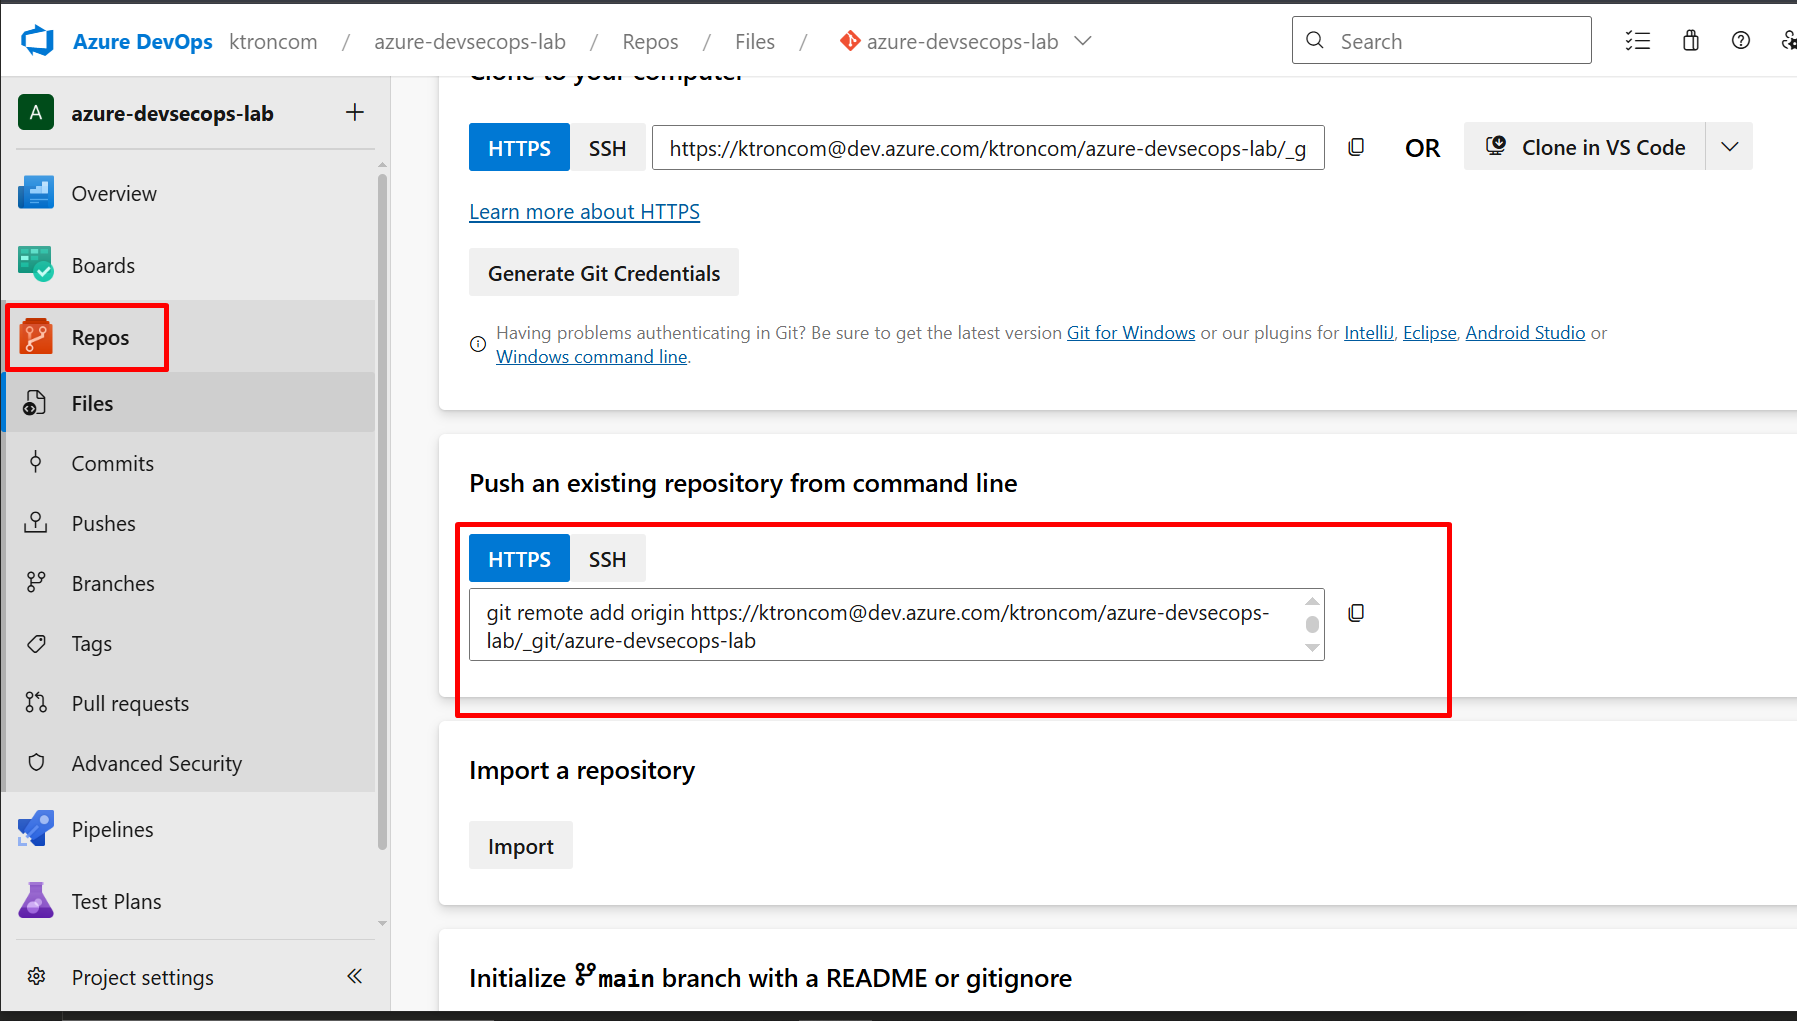
- Get the remote URL:
- In Azure DevOps, go to Repos
- Copy the URL shown (looks like:
https://dev.azure.com/yourorg/azure-devsecops-lab/_git/azure-devsecops-lab) - Link your local repo to Azure DevOps:
STEP 8: Create Your Project Folder Structure
Now let’s create organized folders for your work.
Create the Main Project Folder:
- Decide where to create your project
- I recommend:
C:\Users\YourUsername\Projects(Windows) - Or:
~/Projects(Mac/Linux)
- I recommend:
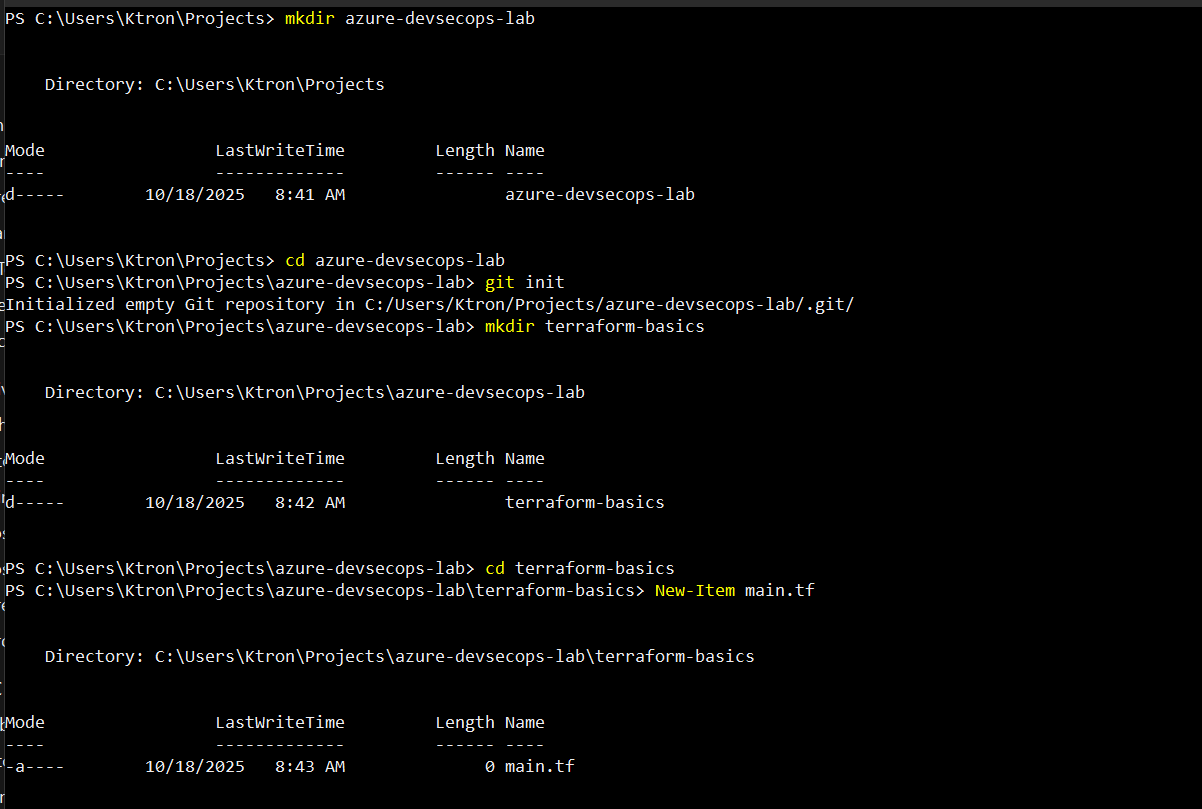
- Create the folder structure: In PowerShell/Terminal, run these commands one by one:
   # Navigate to your Documents folder
   cd ~\Documents

   # Create main project folder
   mkdir azure-devsecops-lab

   # Go into that folder
   cd azure-devsecops-lab

   # Initialize Git (creates a hidden .git folder)
   git init

   # Create a Terraform subfolder
   mkdir terraform-basics

   # Go into the Terraform folder
   cd terraform-basics

   # Create empty Terraform files
   New-Item main.tf
   New-Item variables.tf
   New-Item outputs.tf
Mac/Linux users use these commands instead:
   cd ~/Documents
   mkdir azure-devsecops-lab
   cd azure-devsecops-lab
   git init
   mkdir terraform-basics
   cd terraform-basics
   touch main.tf variables.tf outputs.tf
- Open your project in VS Code:
   # Go back to the main project folder
   cd ..

   # Open VS Code in this folder
   code .
VS Code should open and show your project structure in the left sidebar!


4. Link your local repo to Azure DevOps:
Firstly, we need to create a Personal Access Token (PAT)
Azure DevOps doesn’t use passwords for Git anymore, it uses a Personal Access Token.
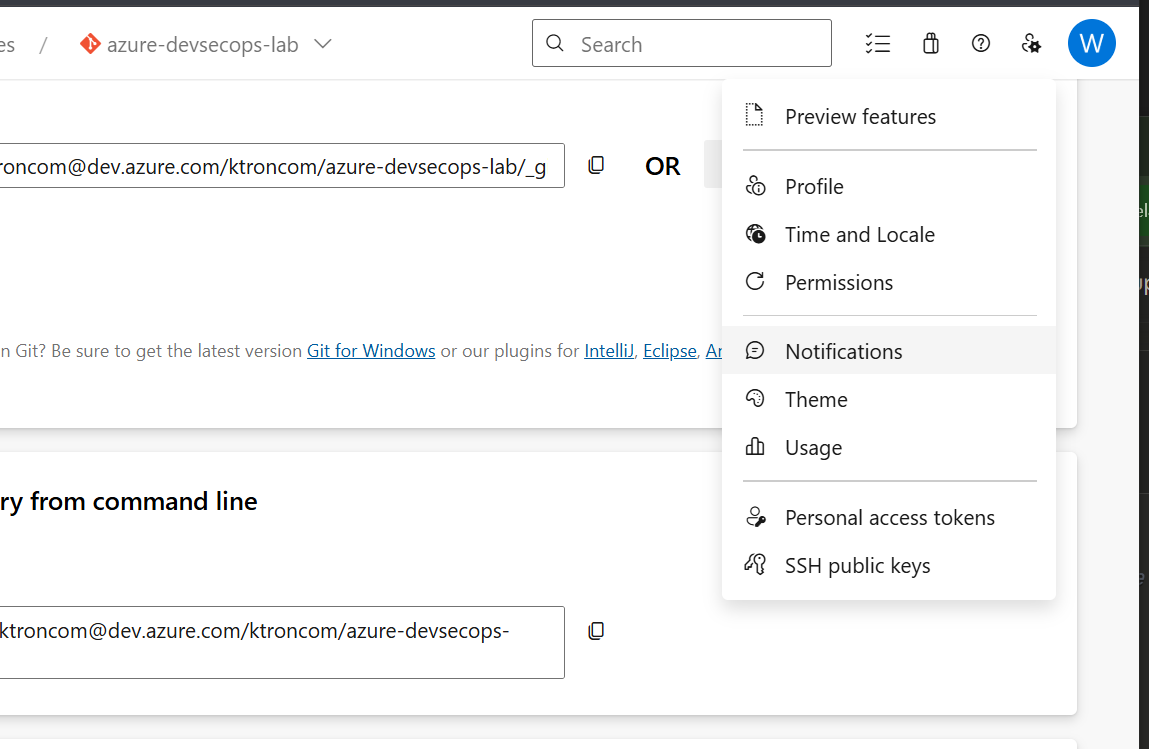
- Go to the top-right corner of Azure DevOps → click your profile picture → Personal Access Tokens.
- Click New Token.
- Give it a name like
Git Push Token. - Choose your organization (e.g.,
ktroncom). - Set Scopes → choose Code (Read & Write).
- Click Create and copy the token immediately (you won’t see it again).
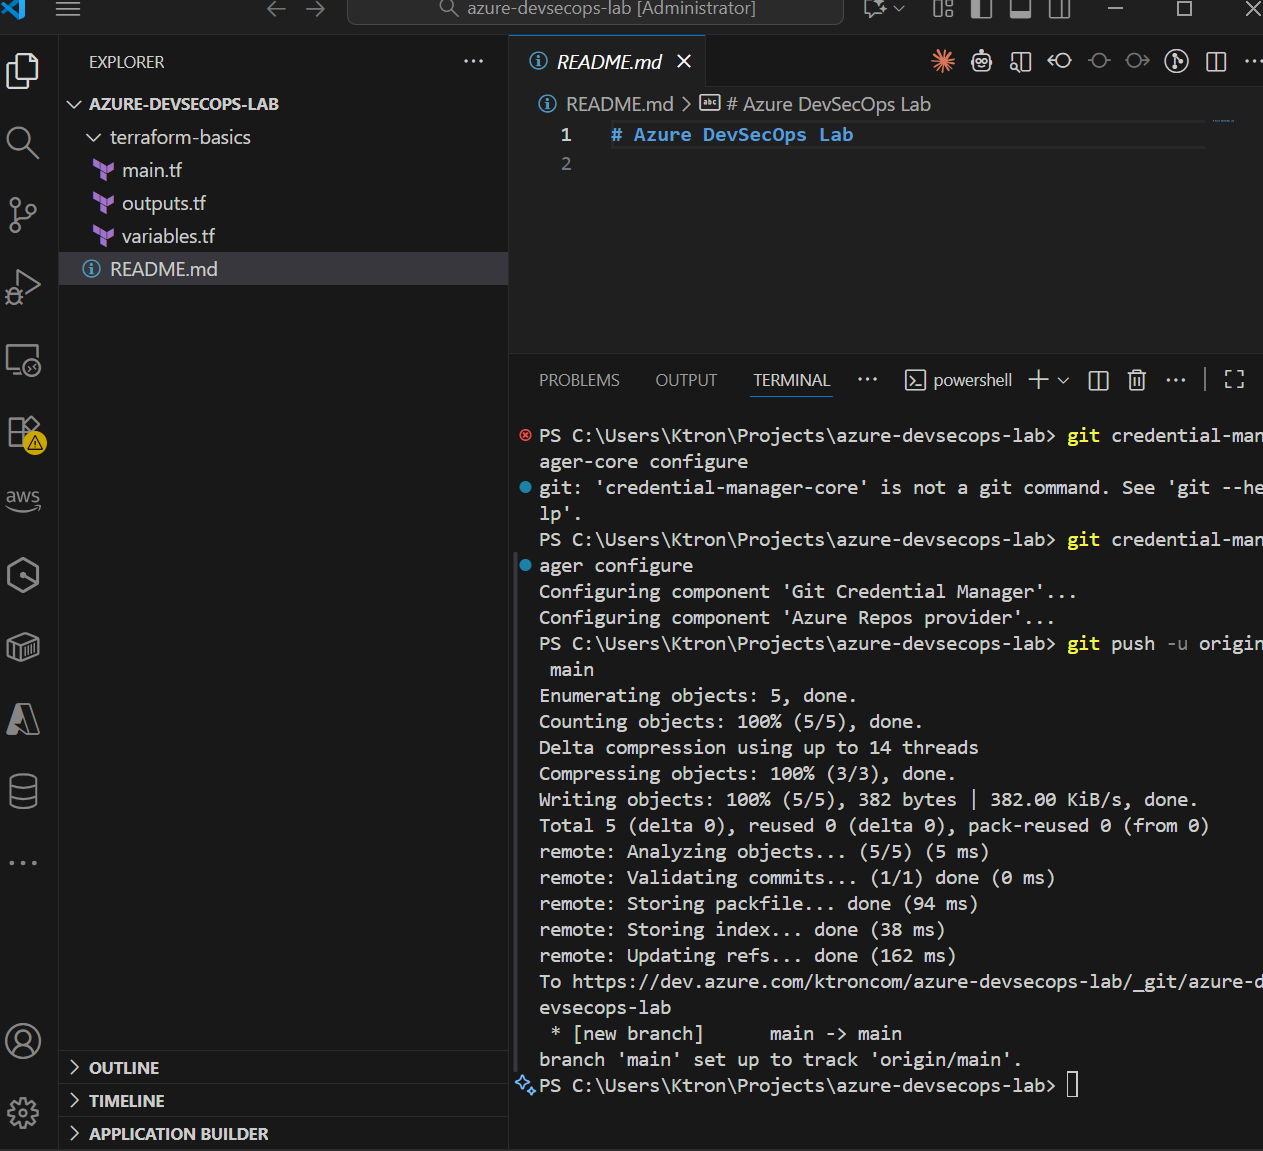
Then we, Authenticate Git
Run this command:
git credential-manager configure
# Make sure you're in your project folder
cd ~\username\azure-devsecops-lab
# Add Azure DevOps as the remote location
git remote add origin YOUR_AZURE_DEVOPS_URL
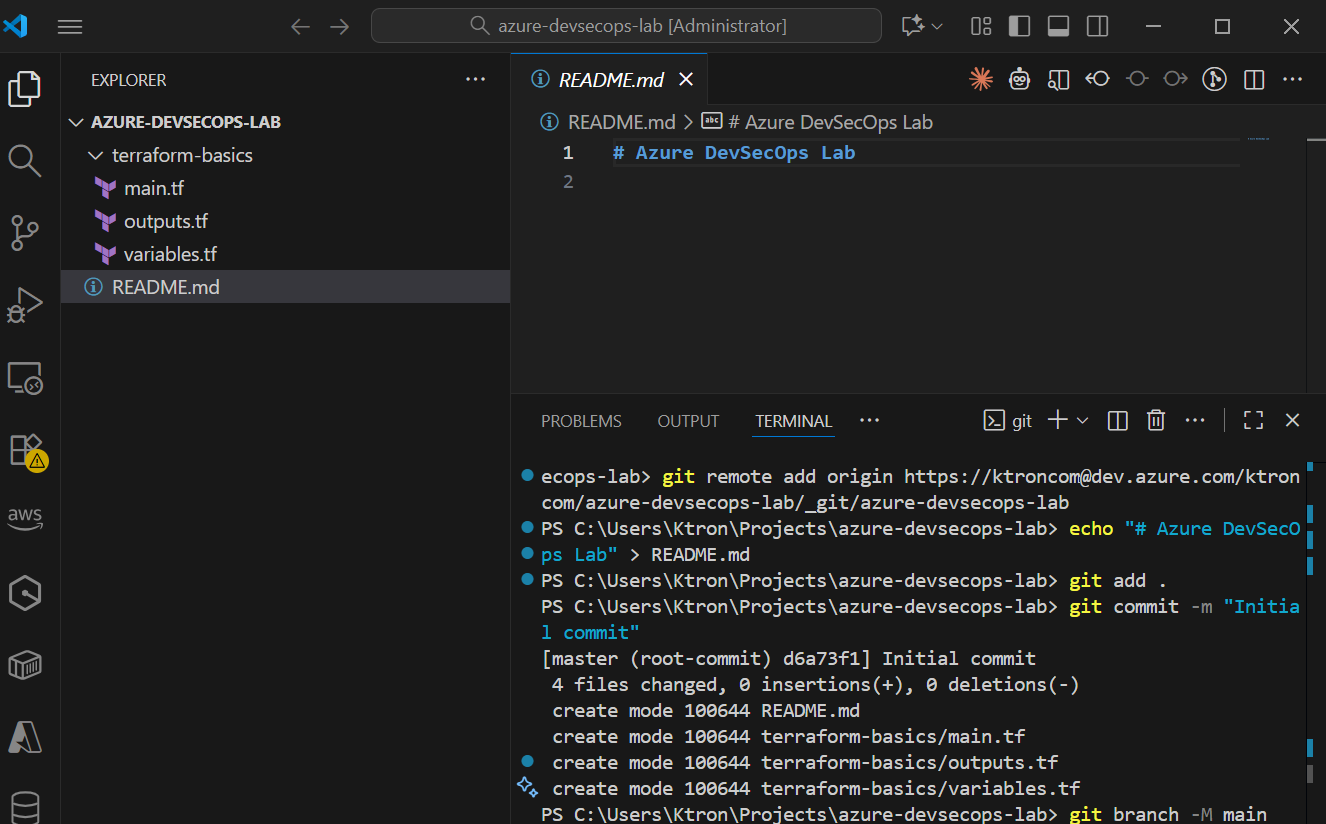
# Create a README file
echo "# Azure DevSecOps Lab" > README.md
# Stage all files
git add .
# Commit them
git commit -m "Initial commit"
# Push to Azure DevOps
git branch -M main
```
Then push to remote:
git push -u origin mainYou’ll be prompted to sign in — use one of these methods:
- Option 1: Microsoft sign-in (browser pop-up)
- Option 2: Use the PAT token as your password
When prompted for username/password:
Username: ktroncom
Password: <paste-your-PAT>
Your credentials will be saved securely via the Git Credential Manager so you won’t need to re-enter them again.
By the top left of your Vscode, you will open the terminal where you run the commands below :

Reflection
“The foundation determines the structure.”
Setting up a modern Work environment is not just about installing tools , it’s about preparing a workspace that encourages automation, consistency, and scalability.
This environment is now my sandbox for everything to come: from building Terraform IaC pipelines to implementing FinOps observability and AI-driven optimization later in this challenge.


Leave a comment