
In today’s cloud-first world, deploying a simple web application isn’t enough. Modern applications need to be secure, scalable, and resilient. In this hands-on guide, we’ll build a production-grade web infrastructure on Microsoft Azure that automatically scales with demand, distributes traffic intelligently, and provides complete visibility into your application’s health.
This project is the fifth of the ten in preparing for my AZ-104: Microsoft Azure Administrator certification and also to understand how enterprise-grade applications are deployed in the cloud.
What We’ll Build
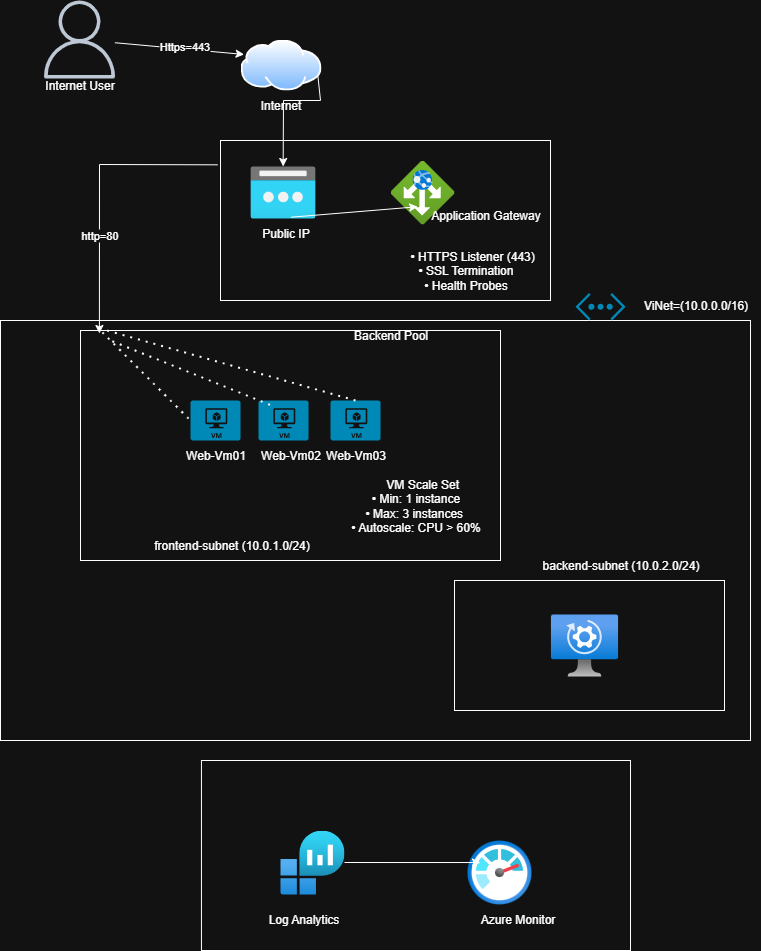
By the end of this tutorial, we’ll have deployed:
- Azure Application Gateway – A Layer 7 load balancer that distributes HTTPS traffic
- Virtual Machine Scale Set (VMSS) – Auto-scaling web servers that grow and shrink based on demand
- Azure Monitor – Complete observability into your application’s performance
- Secure Networking – Properly segmented subnets with Network Security Groups
Prerequisites
Before starting, we’ll need:
- An active Azure subscription (free trial works fine)
- Basic understanding of networking concepts (IP addresses, subnets)
- Familiarity with the Azure Portal
- A terminal or command prompt for generating SSL certificates
- OpenSSL installed on your machine
Estimated Time: 90-120 minutes
Cost: ~$5-10 if you delete resources after testing
Understanding the Architecture
Before diving into the implementation, let’s understand what we’re building and why each component matters.
The Big Picture
Imagine you’re running an e-commerce website. During normal hours, you might need just one or two servers. But during a flash sale, traffic could spike 10x. This architecture automatically handles those scenarios:
- Users connect to your application via HTTPS (secure)
- Application Gateway receives the traffic and terminates SSL (decrypts HTTPS)
- Traffic is distributed across multiple backend web servers
- VM Scale Set automatically adds more servers when CPU usage is high
- Azure Monitor tracks everything and alerts you to issues
Key Components Explained
Application Gateway (Layer 7 Load Balancer)
Think of this as your application’s intelligent front door. Unlike a basic load balancer that just distributes traffic, Application Gateway can make routing decisions based on URL paths, cookies, and more. It also handles SSL/TLS termination, meaning your backend servers don’t need to worry about encryption overhead.
Virtual Machine Scale Set (VMSS)
Instead of manually creating and managing individual VMs, a scale set lets you define a template and Azure automatically creates identical instances. When load increases, Azure spins up more VMs. When load decreases, it removes them. You pay only for what you use.
Network Segmentation
We’ll create separate subnets for frontend (Application Gateway) and backend (VMSS) components. This follows the security principle of “least privilege” – each component only has access to what it needs.
Azure Monitor & Log Analytics
Your application’s nervous system. It collects metrics, logs, and traces from all components, giving you visibility into performance, errors, and usage patterns.
Phase 1: Setting Up the Foundation
I have shown this part already in my other write ups, but I’ll add the steps here and add some little extra details
Step 1: Create Your Resource Group
Every Azure project starts with a resource group – a logical container for all related resources.
- Sign in to the Azure Portal
- Click “Create a resource” or search for “Resource groups”
- Click “+ Create”
- Configure:
- Subscription: Select your subscription
- Resource group name:
Project5-RG - Region: Choose a region close to you (e.g., East US, West Europe)
- Click “Review + create” then “Create”
Why this matters: As earlier stated before, grouping resources makes management easier. When you’re done testing, you can delete the entire resource group to remove everything at once and stop charges.
Step 2: Create the Virtual Network
A Virtual Network (VNet) is your private network in Azure. We’ll create one with two subnets.
- In the Azure Portal, search for “Virtual networks”
- Click “+ Create”
- Basics tab:
- Resource group: Select
Project5-RG - Name:
Project5-VNet - Region: Same as your resource group
- Resource group: Select
- Click “Next: IP Addresses”
- IP Addresses tab:
- Ensure the address space is
10.0.0.0/16(this gives you 65,536 IP addresses) - Delete the default subnet if present
- Click “+ Add subnet”
- Subnet name:
frontend-subnet - Subnet address range:
10.0.1.0/24(256 addresses) - Click “Add”
- Subnet name:
- Click “+ Add subnet” again
- Subnet name:
backend-subnet - Subnet address range:
10.0.2.0/24 - Click “Add”
- Subnet name:
- Ensure the address space is
- Click “Review + create” then “Create”
Understanding IP Addresses:
10.0.0.0/16means the first 16 bits are fixed (10.0), leaving 16 bits for your use10.0.1.0/24means the first 24 bits are fixed (10.0.1), leaving 8 bits (256 addresses)- Azure reserves 5 addresses in each subnet for internal use

Phase 2: Deploying the Virtual Machine Scale Set
The scale set will host your web application across multiple identical VMs.
Step 3: Create the VM Scale Set
- Search for “Virtual machine scale sets” in the Azure Portal
- Click “+ Create”
- Basics tab:
- Resource group:
Project5-RG - Scale set name:
WebApp-VMSS - Availabilty zone: check all the Az boxes
- Region: Same as before
- Orchestration mode: Select “Uniform” (for simplified management)
- Image: Select “Ubuntu Server 22.04 LTS”
- Size: Select “Standard_B2s” (2 vCPUs, 4GB RAM – economical for testing)
- Authentication:
- Choose “Password” for simplicity
- Username:
azureuser - Password: Create a strong password and save it securely
- Resource group:

4. Scaling tab: select Autoscaling: Scaling based on a CPU metric, on any schedule.
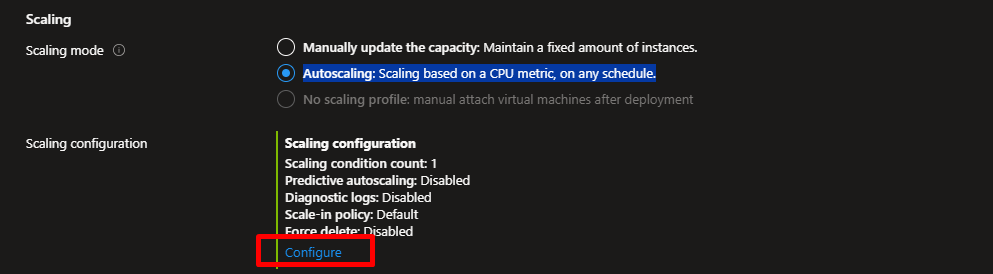
- Click “Configure”
- Add a scaling condition
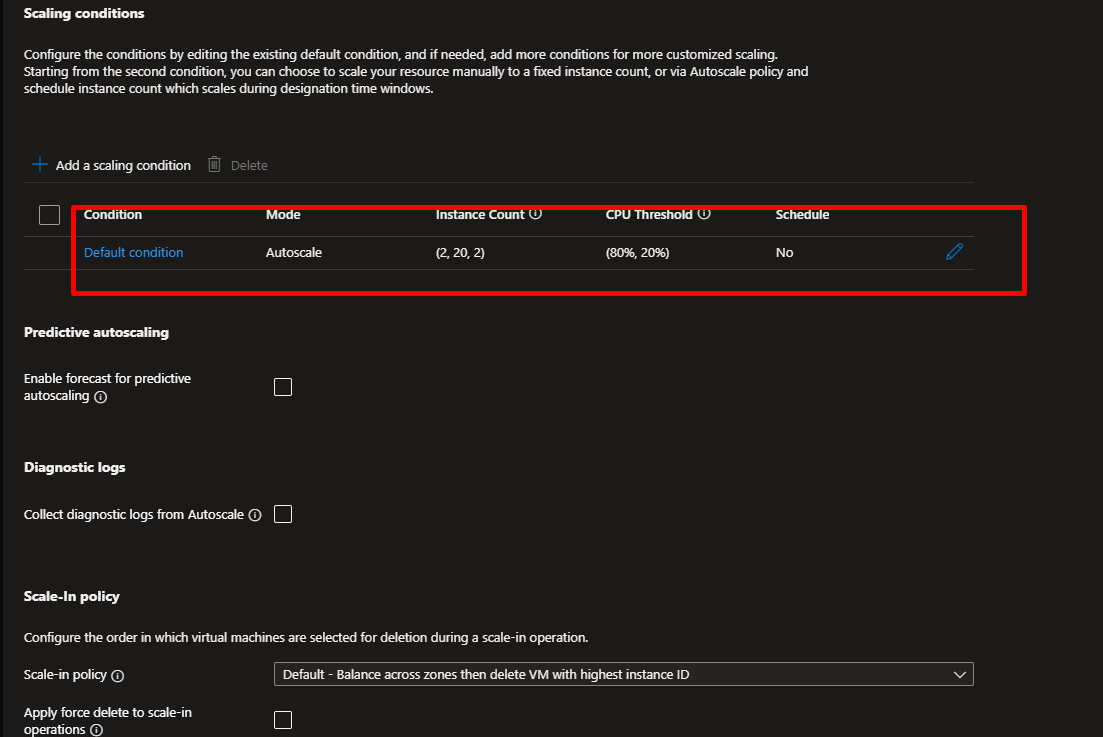
- Default instance count : 2
- Minimum number of VMs: 2
- Maximum number of VMs: 4
- Under “Scale out”:
- CPU threshold:
60% - Duration:
10 minutes - Increase instance count by:
1
- CPU threshold:
- Under “Scale in”:
- CPU threshold:
20% - Duration:
10 minutes - Decrease instance count by:
1
- CPU threshold:

Spot tab: This session can be turned on to save money, it givesAzure capacity at a discounted rate with Azure Spot, it’s great for workloads that can tolerate interruptions and downtime when capacity is needed elsewhere.
5. Disks tab:
- Leave defaults (Standard SSD)
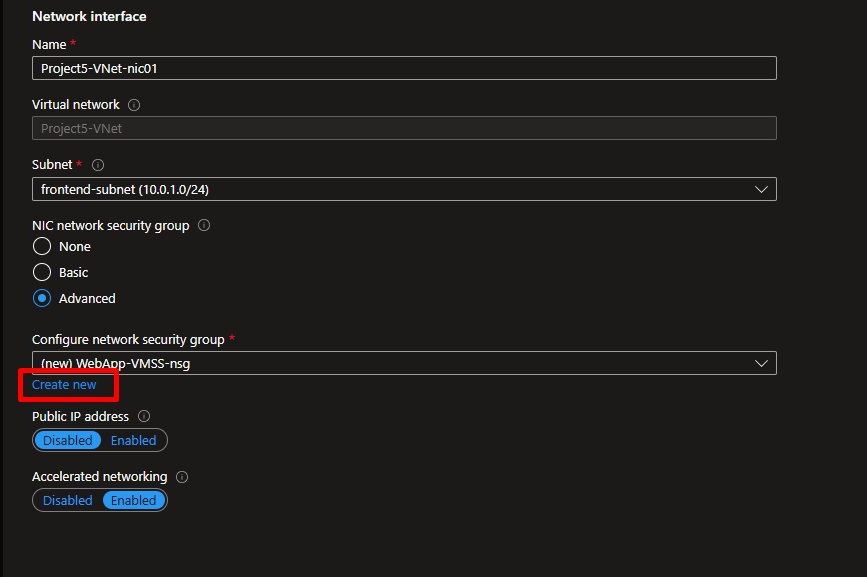
6. Networking tab:
- Virtual network: Select
Project5-VNet - Subnet: Select
backend-subnet - Public IP address: Select “Disabled” (Application Gateway will be public-facing)
- NIC network security group: Select “Basic”
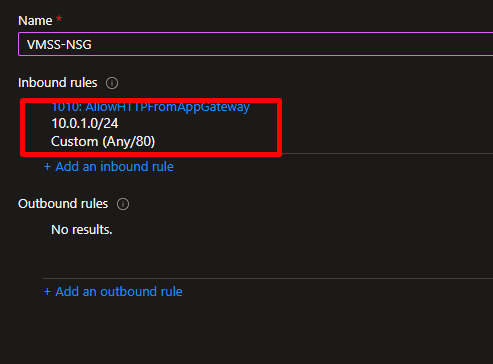
- Click “Create new” for the NSG
- Name:
VMSS-NSG - Add an inbound rule:
- Source:
10.0.1.0/24(frontend subnet) - Source port ranges:
* - Destination: Any
- Destination port ranges:
80 - Protocol: TCP
- Action: Allow
- Priority: 100
- Name:
AllowHTTPFromAppGateway
- Source:
- Click “OK”
- Name:

7. Management tab:
- Enable application health monitoring: Check this box
- Automatic repair policy: Enable it
- Leave other defaults
8 . Advanced tab:
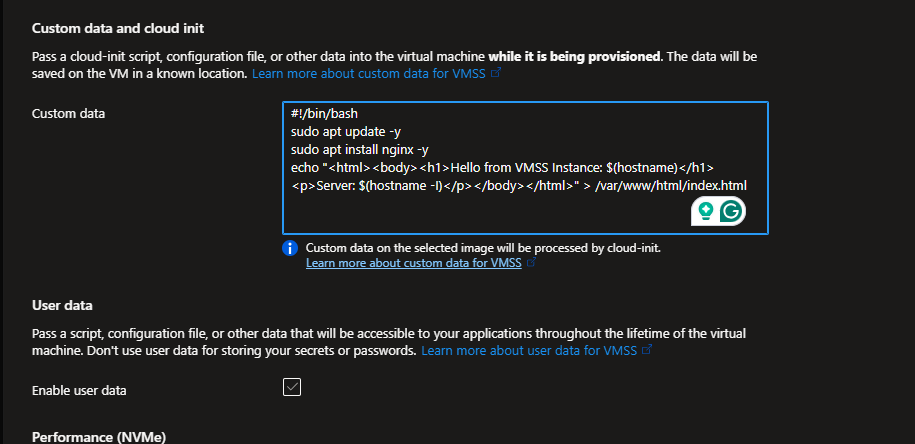
- Scroll down to “Custom data” section
- Paste this script (it installs Nginx and creates a simple webpage):
#!/bin/bash
sudo apt update -y
sudo apt install nginx -y
echo "<html><body><h1>Hello from VMSS Instance: $(hostname)</h1><p>Server: $(hostname -I)</p></body></html>" > /var/www/html/index.html
systemctl restart nginx
systemctl enable nginx
- Click “Review + create” then “Create”
What we just did:
- Azure is creating a template for your VMs
- It will launch 2 identical instances immediately
- Each instance will automatically run the bash script, installing Nginx and creating a custom homepage
- The scale set will monitor CPU usage and add/remove instances automatically
Wait for 5-10 minutes for deployment to complete.

Phase 3: Creating the SSL Certificate
Application Gateway requires an SSL certificate for HTTPS. We’ll create a self-signed certificate for testing.
Step 4: Generate SSL Certificate
On Windows (using Git Bash or WSL):
openssl req -x509 -nodes -days 365 -newkey rsa:2048 \
-keyout myCert.key -out myCert.crt -subj "//CN=myappgatewaydemo.local"

Because we plan to use this certificate for Azure Application Gateway, we will have to convert it to PFX format with:
openssl pkcs12 -export -out myCert.pfx -inkey myCert.key -in myCert.crt -password pass:YourStrongPassword123!Replace YourStrongPassword123! with your password
On Mac/Linux:
openssl req -x509 -nodes -days 365 -newkey rsa:2048 \
-keyout myCert.key -out myCert.crt \
-subj "/CN=myappgatewaydemo.local"
Then combine the key and certificate into a .pfx file:
openssl pkcs12 -export -out myCert.pfx -inkey myCert.key -in myCert.crt
You’ll be prompted for a password – create one and remember it (you’ll need it in the next step).
What these commands do:
req -x509creates a self-signed certificate-nodesmeans no password on the private key file-days 365makes it valid for one year-newkey rsa:2048generates a 2048-bit RSA keypkcs12 -exportcombines key and certificate into a single.pfxfile
Important: For production, you’d use a certificate from a trusted Certificate Authority (CA) like Let’s Encrypt, DigiCert, or Azure’s own certificate service.
Phase 4: Deploying Application Gateway
Now we’ll create the Application Gateway that sits in front of our VMs.
Step 5: Create Application Gateway
- Search for “Application gateways” in the Azure Portal
- Click “+ Create”
- Basics tab:
- Resource group:
Project5-RG - Application gateway name:
Project5-AppGW - Region: Same as before
- Tier: Select “Standard V2”
- Autoscaling: Enable it
- Minimum scale units:
1 - Maximum scale units:
3
- Minimum scale units:
- Virtual network: Select
Project5-VNet - Subnet: Select
frontend-subnet
- Resource group:
- Frontends tab:
- Frontend IP address type: Public
- Public IP address: Click “Add new”
- Name:
AppGW-PublicIP - SKU: Standard
- Click “OK”
- Name:
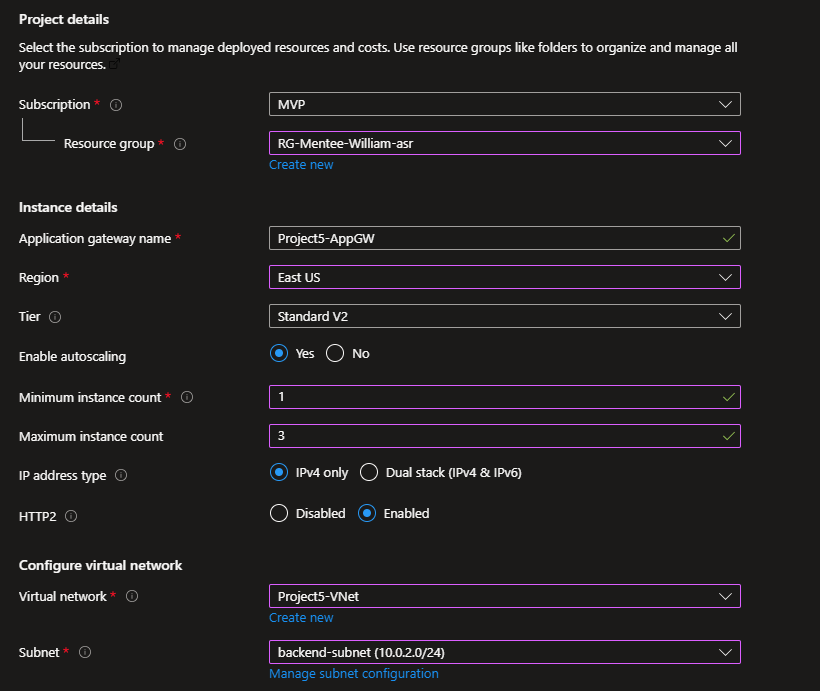
NB: Here I used the backend subnet because I used the frontend subnet for the VMMS: realised this late, but you can go ahead with what you have.

5. Backends tab:
- Click “+ Add a backend pool”
- Name:
VMSS-BackendPool - Target type: Select “Virtual machine scale set”
- Target: Select your
WebApp-VMSS - Click “Add”
- Name:

- Configuration tab:
- Click “+ Add a routing rule”Rule name:
HTTPSRule
- Listener name:
HTTPS-Listener
- Click “+ Add a routing rule”Rule name:
- Frontend IP: Public
- Protocol: HTTPS
- Port: 443
- Listener type: Basic
- Certificate: Click “Upload a certificate”
- Cert name:
SelfSignedCert
- Cert name:
- Certificate: Click “Upload a certificate”
- PFX certificate file: Upload your
myCert.pfx
- PFX certificate file: Upload your
- Password: Enter the password you created earlier
- Target type: Backend pool
- Backend target: Select
VMSS-BackendPool - Backend settings: Click “Add new”
- Backend settings name:
HTTP-BackendSettings - Backend protocol: HTTP
- Backend port: 80
- Cookie-based affinity: Disable
- Request time-out: 20 seconds
- Click “Add”
- Backend settings name:
- Click “Add” to save the routing rule
- Tags tab: (Optional) Add tags like
Environment: Testing - Click “Review + create” then “Create”
Wait for about 10-15 minutes. Application Gateway deployment takes longer because it’s provisioning load balancer infrastructure.


Phase 5: Monitoring and Logging
Step 6: Create Log Analytics Workspace
- Search for “Log Analytics workspaces”
- Click “+ Create”
- Configure:
- Resource group:
Project5-RG - Name:
Project5-Workspace - Region: Same as before
- Resource group:
- Click “Review + create” then “Create”
Step 7: Enable Diagnostics for Application Gateway
- Navigate to your Application Gateway (
Project5-AppGW) - In the left menu, under Monitoring, click “Diagnostic settings”
- Click “+ Add diagnostic setting”
- Configure:
- Diagnostic setting name:
AppGW-Diagnostics - Logs: Check all categories
- ApplicationGatewayAccessLog
- ApplicationGatewayPerformanceLog
- ApplicationGatewayFirewallLog
- Metrics: Check
AllMetrics - Destination details: Check “Send to Log Analytics workspace”
- Select your
Project5-Workspace
- Diagnostic setting name:
- Click “Save”


Phase 6: Testing Your Deployment
Step 9: Access Your Application
- Navigate to your Application Gateway
- On the Overview page, copy the Frontend public IP address
- Open a web browser
- Navigate to:
https://<your-public-ip>
You’ll see a security warning because we’re using a self-signed certificate. This is expected for testing. Click “Advanced” and “Proceed” (exact wording varies by browser).
What you should see:
A webpage displaying: Hello from VMSS Instance: WebApp-VMSS_X with the instance name and IP address.
Refresh the page multiple times. You should see the hostname change, showing that Application Gateway is distributing traffic across different VM instances.

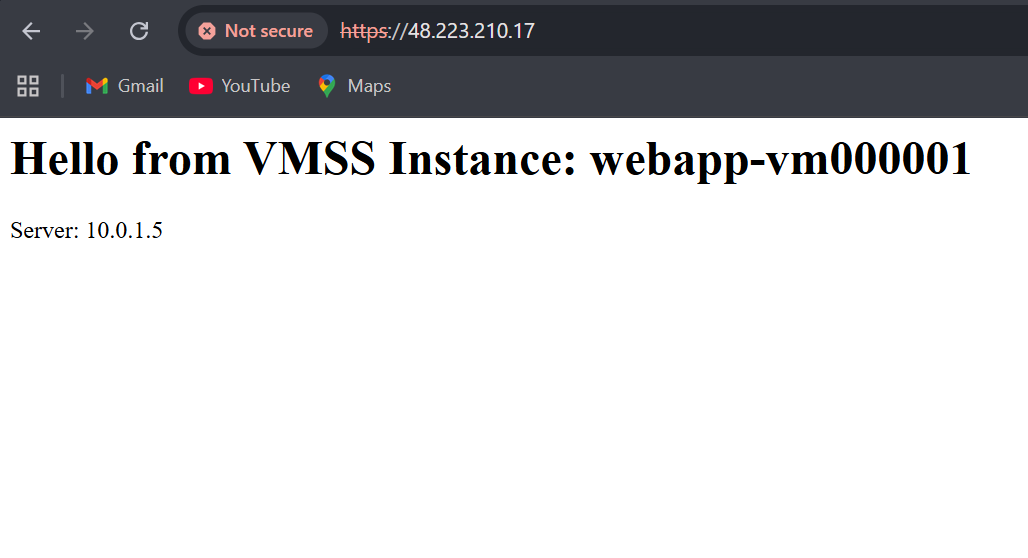
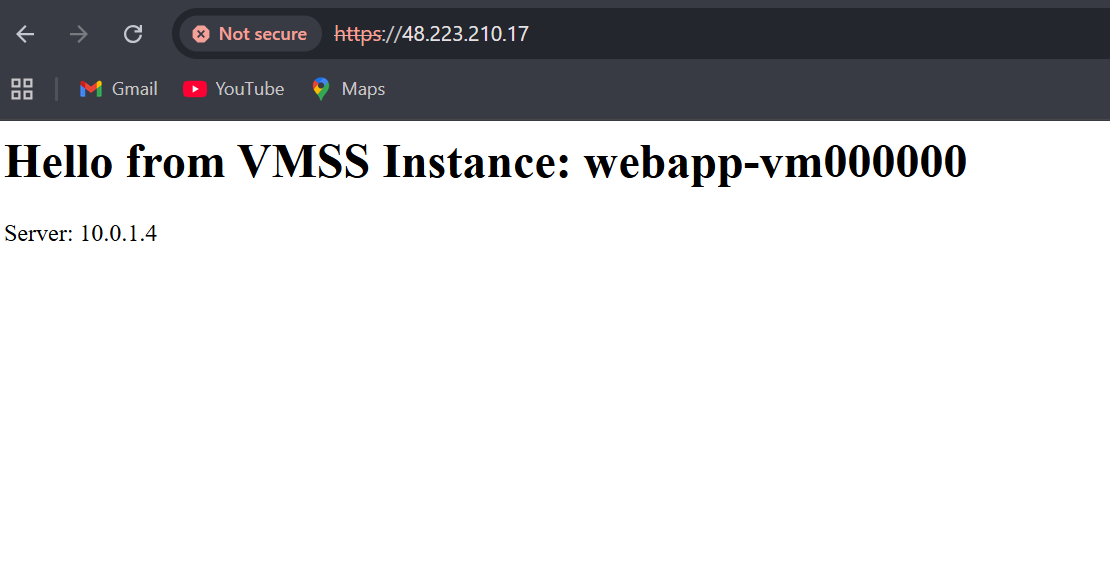
If you observe, the browser shows “Not secure” because we created our own SSL certificate, and browsers only trust certificates issued by official organizations called Certificate Authorities. The connection is still encrypted and working perfectly – it’s just that the browser is being cautious because it can’t verify who issued the certificate. You can Learn more about Certificate Authority Here

Trobleshooting
If you see a 502 error, it most likely will result from the NSG rules, but if you follow the steps from above, you should not have a problem with security rules , but one error I faced is with the instances showing “LatestModelApplied: False“, meaning the Nginx installation script didn’t run completely as expected and the script below fixes that on you azure cli or Azure Cloudshell.
az vmss update-instances \ --resource-group <ResourceGroup> \ --name WebApp-VMSS \ --instance-ids "*"Change <ResourceGroup> to the name of your resource group.

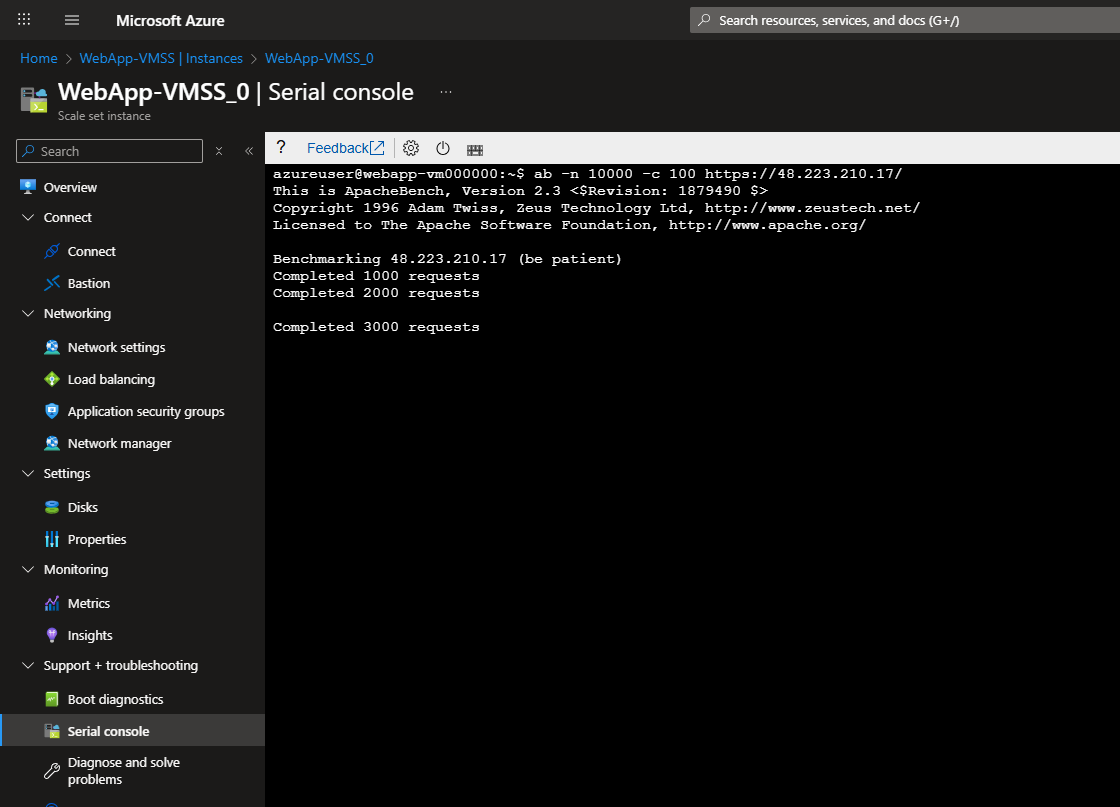
Step 10: Test Auto-Scaling
To see auto-scaling in action, we need to generate load:
- SSH into one of your VMSS instances (you’ll need to set up a bastion host or add a temporary NSG rule allowing SSH)
- Or use Serial Console and run:
# Install Apache Bench
sudo apt install apache2-utils -y

# Generate load - 10,000 requests with 100 concurrent connections
ab -n 10000 -c 100 https://<your-public-ip>/
- Navigate to VM Scale Set → Instances
- After a few minutes, you should see the instance count increase from 2 to 3 as CPU usage exceeds 60%


Step 11: Monitor Performance
- Go to Azure Monitor from the home page
- Click “Metrics”
- Select your resource group:
Project5-RG - Select Application Gateway
- Add metrics:
- Total Requests
- Backend Response Status
- Healthy/Unhealthy Host Count
We’ll see real-time graphs of your application’s performance.


Conclusion
We’ve built a production-grade, auto-scaling web infrastructure on Azure. This isn’t just a learning exercise, this is the same architectural pattern used by companies running mission-critical applications.
We’ve learned how to:
- Design secure network topologies with proper segmentation
- Deploy highly available applications using VM Scale Sets
- Implement Layer 7 load balancing with SSL termination
- Configure auto-scaling based on performance metrics
- Set up comprehensive monitoring and logging
These skills are directly applicable to real-world Azure administration and will serve well in the AZ-104 exam and beyond.


Leave a comment