This time, I continue on setting up a clean, organized Azure environment that I can use for all my future projects. Think of it as building the workshop before you start crafting furniture. Let me walk you through exactly what I did, step by step, in a way that makes sense even if you’re just starting out.
What We’re Building
Before diving in, here’s the big picture:
- A Resource Group – Think of this as a folder in Azure that holds all your stuff
- Storage for Terraform – A safe place to store our infrastructure’s “memory”
- Azure DevOps Project – Our command center for automation
- Security Checks – Because security isn’t optional!
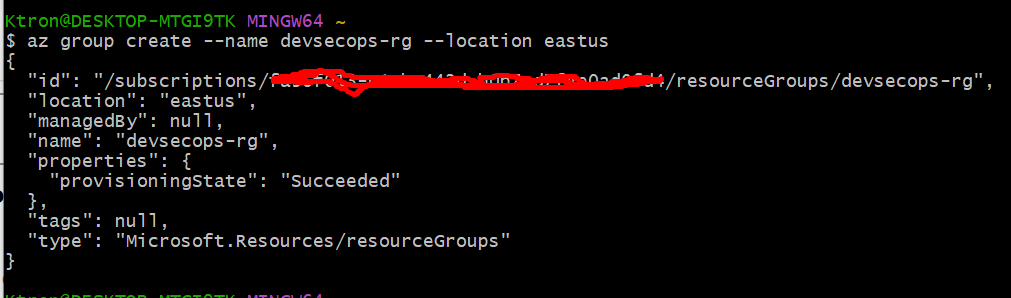
Step 1: Logging Into Azure and Creating Your First Resource Group
Everything in Azure lives inside Resource Groups. It’s like creating a project folder before you start working.
First, I opened my terminal and logged into Azure:
az login
This opens your browser and asks you to sign in. Once you’re in, create your resource group:
az group create --name devsecops-rg --location eastus
A little explanation
--name devsecops-rg– I named my resource group “devsecops-rg”--location eastus– I chose East US (you can pick a region closer to you)
You’ll see a success message with JSON output. Congrats — you just created your first Azure resource!

Step 2: Creating Storage for Terraform State Files
Here’s where things get interesting. When Terraform builds infrastructure, it needs to remember what it created. This “memory” is stored in a state file.
Instead of keeping it on your computer (where it could get lost), we’ll store it in Azure.
Create a Storage Account
az storage account create \
  --name devsecopsstate001 \
  --resource-group devsecops-rg \
  --location eastus \
  --sku Standard_LRS
Breaking it down:
- Storage account names must be globally unique and lowercase only
Standard_LRSmeans locally redundant storage (the basic, cost-effective option)
Create a Container Inside That Storage
az storage container create \
  --name tfstate \
  --account-name devsecopsstate001
Think of a container like a subfolder inside your storage account. This is where Terraform will save its state file.

Step 3: Getting Your Azure Subscription ID
Get it with this command:
az account show --query id --output tsv
We will copy that ID , we’ll need it in the next step!
Step 4: Setting Up Terraform
Now let’s create our Terraform project. Create a new folder and add these files:
Project Structure
terraform-basics/
│
├── main.tf
├── variables.tf
├── outputs.tf
└── provider.tf
provider.tf
This file tells Terraform where to store its state and how to connect to Azure:
terraform {
  required_providers {
    azurerm = {
      source  = "hashicorp/azurerm"
      version = "~> 4.0"
    }
  }

  backend "azurerm" {
    resource_group_name  = "devsecops-rg"
    storage_account_name = "devsecopsstate001"
    container_name       = "tfstate"
    key                  = "devsecops-env.tfstate"
  }
}

provider "azurerm" {
  features {}
}

main.tf
Let’s create a simple example — a new resource group via Terraform:
resource "azurerm_resource_group" "example" {
  name     = "terraform-test-rg"
  location = "eastus"
}
variables.tf
variable "location" {
  description = "Azure region for resources"
  type        = string
  default     = "eastus"
}
outputs.tf
output "resource_group_name" {
  value = azurerm_resource_group.example.name
}
Now run the below command on a Bash terminal to set your subscription to work
export ARM_SUBSCRIPTION_ID=<YOUR_SUBSCRIPTION_ID_HERE>Replace YOUR_SUBSCRIPTION_ID_HERE with the ID you copied earlier!

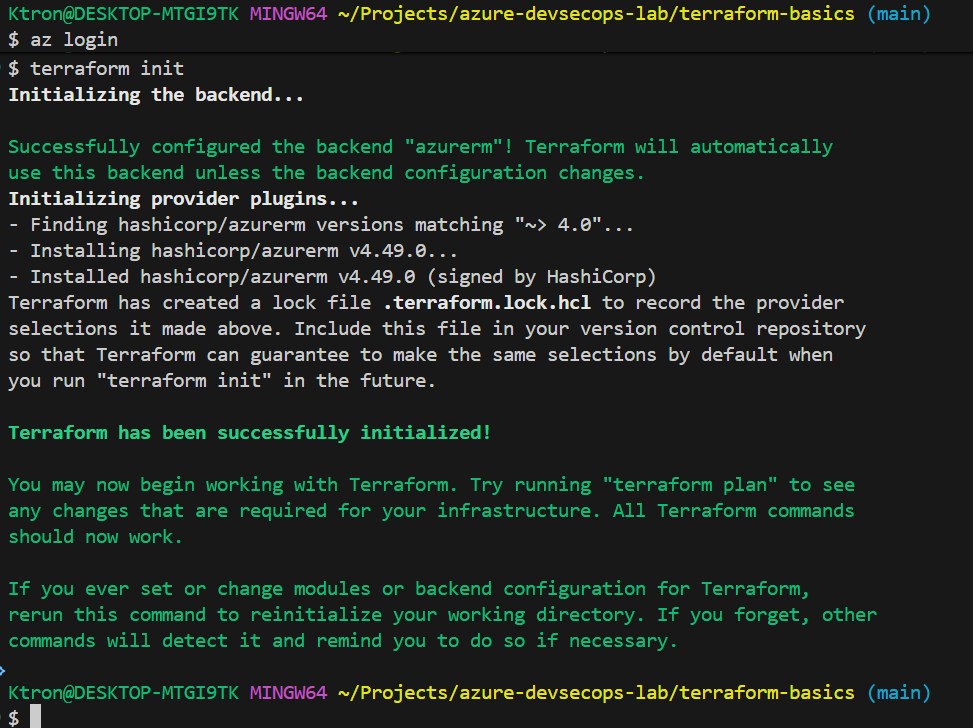
Initialize and Validate Terraform
We now need to validate our Terraform setup works correctly:
terraform init
terraform plan
What’s happening here:
terraform init– Connects to Azure and sets up the backendterraform plan– Shows what Terraform would do (but doesn’t actually do it)
We’re NOT running terraform apply manually because that’s the whole point of this project , we want Azure DevOps pipelines to do that automatically!
This manual validation just confirms everything is configured correctly before we hand control over to automation.

Step 5: Working with Your Azure DevOps Project
Since we already created our Azure DevOps project in Project 1, now we’re going to connect it to our Terraform code and set up automation.
Navigate to Your Existing Project
- Go to dev.azure.com
- Open your
Azure-DevSecOps-Labproject - We’ll be adding our Terraform code to this project’s repository

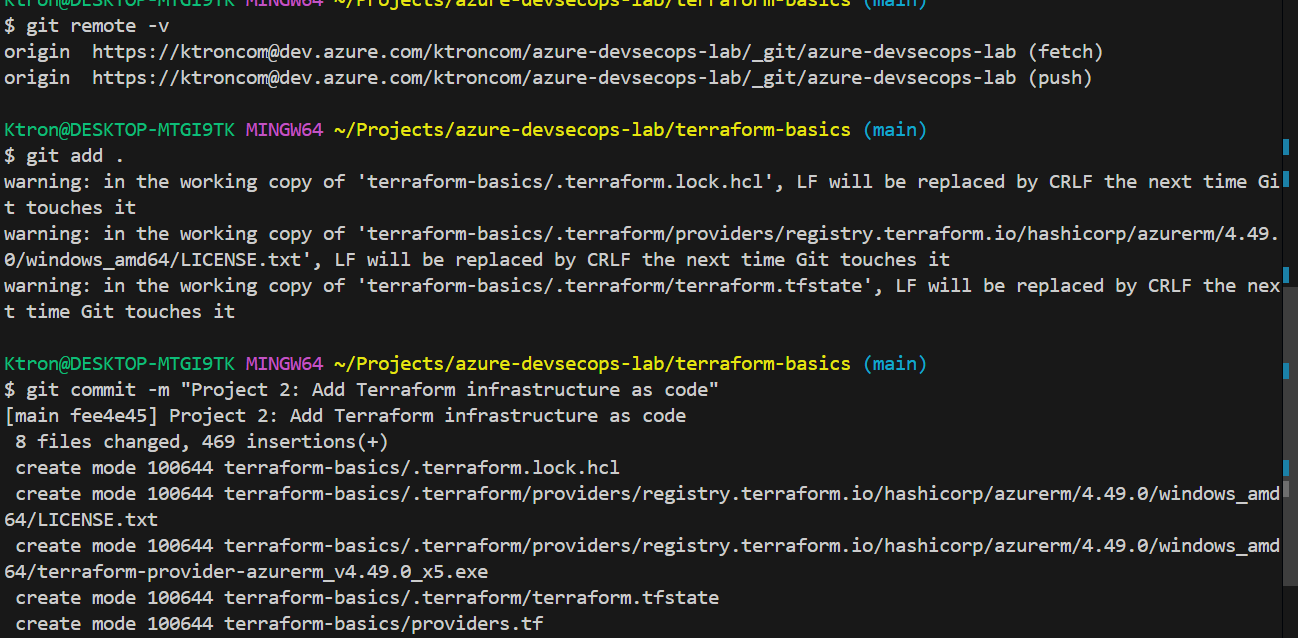
Add Your Terraform Code to Your Existing Repo
- In your Azure DevOps project, go to Repos
- We already have this initialized repo from Project 1
- In your local terminal (in your Terraform folder):
NB: You might want to remove or delete the .terraform folder and others generated from initialisation and plan from the above step
git remote -v  # Check if remote exists
# If it exists, just push:
git add .
git commit -m "Project 2: Add Terraform infrastructure as code"
git push origin main

# If no remote exists yet:
git remote add origin https://dev.azure.com/YOUR_ORG/Azure-DevSecOps-Lab/_git/devsecops-env
git push -u origin main

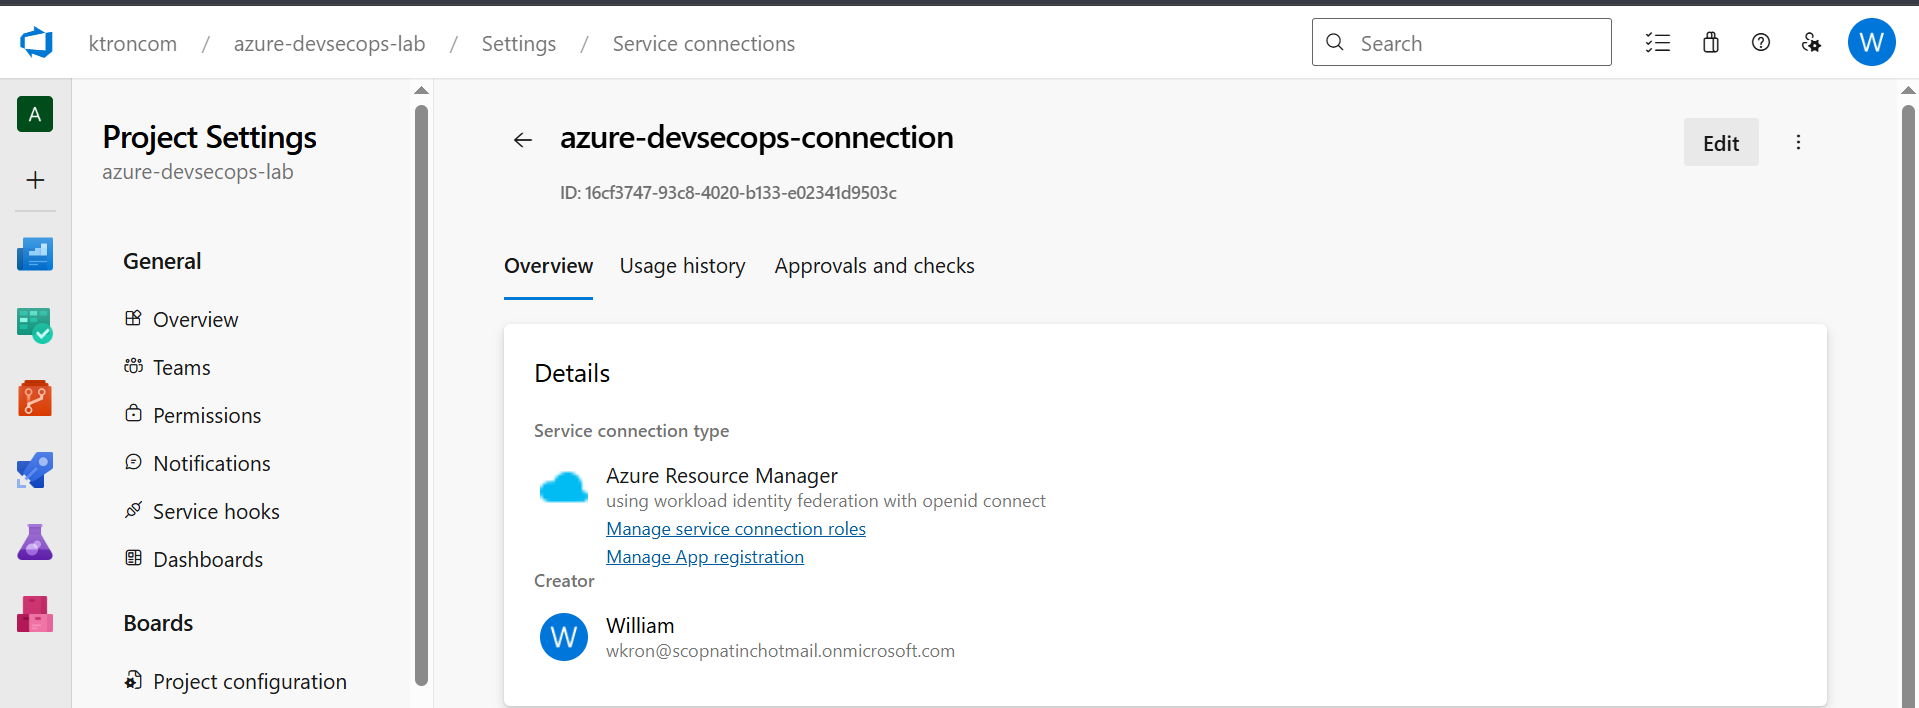
Create Your Service Connection
Now we need to create a service connection, this is what allows Azure DevOps to securely communicate with your Azure subscription.
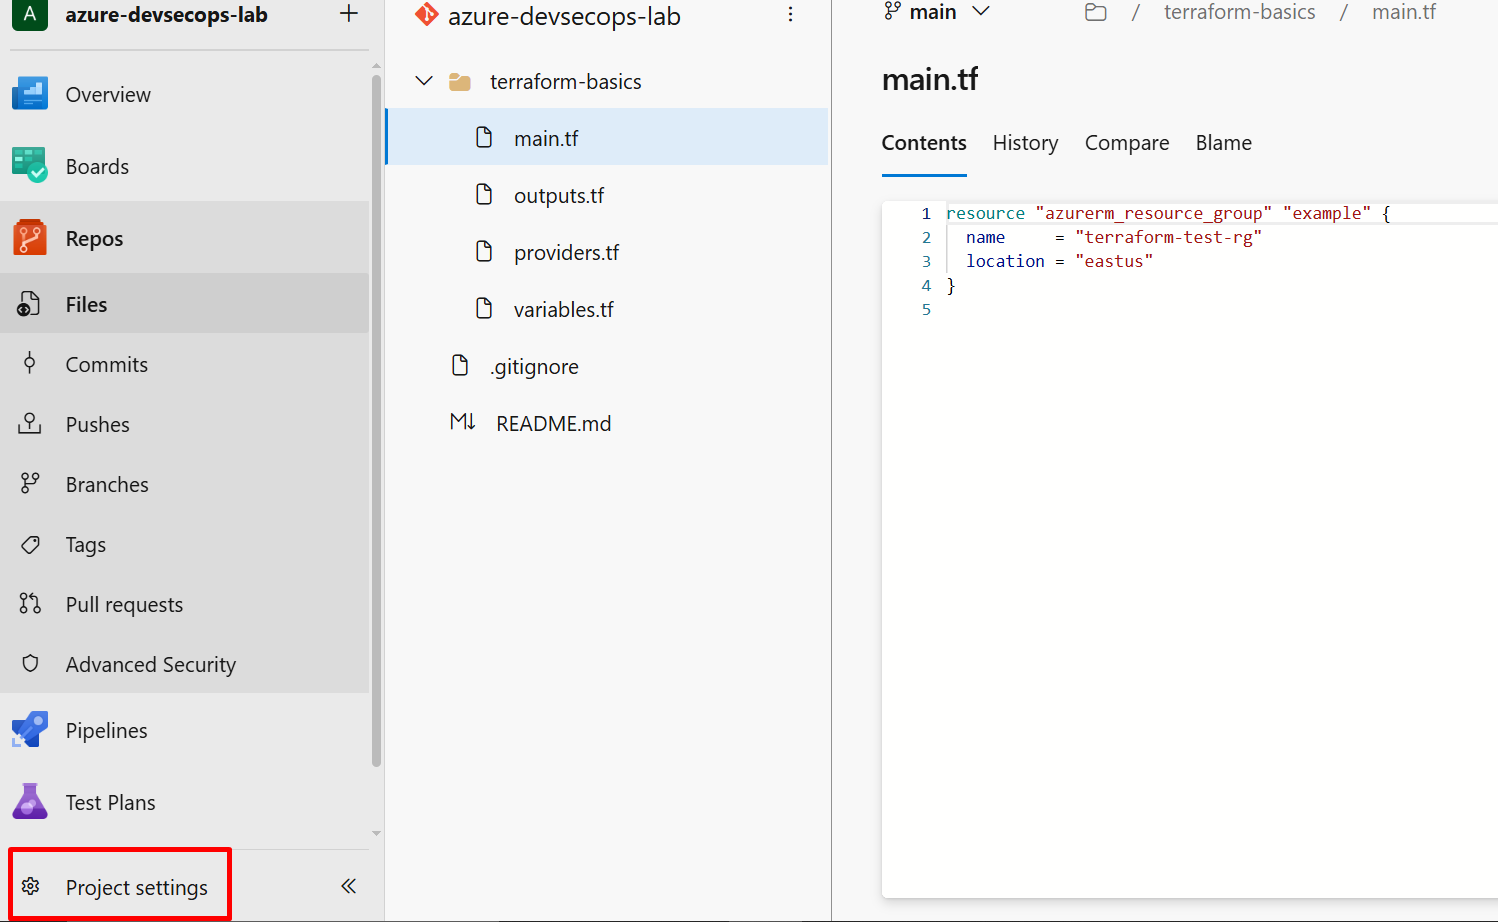
- Go to Project Settings (bottom left corner) → Service Connections
- Click New Service Connection
- Choose Azure Resource Manager
- Select App Registration (automatic)
- In the scope level, choose Subscription
- Select your Azure subscription from the dropdown
- Leave “Resource group” empty (or select
devsecops-rgif you want to limit access) - Name it
azure-devsecops-connection - Check the box “Grant access permission to all pipelines” (makes it easier for now)
- Click Save
What just happened? Azure DevOps just created a service principal (a machine identity) that your pipelines can use to deploy resources to Azure. This is more secure than using your personal credentials!
Save that name — you’ll use azure-devsecops-connection in your pipeline configuration.

Step 6: Setting Up Your Agent Pool
Before we create our pipeline, we need to set up an agent pool. Think of this as the computer that will run your pipeline tasks.
Option 1: Use Microsoft-Hosted Agents (Easiest for Beginners)
Microsoft provides free agents that work out of the box. We’ll use this option:
- Go to Project Settings → Agent pools
- You should see Azure Pipelines pool already exists
- Click on it and verify you can see Microsoft-hosted agents
- That’s it! We’ll use
ubuntu-latestin our pipeline
Free tier gives you: 1,800 minutes per month for private projects, which is plenty for learning!

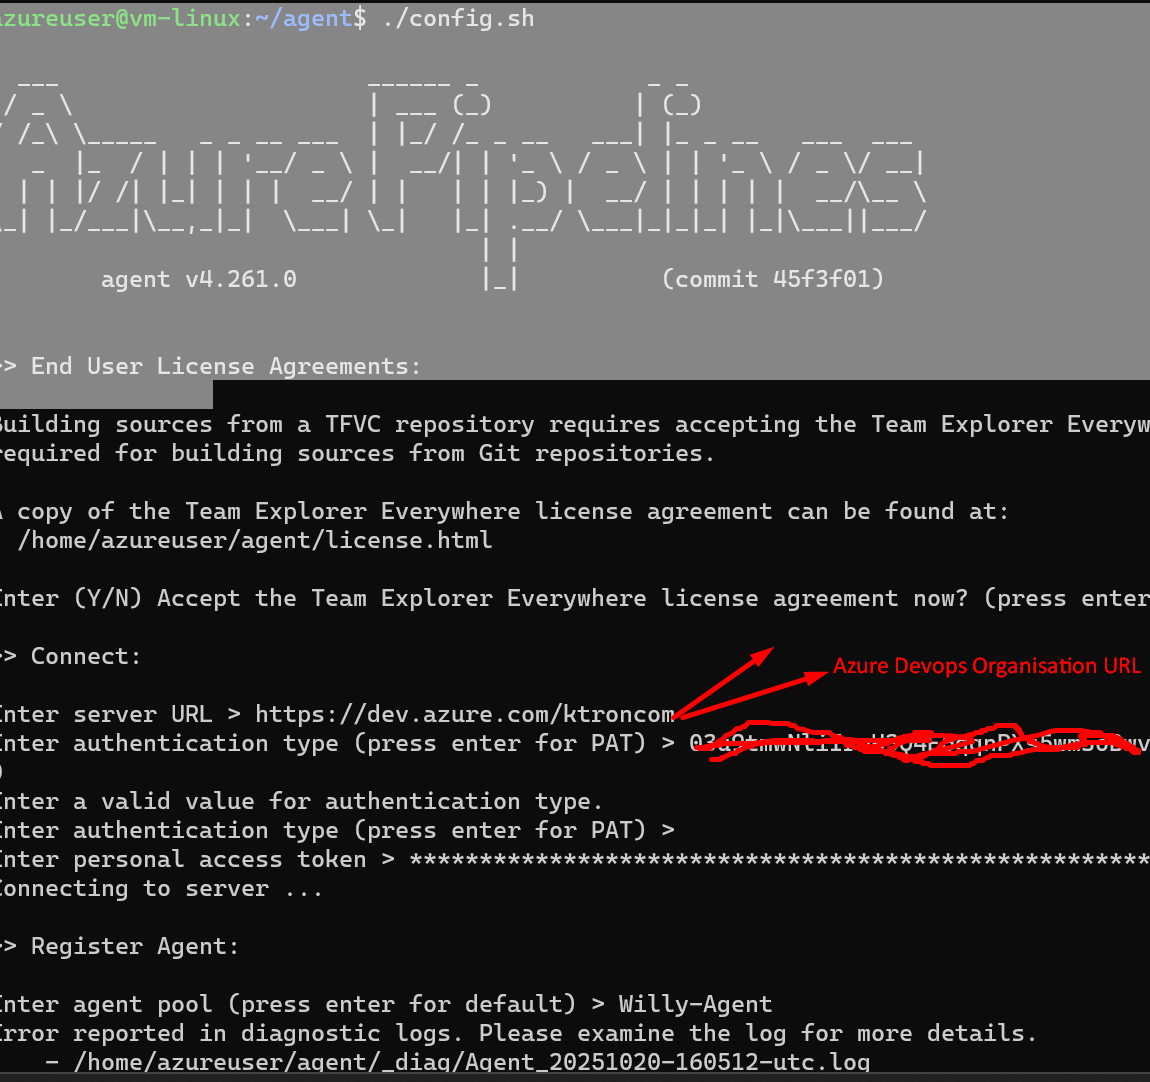
Option 2: Self-Hosted Agent
In my case I used a Self-Hosted Vm, by following the following steps:
- Set up a Virtual Machine on Azure precisely Linux
- Downloaded the Installing Agent from Azure Devops and used scp command to copy to my Virtual Machine
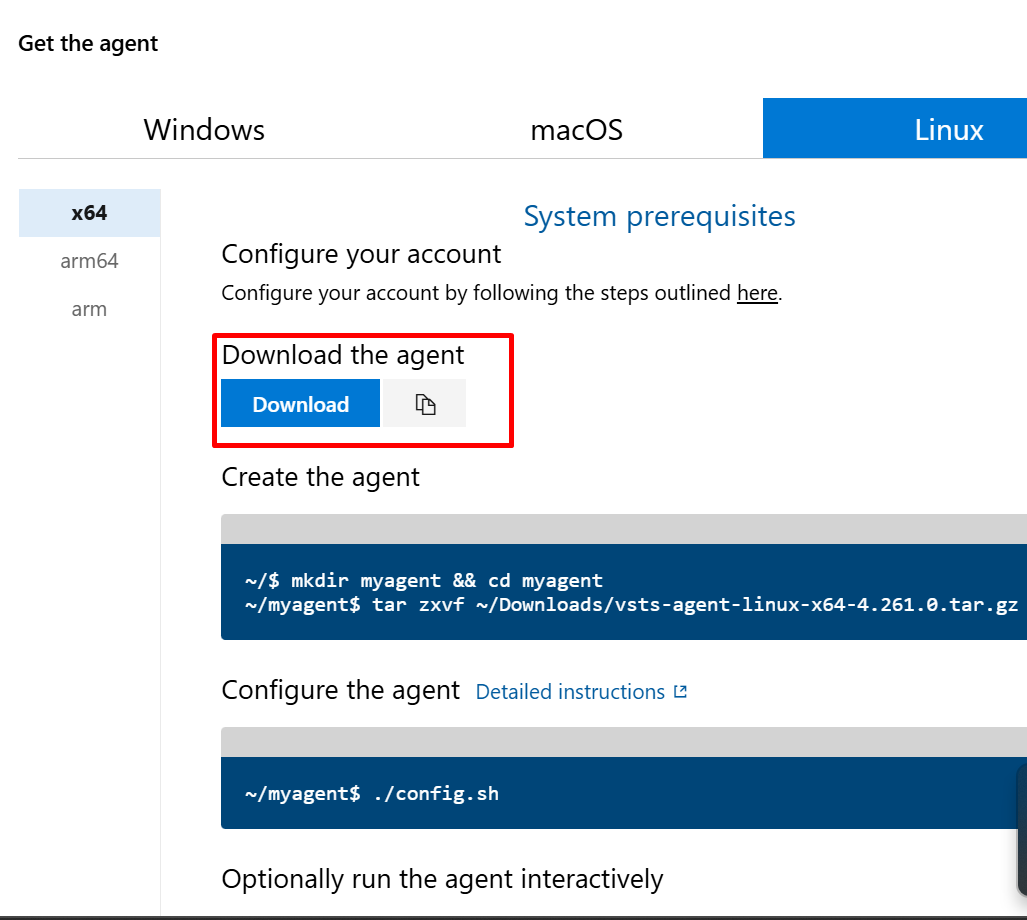

3. Run the installation Object

Step 7: Installing the Terraform Extension
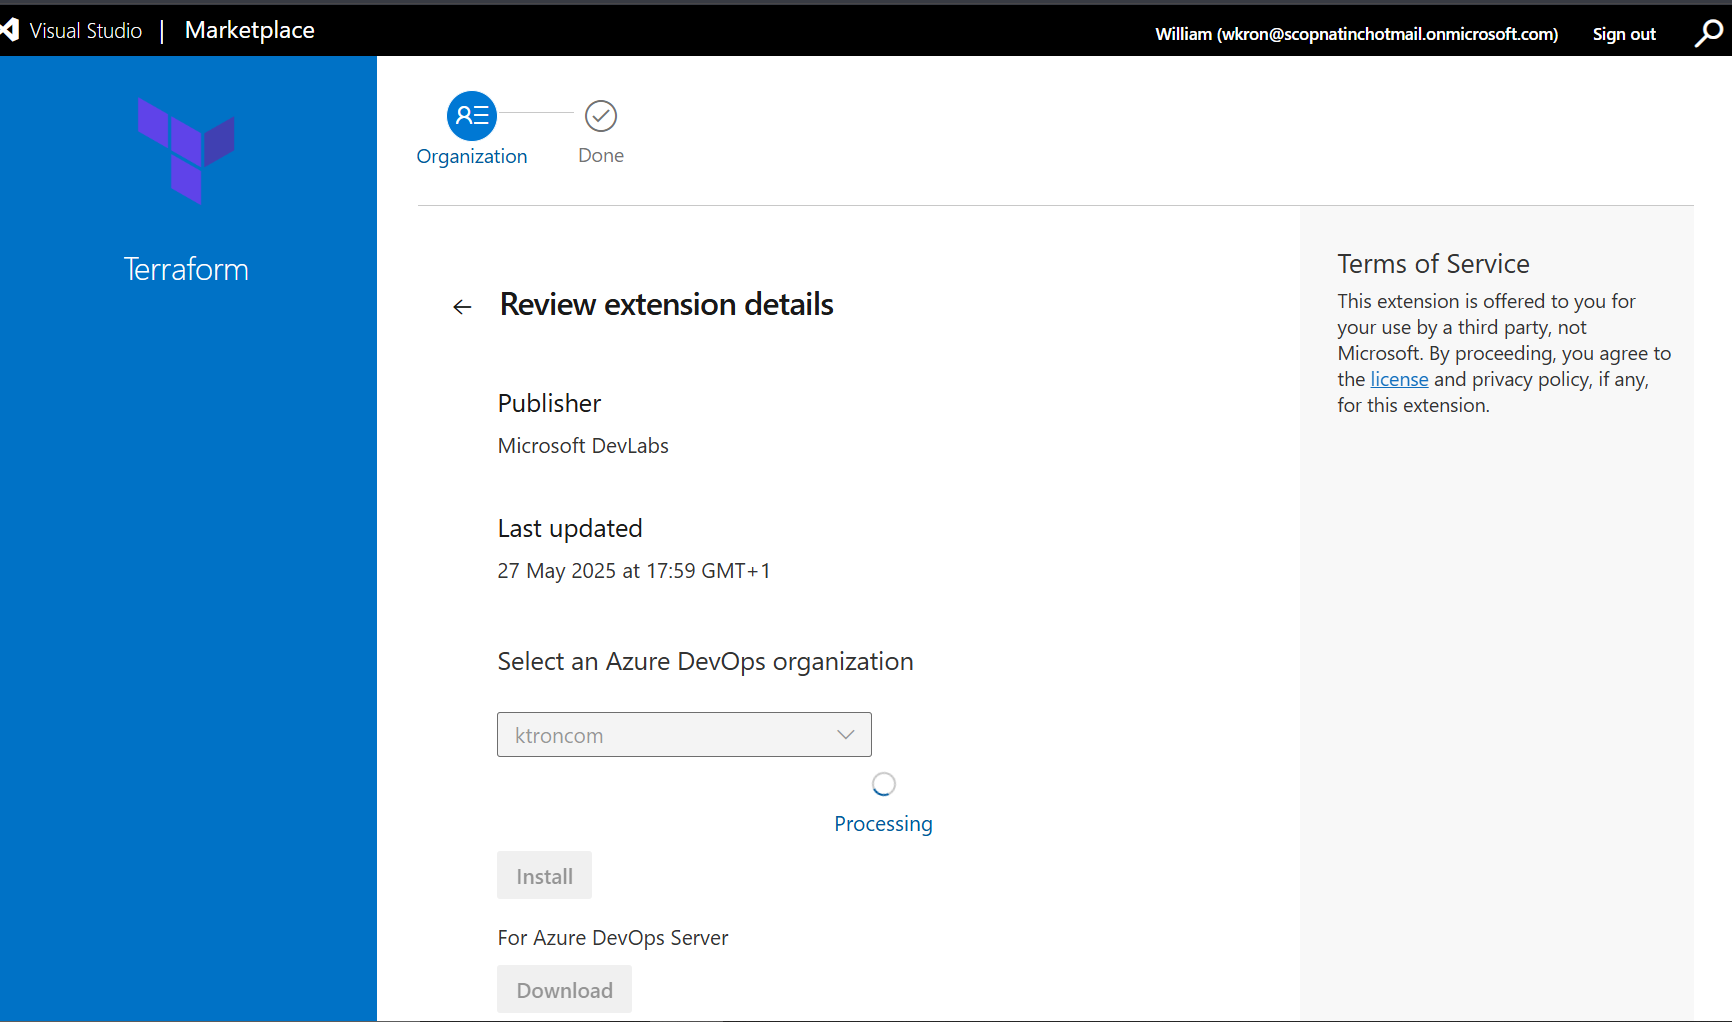
Before we can create pipelines that use Terraform, we need to install the Terraform extension from the Azure DevOps Marketplace.
Install Terraform Build & Release Tasks
- Go to the Azure DevOps Marketplace
- Search for “Terraform”
- Click on “Terraform” by Microsoft DevLabs
- Click Get it free
- Select your Azure DevOps organization from the dropdown
- Click Install
- Once installed, click Proceed to organization
What did we just install? This extension adds Terraform tasks (TerraformInstaller and TerraformTaskV4) that our pipeline can use. Without it, Azure DevOps doesn’t know how to run Terraform commands!
Alternative Extension (if you prefer): You can also use “Terraform Build & Release Tasks” by Charles Zipp – both work great! Just make sure you install one of them.

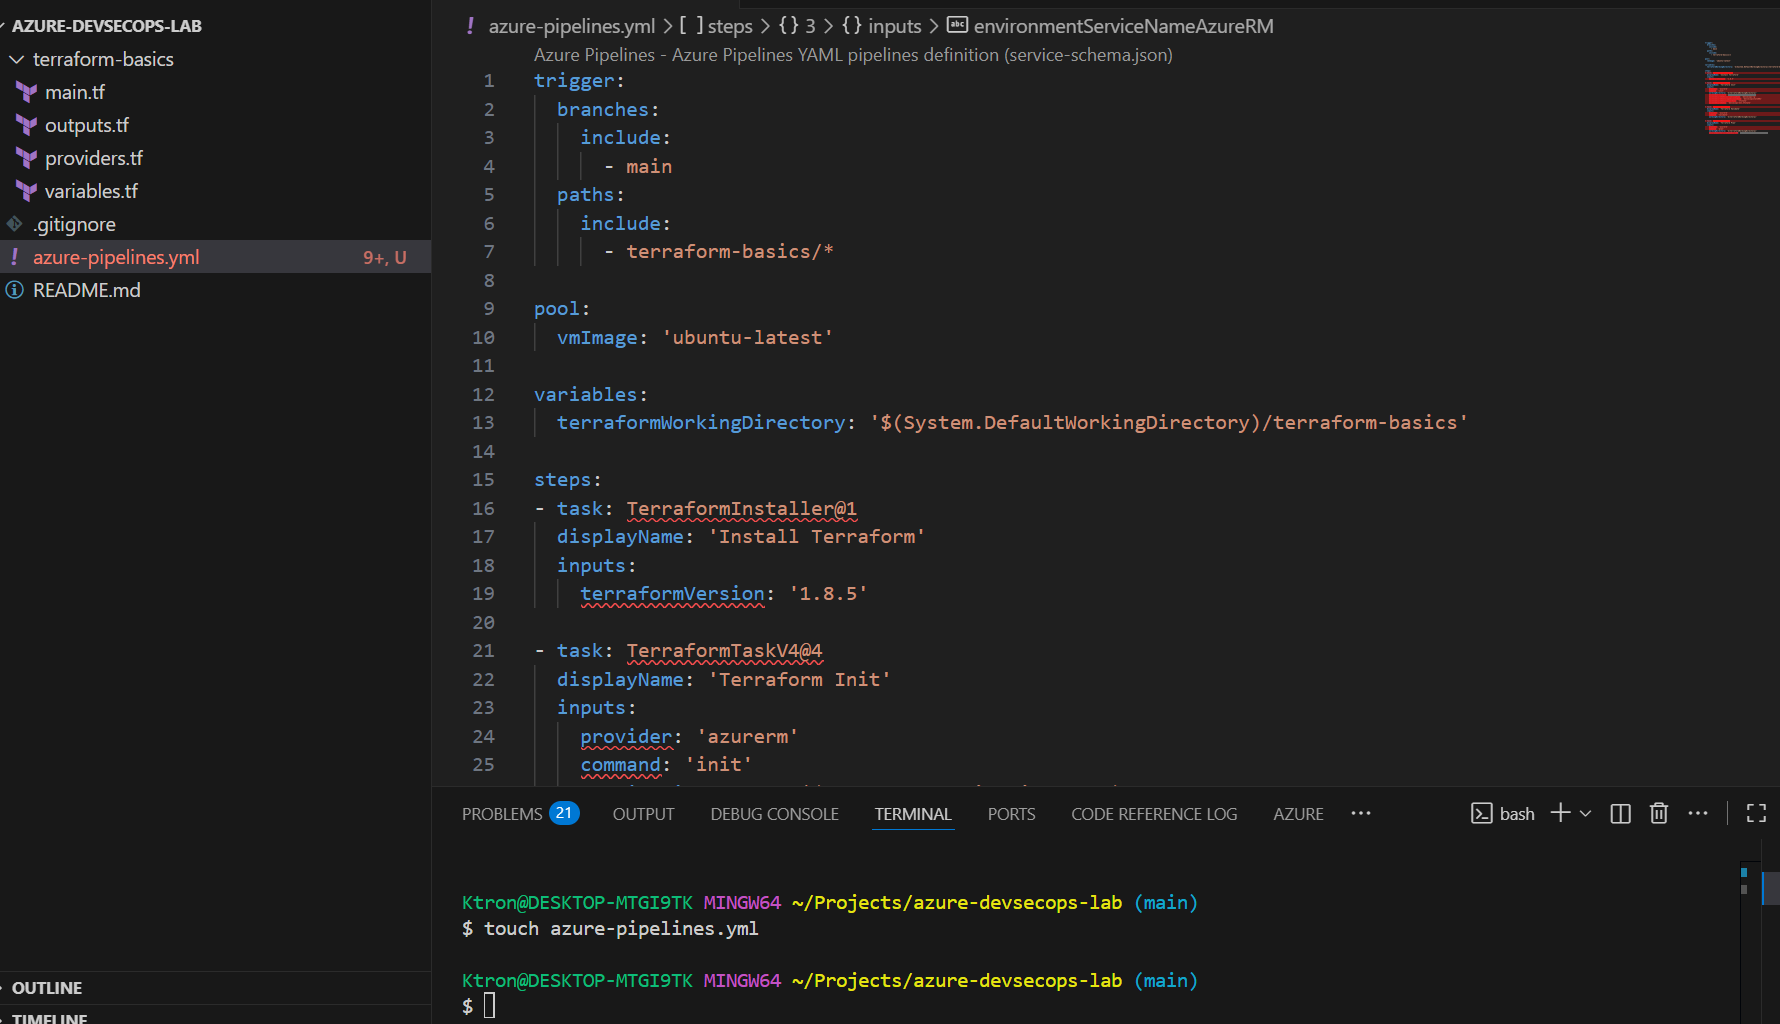
Step 8: Creating Your First Pipeline
Create a file called azure-pipelines.yml in the root of your project (not inside the terraform-basics folder):
trigger:
  branches:
    include:
      - main
  paths:
    include:
      - terraform-basics/*

pool:
  vmImage: 'ubuntu-latest'

variables:
  terraformWorkingDirectory: '$(System.DefaultWorkingDirectory)/terraform-basics'

steps:
- task: TerraformInstaller@1
  displayName: 'Install Terraform'
  inputs:
    terraformVersion: '1.8.5'

- task: TerraformTaskV4@4
  displayName: 'Terraform Init'
  inputs:
    provider: 'azurerm'
    command: 'init'
    workingDirectory: '$(terraformWorkingDirectory)'
    backendServiceArm: 'azure-devsecops-connection'
    backendAzureRmResourceGroupName: 'devsecops-rg'
    backendAzureRmStorageAccountName: 'devsecopsstate001'
    backendAzureRmContainerName: 'tfstate'
    backendAzureRmKey: 'devsecops-env.tfstate'

- task: TerraformTaskV4@4
  displayName: 'Terraform Validate'
  inputs:
    provider: 'azurerm'
    command: 'validate'
    workingDirectory: '$(terraformWorkingDirectory)'

- task: TerraformTaskV4@4
  displayName: 'Terraform Plan'
  inputs:
    provider: 'azurerm'
    command: 'plan'
    workingDirectory: '$(terraformWorkingDirectory)'
    environmentServiceNameAzureRM: 'azure-devsecops-connection'
Key things to note:
paths: include: - terraform-basics/*– Pipeline only triggers when files in the terraform-basics folder changeterraformWorkingDirectory– Variable that points to your terraform-basics folderworkingDirectory: '$(terraformWorkingDirectory)'– Tells each task where your Terraform files arepool: vmImage: 'ubuntu-latest'– Uses Microsoft’s free Ubuntu agent
Your Project Structure Should Look Like This:
Azure-DevSecOps-Lab/
│
├── azure-pipelines.yml          ← Pipeline file (root level)
│
└── terraform-basics/            ← Your Terraform folder
    ├── main.tf
    ├── variables.tf
    ├── outputs.tf
    └── provider.tf
Create the Pipeline in Azure DevOps
Now let’s connect this YAML file to Azure DevOps:
- Go to Pipelines in Azure DevOps
- Click New Pipeline (or Create Pipeline if it’s your first one)
- Select Azure Repos Git
- Choose your repository
- Select Existing Azure Pipelines YAML file
- Browse and select
/azure-pipelines.yml - Click Continue
- Review the pipeline YAML
- Click Run
What happens next:
- Azure DevOps will queue your pipeline
- It will spin up an Ubuntu agent (virtual machine)
- Install Terraform
- Run init, validate, and plan on your terraform-basics folder
- Show you what changes would be made (without actually applying them)
Watch your first automated pipeline run!


Step 9: Adding Security from Day One
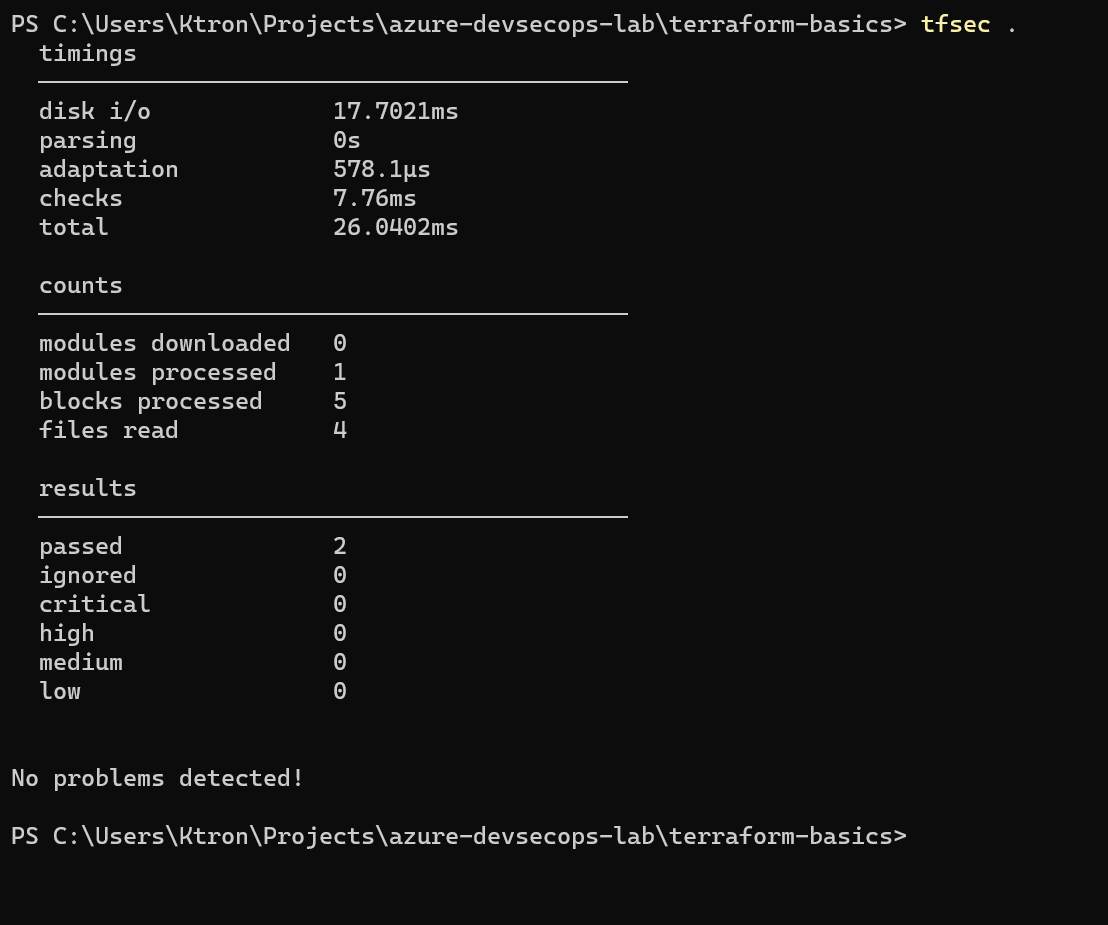
DevSecOps means security isn’t an afterthought. Let’s add tfsec to scan our Terraform code for security issues.
Install tfsec
On Mac:
brew install tfsec
On Linux:
curl -s https://raw.githubusercontent.com/aquasecurity/tfsec/master/scripts/install_linux.sh | bash
On Windows (PowerShell Administrator):
choco install tfsec
Scan Your Code
tfsec .
This scans your Terraform files and highlights any security issues. It’s like spell-check, but for security!
Add to Pipeline
Add this step to your azure-pipelines.yml before the Terraform Init step:
- script: |
    wget -q -O - https://raw.githubusercontent.com/aquasecurity/tfsec/master/scripts/install_linux.sh | bash
    tfsec $(terraformWorkingDirectory) --format junit > tfsec-results.xml
  displayName: 'Run tfsec Security Scan'

- task: PublishTestResults@2
  condition: always()
  inputs:
    testResultsFormat: 'JUnit'
    testResultsFiles: '**/tfsec-results.xml'
    failTaskOnFailedTests: true
  displayName: 'Publish tfsec Results'
Note: We’re using $(terraformWorkingDirectory) to scan your terraform-basics folder specifically!


Bonus: To run Agent as a Service

These are some of the errors I encountered and some tips
- “No hosted parallelism has been purchased or granted”
- This is Microsoft’s anti-abuse measure for new accounts
- Solution: Set up a self-hosted agent (Step 7) OR request free tier access
- Self-hosted agent works immediately!
- “Unable to locate executable file: ‘unzip’” (Self-hosted agent)
- Your agent machine is missing required tools
- Linux/Mac: Run
sudo apt-get install -y unziporbrew install unzip - Windows: Run
choco install unzip -y(install Chocolatey first if needed) - Stop and restart your agent after installing
- “A task is missing. The pipeline references a task called ‘TerraformInstaller’”
- You forgot to install the Terraform extension from the Marketplace (Step 6)
- Go back and install it, then run the pipeline again
- Check your Subscription ID is correct in
provider.tf - Make sure your storage account name is globally unique
- Verify you’re logged into the correct Azure account (
az account show) - Check the service connection name matches what you created (
azure-devsecops-connection) - Verify your folder structure – Terraform files should be in
terraform-basicsfolder - Read the error messages — they’re usually helpful!
Questions? Drop them in the comments below. We’re all learning together!


Leave a comment