
“Welcome back to the AZ-104 practical series! In this project, we’ll dive into Azure Storage, one of the most fundamental services in Azure. we’ll learn how to store files securely, share them with your team, and control who can access what using
By the end of this tutorial, we’ll have:
- A fully configured Azure Storage Account
- An Azure File Share (like a network drive in the cloud)
- Role-Based Access Control (RBAC) configured for secure access
- Time-limited Shared Access Signature (SAS) tokens for temporary access
- A Virtual Machine with the file share mounted as a drive
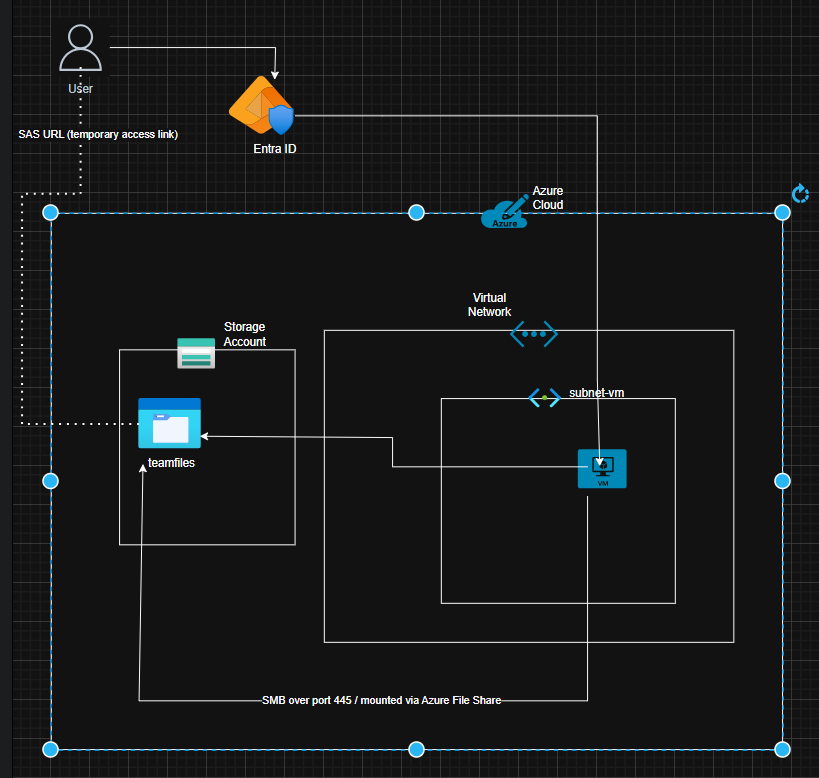
What We’ll Build
By the end of this tutorial, we’ll have:
- A fully configured Azure Storage Account
- An Azure File Share (like a network drive in the cloud)
- Role-Based Access Control (RBAC) configured for secure access
- Time-limited Shared Access Signature (SAS) tokens for temporary access
- A Virtual Machine with the file share mounted as a drive
Prerequisites
Before we start, make sure you have:
- An active Azure subscription (you can use the free tier)
- Access to the Azure Portal
- Basic understanding of cloud concepts
- About 30-45 minutes
Step 1: Create a Resource Group
Let’s start by creating a container for all our resources.
We’ve already discussed resource groups extensively in previous projects , they act like folders that organize and manage related Azure resources together. In this project, we simply create one (e.g., rg-storage-project6) under our subscription and preferred region for centralized management.
Step 2: Create a Storage Account
Now let’s create the storage account that will hold our file shares.
Understanding Storage Accounts
A storage account provides a unique namespace for your Azure Storage data that’s accessible from anywhere in the world over HTTP or HTTPS. Data in your storage account is durable and highly available, secure, and massively scalable.
Creating the Storage Account:
- In the Azure Portal, search for “Storage accounts“ in the top search bar
- Click + Create
- On the Basics tab, configure:
- Resource group: Select
rg-storage-project6 - Storage account name:
stproject6+ your initials + random numbers (must be globally unique, 3-24 characters, lowercase letters and numbers only)- Example:
stproject6jd2025
- Example:
- Region: Same as your resource group
- Performance: Standard (uses HDD, cost-effective)
- Redundancy: Locally-redundant storage (LRS) (cheapest option for learning)
- Resource group: Select
- Click Next: Advanced
- Leave most defaults
- Ensure “Require secure transfer for REST API operations” is Enabled (security best practice)
- Click Next: Networking
- Network access: Select Enable public access from all networks (for learning purposes)
- In production, you’d restrict this!
- Click Next: Data protection
- Leave defaults (you can explore these later)
- Click Review + create, then Create
Click Go to resource to view your storage account!

Step 3: Create an Azure File Share
Azure Files lets you create file shares in the cloud that can be accessed using the standard SMB protocol.
What is Azure Files?
Azure Files offers fully managed file shares in the cloud that are accessible via the industry standard Server Message Block (SMB) protocol. Azure file shares can be mounted concurrently by cloud or on-premises deployments.
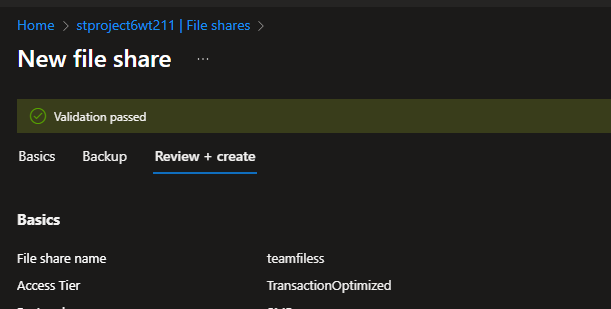
Creating the File Share:
- In your storage account, find the Data storage section in the left menu
- Click File shares
- Click + File share at the top
- Configure your file share:
- Name:
teamfiles - Access tier: Transaction optimized (best for general purpose use)
- Provisioned capacity:
5 GiB(more than enough for testing) - Protocol: SMB (standard file sharing protocol)
- Name:
- Click Create
Step 4: Configure RBAC (Role-Based Access Control)
Now let’s grant yourself permission to access the file share using your Azure identity.
Why Use RBAC?
RBAC allows for read, write, and delete access in Azure Storage file shares over SMB, providing identity-based authentication instead of relying on storage account keys.
Assigning the Role:
- Click on your teamfiles file share
- In the left menu, click Access Control (IAM)
- Click + Add → Add role assignment
- On the Role tab:
- Search for “Storage File Data SMB Share Contributor”
- Select it (this allows read, write, and delete access)
- Click Next
- On the Members tab:
- Select User, group, or service principal
- Click + Select members
- Search for and select your user account
- Click Select
- Click Next
- Click Review + assign, then Review + assign again
Important: The share-level permissions will take up to three hours to take effect once completed


Step 5: Generate a Shared Access Signature (SAS) Token
SAS tokens provide temporary, limited access to storage resources without sharing your account keys.
What is a SAS Token?
A shared access signature is a token that is appended to the URI for an Azure Storage resource. The token contains a special set of query parameters that indicate how the resources may be accessed by the client.
Creating the SAS Token:
- Navigate back to your Storage Account (not the file share)
- In the left menu, find Security + networking section
- Click Shared access signature
- Configure the SAS:
- Allowed services: Check File only
- Allowed resource types: Check Service, Container, and Object
- Allowed permissions: Check Read, Write, List
- Blob versioning permissions: Leave unchecked
- Start time: Leave as current time
- Expiry time: Set to 2 hours from now (or longer if you need more time)
- Allowed IP addresses: Leave blank (allow all IPs)
- Allowed protocols: HTTPS only (security best practice)
- Click Generate SAS and connection string
- Copy the SAS token (the string starting with
?sv=...) to a text file
Important: You’ll need to manually construct the URL to access specific files. The format is:
https://<storageaccountname>.file.core.windows.net/<filesharename>/<filename><SAS_TOKEN>
Example:
https://stproject6jd2025.file.core.windows.net/teamfiles/test.txt?sv=2022-11-02&ss=f&srt=sco&sp=rwl&se=2025-10-21T10:00:00Z&st=2025-10-21T08:00:00Z&spr=https&sig=xxxxx
Security Note: SAS tokens grant permissions to storage resources, and should be protected in the same manner as an account key. Operations that use SAS tokens should be performed only over an HTTPS connection

Step 6: Deploy a Virtual Machine
Let’s create a VM to mount our file share.
Creating a Windows VM (Choose Windows OR Linux):
- Search for “Virtual machines” in the Azure Portal
- Click + Create → Azure virtual machine
- On the Basics tab:
- Resource group:
rg-storage-project6 - Virtual machine name:
vm-storage-test - Region: Same as your storage account
- Image: Windows Server 2022 Datacenter: Azure Edition
- Size: Standard_B2s (2 vCPUs, 4 GB RAM – affordable)
- Username:
azureuser - Password: Create a strong password (save it!)
- Public inbound ports: Allow selected ports
- Select inbound ports: RDP (3389)
- Resource group:
- Click Next: Disks → Leave defaults
- Click Next: Networking
- Leave defaults (creates new network automatically)
- Click Review + create, then Create
VM deployment takes 2-4 minutes
Creating a Linux VM (Alternative):
If you prefer Linux:
- Image: Ubuntu Server 22.04 LTS
- Authentication type: Password (easier for beginners)
- Select inbound ports: SSH (22)
Your VM should show “Running” status!
Step 8: Mount the File Share on Your VM
For Windows:
- Once connected to your Windows VM, open PowerShell(ISE) as Administrator
- Go back to the Azure Portal → Your storage account → File shares → teamfiles
- Click Connect at the top
- Select Windows
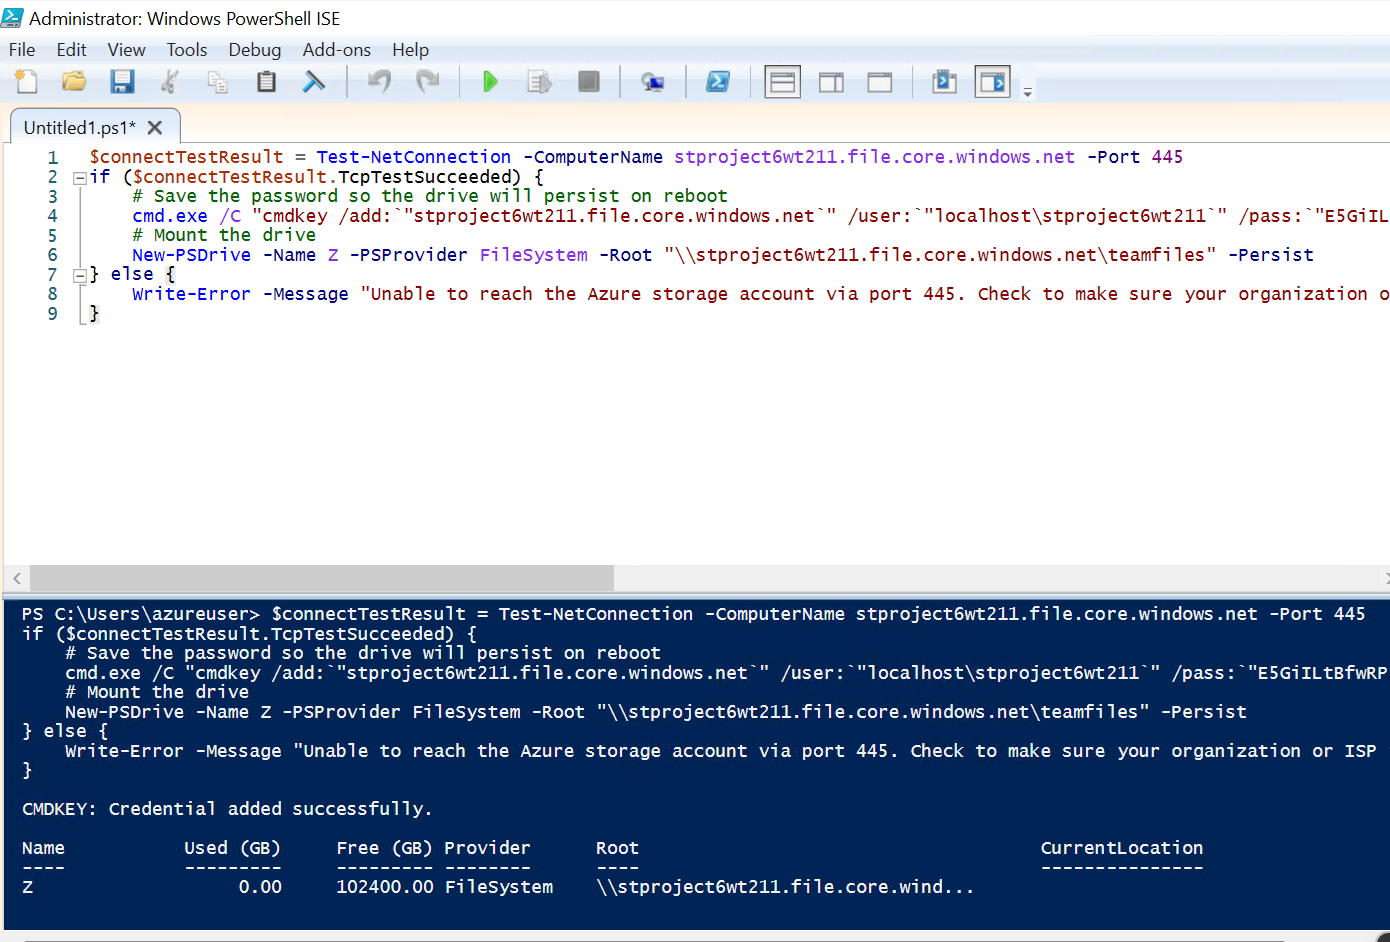
- Copy the PowerShell script provided (it looks like this):
$connectTestResult = Test-NetConnection -ComputerName stproject6jd2025.file.core.windows.net -Port 445
if ($connectTestResult.TcpTestSucceeded) {
    cmd.exe /C "cmdkey /add:`"stproject6jd2025.file.core.windows.net`" /user:`"localhost\stproject6jd2025`" /pass:`"YOUR_STORAGE_KEY`""
    New-PSDrive -Name Z -PSProvider FileSystem -Root "\\stproject6jd2025.file.core.windows.net\teamfiles" -Persist
} else {
    Write-Error -Message "Unable to reach the Azure storage account via port 445."
}
- Paste and run the script in PowerShell
- Open File Explorer – you should see a new Z: drive!


For Linux:
- Once connected via SSH, run these commands:
# Install cifs-utils (for mounting SMB shares)
sudo apt-get update
sudo apt-get install cifs-utils -y

# Create mount point
sudo mkdir -p /mnt/teamfiles

# Get your storage account key from the portal
# Azure Portal → Storage Account → Security + networking → Access keys → Show → Copy key1

# Mount the share (replace with your details)
sudo mount -t cifs //stproject6jd2025.file.core.windows.net/teamfiles /mnt/teamfiles -o vers=3.0,username=stproject6jd2025,password=YOUR_STORAGE_KEY,dir_mode=0777,file_mode=0777,serverino
- Verify the mount:
ls /mnt/teamfiles
You should be able to access your mounted drive!
Step 9: Test File Upload and Access
Upload a Test File:
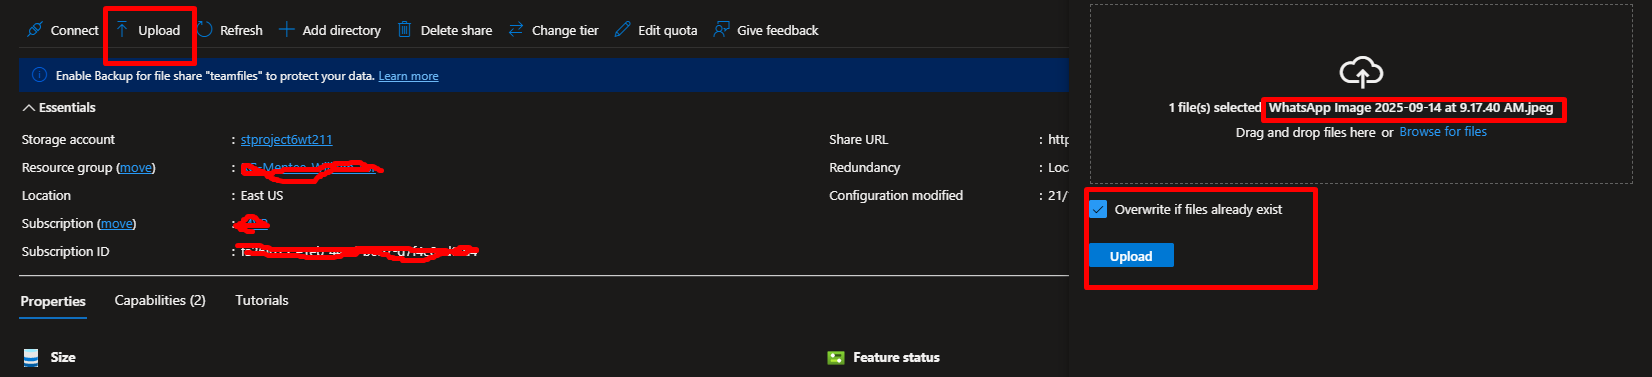
Via Azure Portal:
- Go to your file share in the portal
- Click Upload
- Select a test file from your computer
- Click Upload
Via Mounted Drive:
- On your VM, create a simple text file
- Save it to your mounted drive (Z: on Windows or /mnt/teamfiles on Linux)
- Go to the Azure Portal and verify the file appears!

Test SAS Token Access:
Method 1: Using Azure Storage Explorer (Recommended)
- Download and install Azure Storage Explorer (free tool)
- Open Storage Explorer
- Click the plug icon (Connect to Azure Storage)
- Select Storage account or service
- Select Shared access signature (SAS)
- Paste your complete SAS URI
- You can now browse and manage files!
Method 2: Direct File Access via Browser
- First, upload a file via the portal or mounted drive
- Construct the URL:
https://<storageaccount>.file.core.windows.net/<filesharename>/<filename><SAS_TOKEN> - Example:
https://stproject6jd2025.file.core.windows.net/teamfiles/test.txt?sv=2022-11-02&ss=f... - Paste the complete URL in your browser
- The file should download automatically!
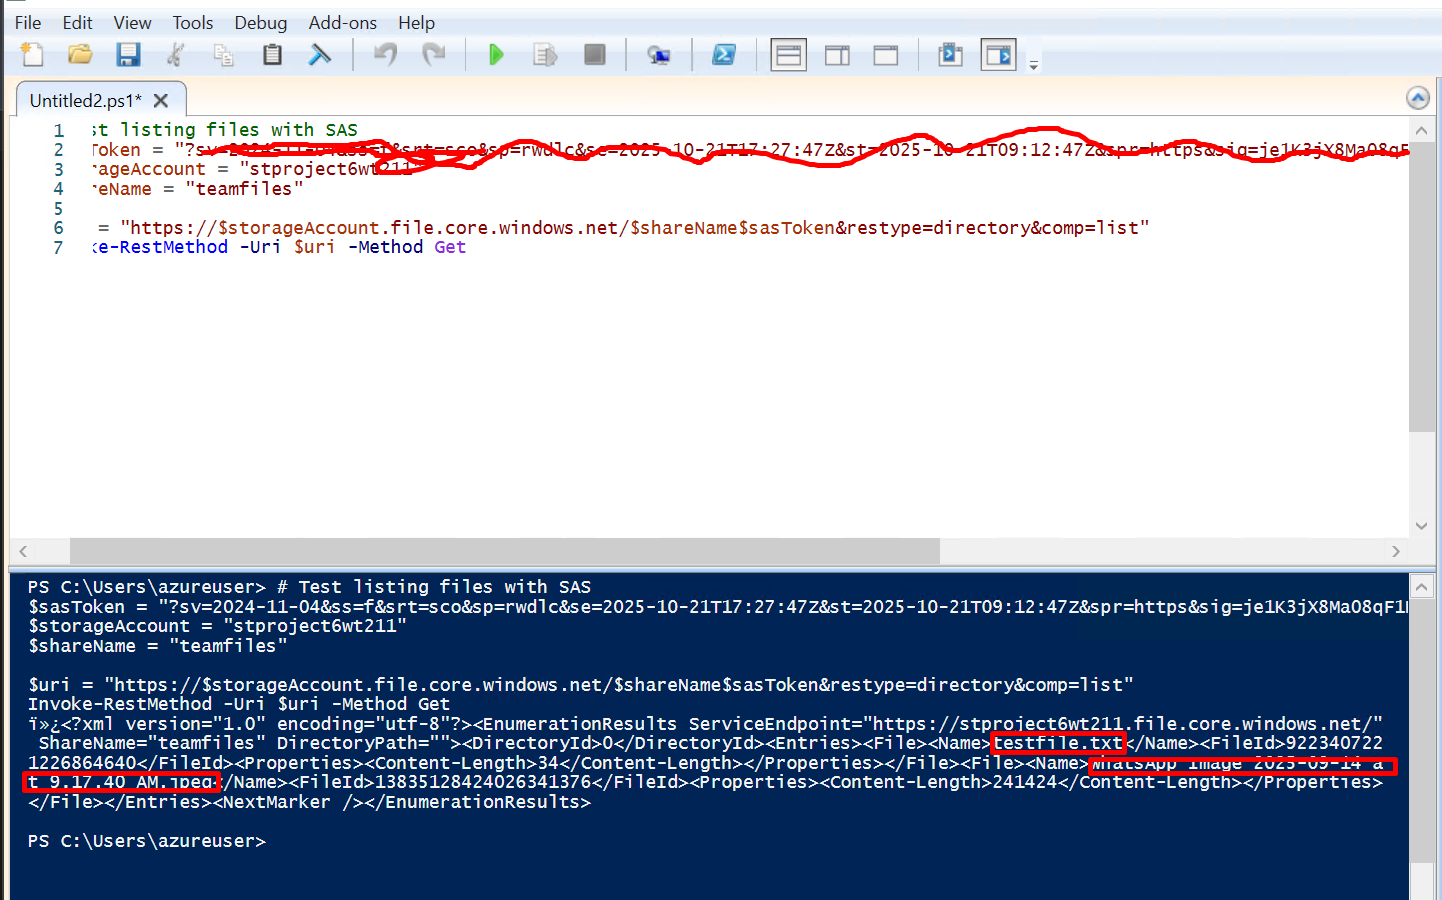
Method 3: Using PowerShell to Test SAS
# Test listing files with SAS
$sasToken = "?sv=2022-11-02&ss=f&srt=sco&sp=rwl&se=2025-10-21T10:00:00Z..."
$storageAccount = "stproject6jd2025"
$shareName = "teamfiles"

$uri = "https://$storageAccount.file.core.windows.net/$shareName$sasToken&restype=directory&comp=list"
Invoke-RestMethod -Uri $uri -Method Get
Method 4: Using Azure CLI
# List files using SAS token
az storage file list --account-name stproject6jd2025 --share-name teamfiles --sas-token "sv=2022-11-02&ss=f..."
Wait until after the expiry time you set, then try accessing again – you should get an “AuthenticationFailed” error!
Key Concepts You’ve Learned
Storage Account Types
General-purpose v2 storage accounts are recommended for most storage scenarios. General-purpose v2 accounts deliver the lowest per-gigabyte capacity prices for Azure Storage, and industry-competitive transaction prices.
SMB File Shares
Azure Files supports the major features of SMB and Azure needed for production deployments of SMB file shares including AD domain join and discretionary access control lists (DACLs), integrated serverless backup with Azure Backup, network isolation with Azure private endpoints, and high network throughput using SMB Multichannel.
Security Best Practices
Best practices recommend that you limit the interval for a SAS in case it’s compromised. By setting a SAS expiration policy for your storage accounts, you can recommend or enforce an upper expiration limit when a user creates a user delegation SAS, a service SAS, or an account SAS.


Leave a comment