
What happens if your virtual machine crashes or critical data is accidentally deleted?
In this project, we’ll explore how Azure Backup and the Recovery Services Vault can protect your data and restore it when things go wrong. You’ll learn how to set up automated backups, create retention policies, and recover a VM.
This hands-on lab directly aligns with the “Manage Data Protection” section of the AZ-104 certification, helping you build confidence in real-world disaster recovery scenarios.
Core Concepts (Building The Foundation)
What is a Recovery Services Vault?
A Recovery Services Vault is a management entity in Azure that:
- Stores backup data from VMs, databases, and file shares
- Orchestrates backup policies (when, how often, how long to keep backups)
- Manages restore operations (bringing back deleted/corrupted data)
- Encrypts data automatically using Azure Storage Service Encryption (256-bit AES)
Think of it like a secure warehouse where copies of your important machines are stored, with a catalog system telling you exactly which copy is from which date.
Types of Backups Azure Can Take
- Snapshot-based backup (Fast, initial copy stored in your subscription)
- Takes 5-20 minutes
- Stored alongside your VM for quick recovery
- Vault-tier backup (Transferred to the vault for long-term retention)
- Takes longer but more secure
- Used for 30-day, 90-day, or yearly retention
- Backup consistency levels:
- Application-consistent: Best quality – captures data in memory and pending I/O operations (like database transactions)
- File-system consistent: Good – ensures file system integrity
- Crash-consistent: Basic – like pulling the power plug and restarting
Step-by-Step Implementation (Complete Guide)
Phase 1: Environment Setup
Prerequisites Check:
# Check if you have a VM running
az vm list --output table

# Check your subscription
az account show --output table

# Check available regions
az account list-locations --output table

What you need:
- Active Azure subscription
- At least 1 running VM (Windows or Linux)
- Contributor or Backup Operator role
- VM and vault must be in the same region (critical!)
Phase 2: Create Recovery Services Vault
- Navigate:
- Portal → Search “Recovery Services vaults” → Click + Create
2. Configuration:
Subscription: [Your subscription]
Resource Group: rg-backup-demo (create new or use existing)
Vault Name: RSV-DemoVault
Region: East US (MUST match your VM’s region)

- Advanced Settings (Click “Next: Redundancy”):
- Backup Storage Redundancy:
- Geo-redundant (GRS): Default – Copies to another region 300+ miles away Locally redundant (LRS): Cheaper – 3 copies within same datacenter Zone-redundant (ZRS): Copies across availability zones in same region
- Backup Storage Redundancy:
- Security Settings:
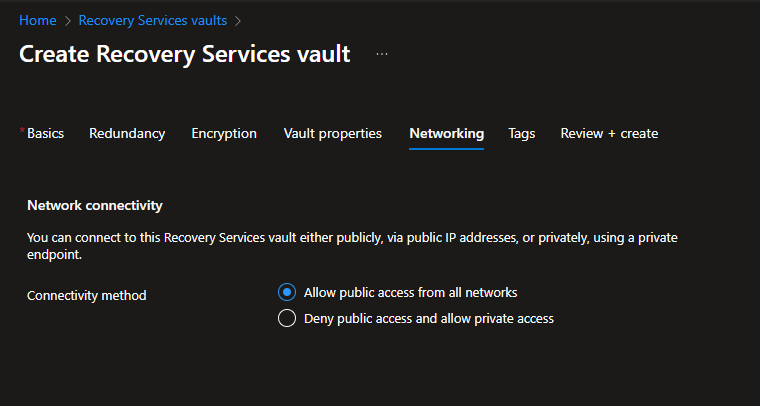
- Cross Region Restore: Enable (allows restore from secondary region)
- connectivity method: Allow public access from all networks
- Click Review + Create → Create

Alternatively,
Azure CLI (Command Line) for this
# Create resource group
az group create --name rg-backup-demo --location eastus

# Create Recovery Services Vault
az backup vault create \
  --resource-group rg-backup-demo \
  --name RSV-DemoVault \
  --location eastus

# Configure vault properties
az backup vault backup-properties set \
  --name RSV-DemoVault \
  --resource-group rg-backup-demo \
  --backup-storage-redundancy GeoRedundant \
  --soft-delete-feature-state Enable
Phase 3: Configure Backup Policy
Understanding Backup Policies
A backup policy defines:
- Frequency: How often backups run (daily/weekly)
- Time: When backups run (off-peak hours recommended)
- Retention: How long to keep recovery points
- Timezone: Critical for scheduling
Default Policy Breakdown
Name: DefaultPolicy
Frequency: Daily at 10:30 PM
Retention:
  - Daily backups: 30 days
  - Weekly backups: 12 weeks (Sunday)
  - Monthly backups: 12 months (First Sunday)
  - Yearly backups: 10 years (First Sunday of January)
Create a Custom Policy
- In Recovery Vault → Manage → Backup policies → + Add
- Policy type: Azure Virtual Machine
- Configuration:
Policy Name: CustomVMPolicy
Policy Type: Azure Virtual Machine

Backup Schedule:
  - Frequency: Daily
  - Time: 2:00 AM
  - Timezone: (UTC) Coordinated Universal Time

Instant Restore:
  - Retain snapshot for: 2 days (faster recovery)

Retention:
  - Daily: 30 days
  - Weekly: 12 weeks (Sunday)
  - Monthly: 12 months (Last Sunday)
  - Yearly: 5 years (First Sunday of January)


Click Create
CLI Method:
# Create custom policy (using JSON)
az backup policy create \
  --resource-group rg-backup-demo \
  --vault-name RSV-DemoVault \
  --name CustomVMPolicy \
  --policy '{
    "schedulePolicy": {
      "schedulePolicyType": "SimpleSchedulePolicy",
      "scheduleRunFrequency": "Daily",
      "scheduleRunTimes": ["2023-01-01T02:00:00Z"]
    },
    "retentionPolicy": {
      "dailySchedule": {"retentionDuration": {"count": 30, "durationType": "Days"}},
      "weeklySchedule": {"retentionDuration": {"count": 12, "durationType": "Weeks"}}
    }
  }'
Phase 4: Enable Backup on VM
1. Go to Recovery Vault → Getting Started → Backup
2. Configuration: Where is your workload running? Azure What do you want to backup? Virtual machine
- Click “Backup” button
- Select VMs:
- Check boxes next to your VMs
- Only VMs in the same region will appear
- Choose Policy:
- Select CustomVMPolicy (or DefaultPolicy)
- Click “Enable Backup”

What happens behind the scenes:
- Azure installs VM Backup Extension on your VM
- Extension name:
VMSnapshot(Windows) orVMSnapshotLinux(Linux) - No reboot required
- Extension communicates with vault to transfer backup data
CLI Method:
# Get VM ID
VM_ID=$(az vm show --resource-group rg-vm --name MyWebServer --query id --output tsv)

# Enable backup
az backup protection enable-for-vm \
  --resource-group rg-backup-demo \
  --vault-name RSV-DemoVault \
  --vm $VM_ID \
  --policy-name CustomVMPolicy
Phase 5: Run Manual Backup
Why run manual backup?
Don’t wait for the scheduled time, verify that the setup is working by creating an immediate recovery point.
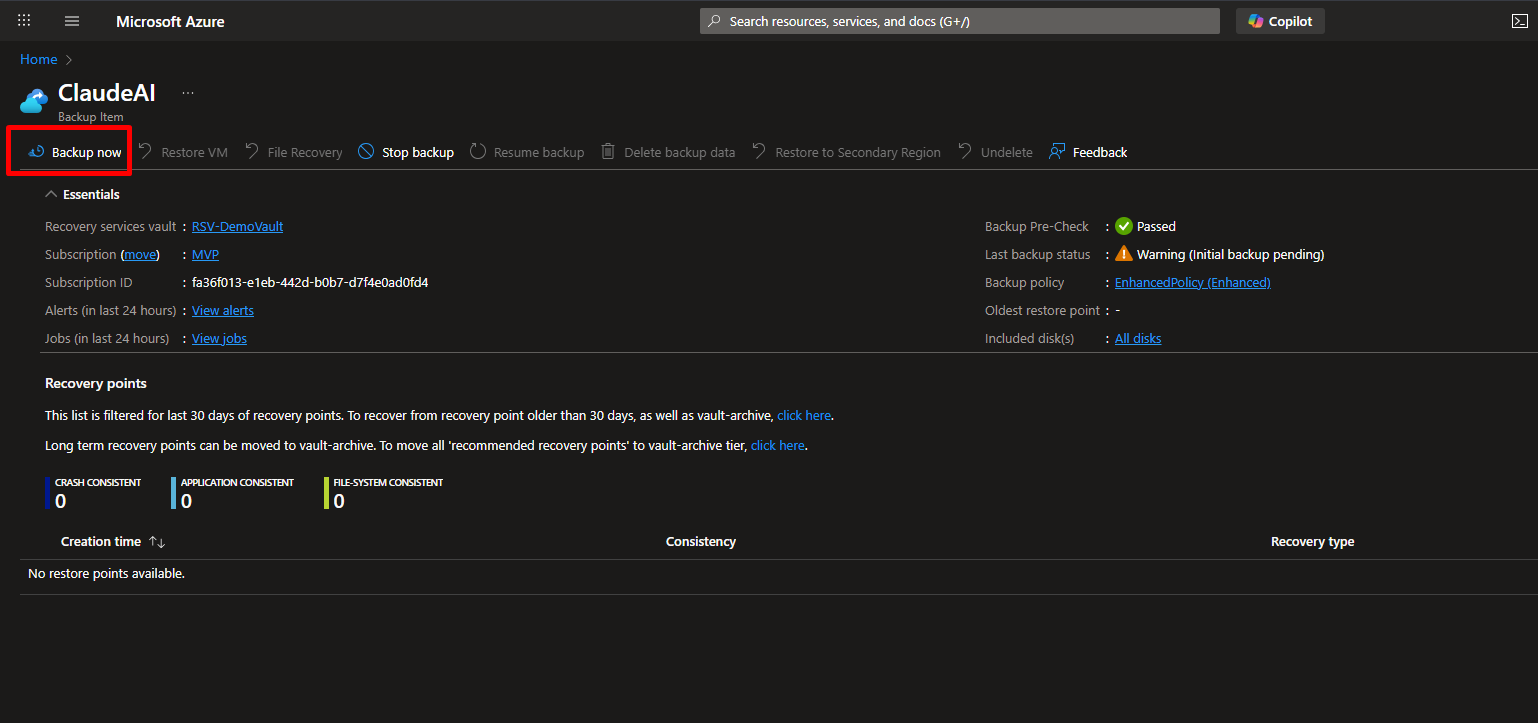
- Go to: Vault → Backup items → Azure Virtual Machine
- Click on your VM name
- Click the “Backup now” button
Configuration:
Retain Backup Until: [Select date - minimum 1 day, maximum 99 years]
Example: 30 days from today
- Click “OK”
Monitor progress:
- Go to Backup jobs (left menu)
- Status will show: “In progress” → “Completed”
- First backup takes 30 minutes to 2 hours (depending on VM size)
What’s happening:
- Snapshot phase (5-20 min): Taking point-in-time copy
- Transfer phase (15 min – 2 hours): Moving data to vault
- Completion: Recovery point created

CLI:
# Trigger backup now
az backup protection backup-now \
  --resource-group rg-backup-demo \
  --vault-name RSV-DemoVault \
  --container-name [VM-Container-Name] \
  --item-name MyWebServer \
  --retain-until 30-12-2025
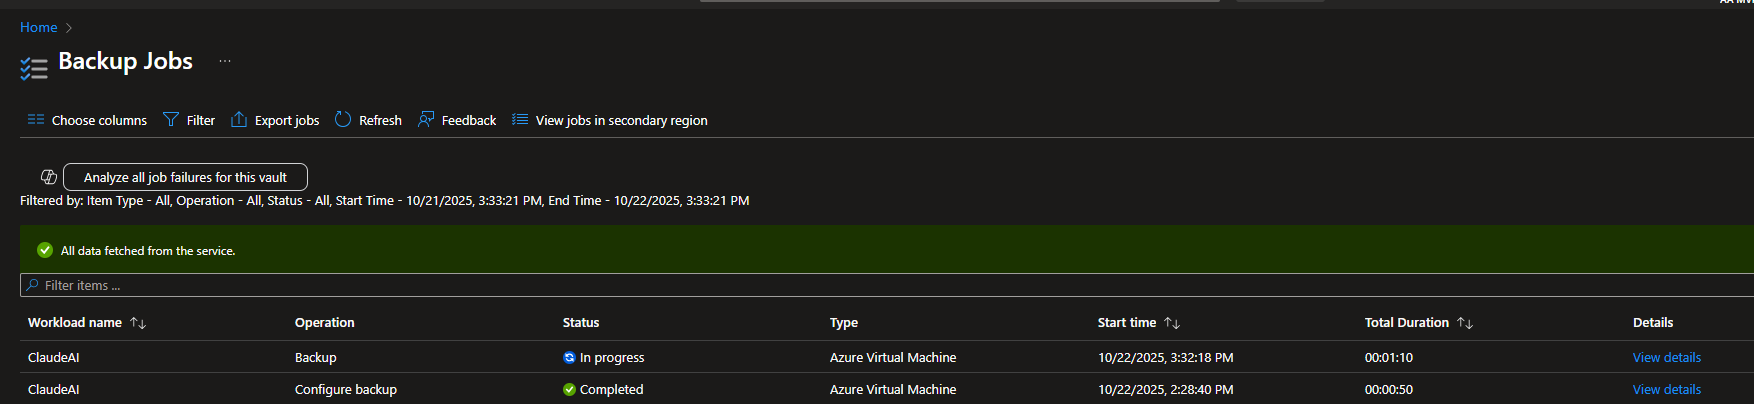
Phase 6: Validate Backup Jobs
Check Job Status
- Navigate to:
Vault → Monitoring → Backup jobs - You’ll see:
Job Name: Backup
Status: Completed / In Progress / Failed
Duration: 45 minutes
Backup Type: On-demand / Scheduled
- Click on a job for details:
- Start time
- End time
- Bytes transferred
- Error messages (if failed)

Check Recovery Points
- Navigate to:
Vault → Backup items → Azure Virtual Machine → [Your VM] - Click: “View details”
- You’ll see a list of recovery points:
Date/Time: 2025-10-22 02:00 AM
Consistency: Application-consistent
Snapshot: Available
Vault: Yes
Expiry: 30 days

Understanding Columns:
- Snapshot → Fast restore tier (stored with VM)
- Vault → Long-term retention tier
- Consistency Level → Quality of the backup
Phase 7: Perform a Restore (The Critical Test)
Restore Options
- Create New VM – Best for testing; creates a completely new VM
- Replace Existing VM – Overwrites the current VM (use with caution)
- Restore Disks Only – Advanced; provides disks for manual attachment
We’ll proceed with Option 1: Create New VM
Portal Method
- Navigate to:
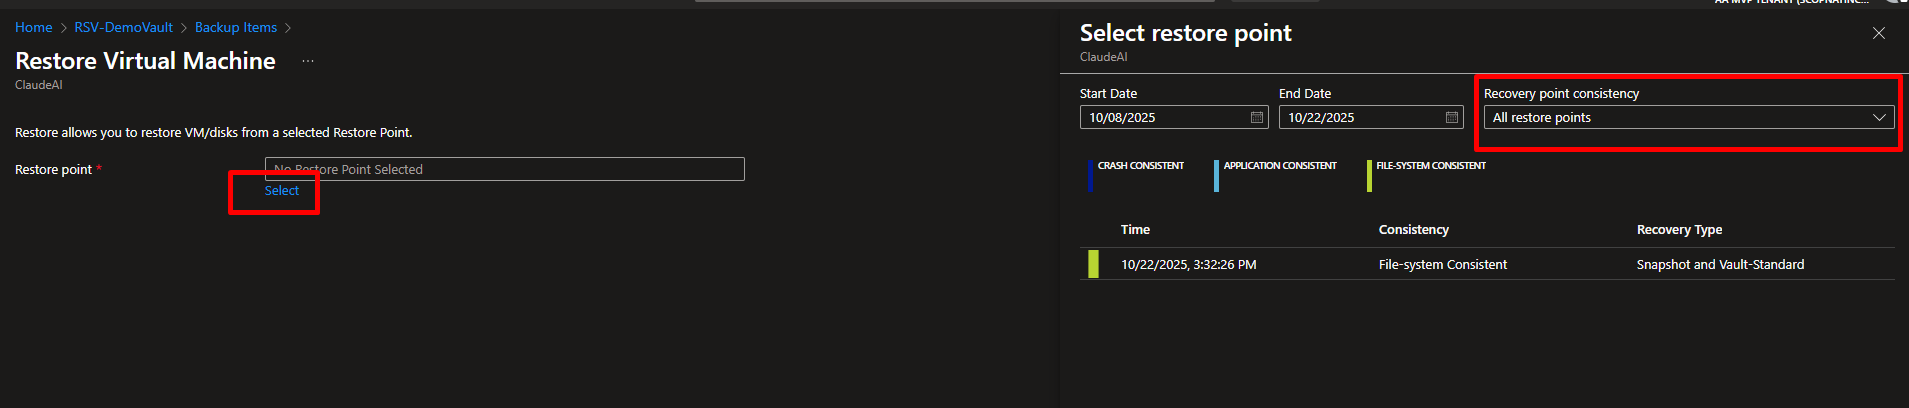
Vault → Backup items → Azure Virtual Machine → [Your VM] - Click: “Restore VM”
- Select Restore Point:
- Choose the desired recovery point (date/time)
- Verify consistency type
- Configuration:
Restore Type: Create new virtual machine

Virtual Machine Name: MyWebServer-Restored
Resource Group: rg-restored-vms (create new)
Virtual Network: [Select existing VNet]
Subnet: [Select subnet]
Staging Location: [Storage account for temporary files]

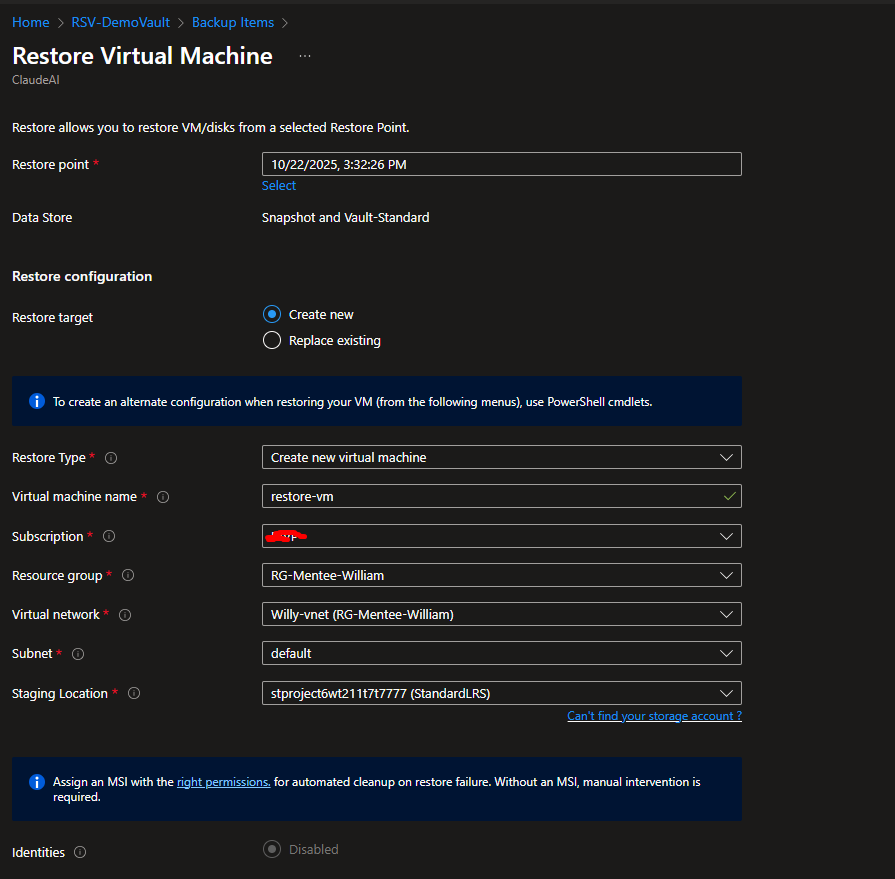
- Validate Configuration (Azure runs checks)
- Click “Restore”
Monitor:
- Go to Backup jobs
- Restore job will show progress
- Time: 15-45 minutes
What Happens During Restore:
- Validation Phase (2 min): Checks if restore is possible
- Disk Creation (10-20 min): Creates managed disks from backup
- VM Creation (5-10 min): Builds VM with restored disks
- Network Attachment (2-5 min): Connects NIC to VNet
- Completion: VM is running

CLI Method:
# Restore as new VM
az backup restore restore-azurevm \
  --resource-group rg-backup-demo \
  --vault-name RSV-DemoVault \
  --container-name [Container-Name] \
  --item-name MyWebServer \
  --restore-mode AlternateLocation \
  --target-resource-group rg-restored-vms \
  --storage-account stagingaccount123
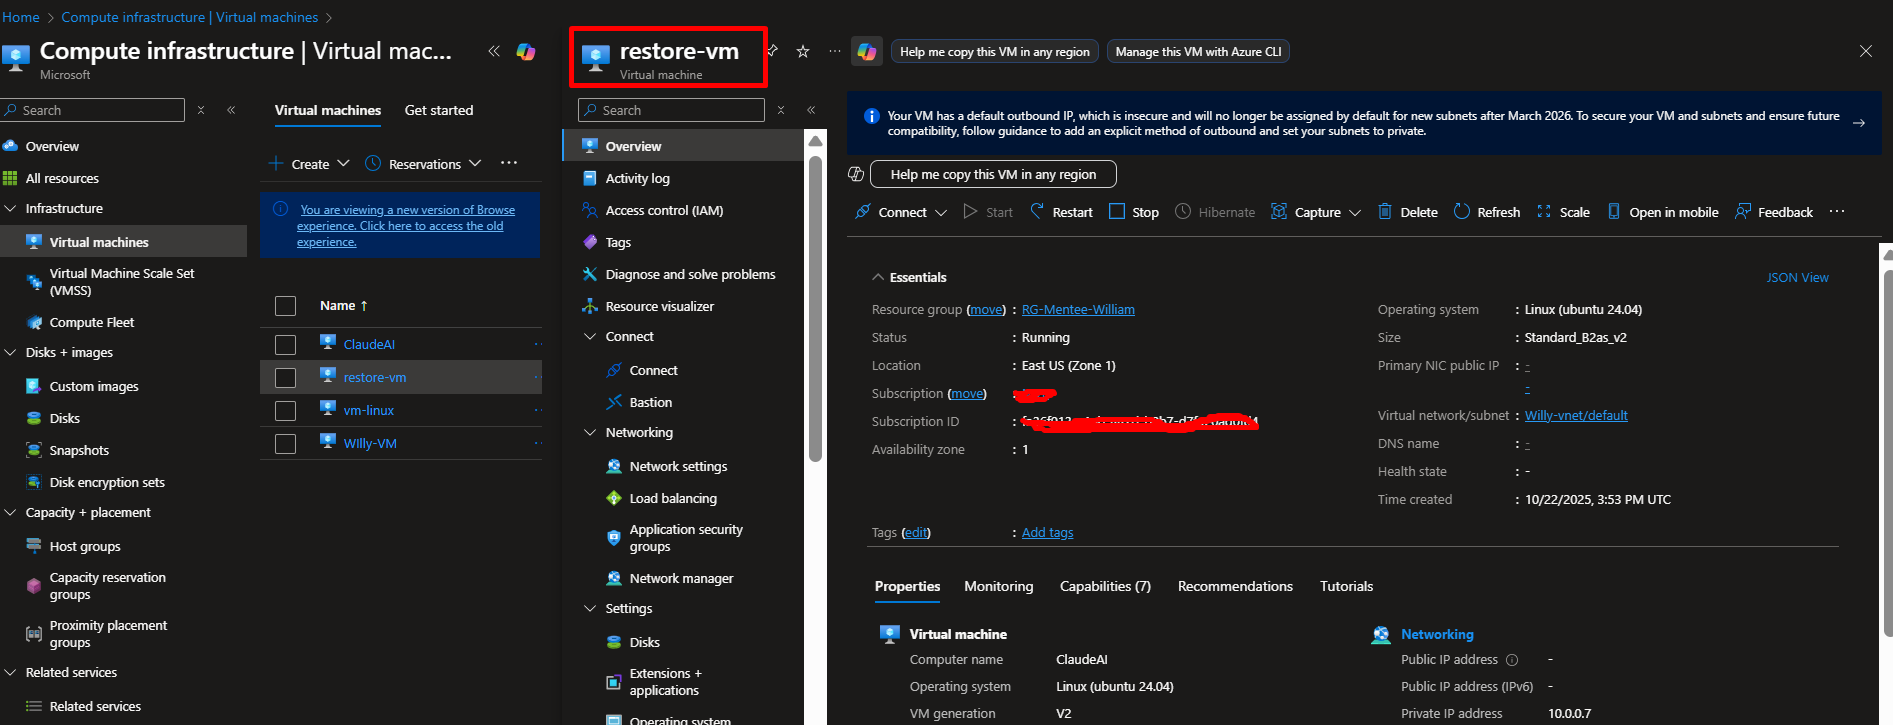
Phase 8: Verify Restored VM
- Go to Portal → Virtual Machines
- Find “MyWebServer-Restored”
- Check:
- Status: Running
- Public IP assigned
- Can you RDP/SSH into it?
- Are your files/applications intact?
- Compare:
- Original VM vs Restored VM
- Check disk configuration
- Verify network settings
Bonus: Real-World Application
In enterprise setups, organizations often use Recovery Vault for:
- Protecting production workloads (SQL, VMs, File shares)
- Enforcing organization-wide backup policies
- Integrating alerts with Azure Monitor and Log Analytics
Conclusion
With Azure Backup and Recovery Services Vault, you’ve implemented enterprise-grade data protection.
This ensures resilience against data loss and aligns with the business continuity and disaster recovery (BCDR) requirements tested in AZ-104.
You can now restore a machine at any point in time, which is exactly what a true Azure Administrator should be able to do.


Leave a comment