
After achieving high availability with Load Balancing and VM Scale Sets, I realized another layer of DevSecOps maturity visibility.
Security and performance mean little if you can’t see where your resources (and costs) are going.
That’s where Azure Storage and Data Lake enter the picture not just as a place to store files, but as the foundation of intelligent cloud cost management.
What We’re Building
Imagine you’re running a lemonade stand, but in the cloud. You need:
- A storage shed to keep your supplies (Azure Storage)
- An organized filing system for your records (Data Lake)
- A budget tracker that alerts you when you’re spending too much (FinOps)
- A dashboard showing where every dollar goes
By the end of this project, we’ll have a system that not only stores our data but also watches cloud spending like a hawk and sends us alerts before we blow your budget.
Understanding the Core Concepts
What is Azure Storage?
Think of Azure Storage as Dropbox on steroids. It’s Microsoft’s cloud hard drive where you can store:
- Files and documents
- Application logs (records of what happened)
- Backups
- Images and videos
Why it matters: Every app needs to store data somewhere. Instead of buying physical hard drives, you rent space from Microsoft.
Cost example:
- Physical hard drive: $100 upfront for 1TB (one-time)
- Azure Storage: $0.02/GB = ~$20/month for 1TB (pay as you go)
What is Data Lake Gen2?
Remember when you used to dump all your files on your desktop in a mess? Data Lake is like having a perfectly organized filing cabinet.
Regular storage (Blob):
my_files/
  document1.pdf
  document2.pdf
  report_jan.xlsx
  report_feb.xlsx
  report_mar.xlsx
Everything in one pile. Hard to find stuff.
Data Lake (organized):
my_files/
  └── 2025/
      ├── january/
      │   ├── reports/
      │   │   └── financial.xlsx
      │   └── logs/
      │       └── app_logs.json
      ├── february/
      │   ├── reports/
      │   │   └── financial.xlsx
      │   └── logs/
      │       └── app_logs.json
Everything has its place. Easy to find files from “February reports.”
Why you need this: When analyzing costs over months, you want logs organized by date, not in one giant pile.
What is FinOps (Financial Operations)?
FinOps is fancy talk for: “Don’t waste money on cloud services you’re not using.”
The problem: Cloud bills can spiral out of control because:
– Resources run 24/7 (even when you’re sleeping)
– You forget to delete test servers
– You don’t notice when costs spike
The solution is to set up automatic tracking and alerts.
Real-world example:
– You set up alerts: “Tell me if my bill exceeds $50/month”
– Netflix emails you: “You’ve hit $45, slow down!”
– You catch it before it gets worse
That’s FinOps for cloud.
Step-by-Step Implementation
Prerequisites (What You Need First)
Before we start, make sure you have:
- An Azure account
- Free tier works: https://azure.microsoft.com/free
- You get $200 credit for 30 days
- Terraform installed
- Azure CLI installed
- A text editor
- VS Code is great: https://code.visualstudio.com
Step 1: Set Up Your Project Folder
Create a new folder on your computer:
finops-project/
Inside, create these files:
providers.tf (connects to Azure)
main.tf (the main infrastructure code)
variables.tf (settings you can change)
outputs.tf (info to display after building)
terraform.tfvars (your personal values)

Step 2: Write the Configuration Files
I’ll break down each file in simple terms:
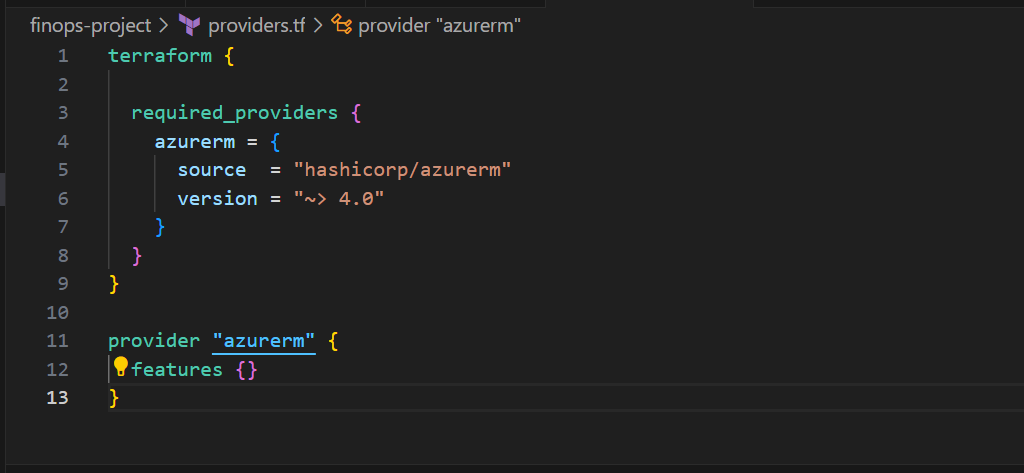
providers.tf: Connect to Azure
terraform {

  required_providers {
    azurerm = {
      source  = "hashicorp/azurerm"
      version = "~> 4.0"
    }
  }
}

provider "azurerm" {
  features {}
}
What this does: Tells Terraform “Hey, we’re going to build stuff in Microsoft Azure.”
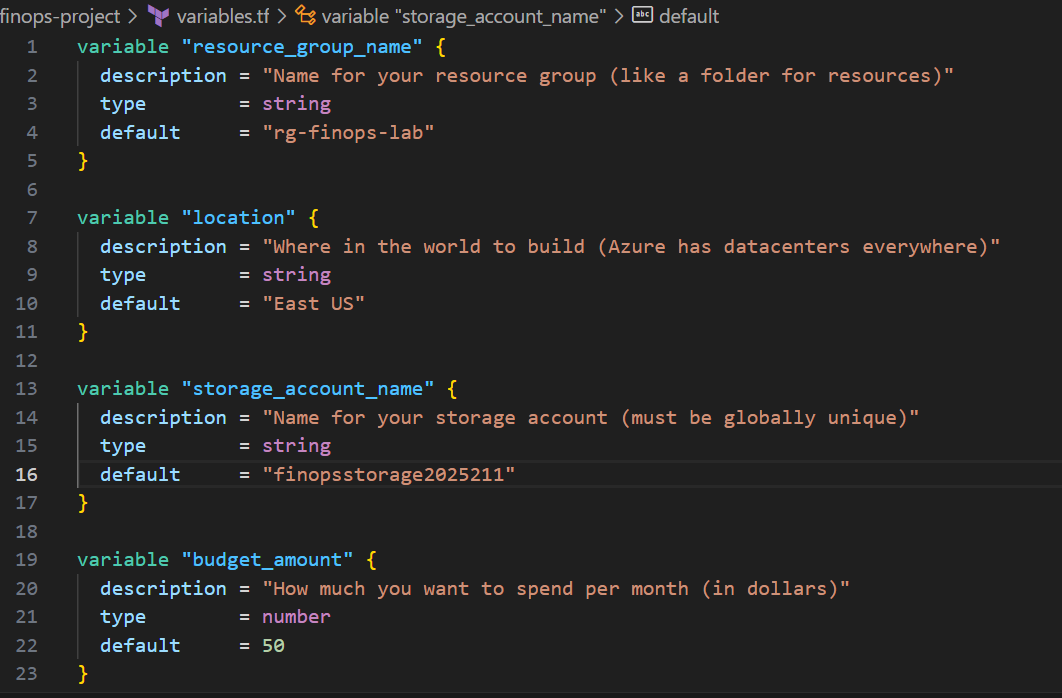
variables.tf : Define What Can Change
variable "resource_group_name" {
  description = "Name for your resource group (like a folder for resources)"
  type        = string
  default     = "rg-finops-lab"
}

variable "location" {
  description = "Where in the world to build (Azure has datacenters everywhere)"
  type        = string
  default     = "East US"
}

variable "storage_account_name" {
  description = "Name for your storage account (must be globally unique)"
  type        = string
  default     = "finopsstorage2025"
}

variable "budget_amount" {
  description = "How much you want to spend per month (in dollars)"
  type        = number
  default     = 50
}

variable "alert_email" {
  description = "Your email for budget alerts"
  type        = string
}
What this does: Like filling out a form before you order something online. “What’s your address? What size do you want?”
terraform.tfvars — Your Personal Settings
resource_group_name   = "rg-my-finops-project"
location              = "East US"
storage_account_name  = "mystorageacct2025"  # Change this! Must be unique globally
budget_amount         = 50
alert_email           = "your-email@gmail.com"  # Your actual email
What this does: Your personal answers to the form. Change storage_account_name to something unique (like adding your name or random numbers).
Why unique? Storage names are like usernames, only one person can have “john123” on Instagram.
main.tf : The Main Infrastructure
This is the longest file. I’ll break it into chunks:
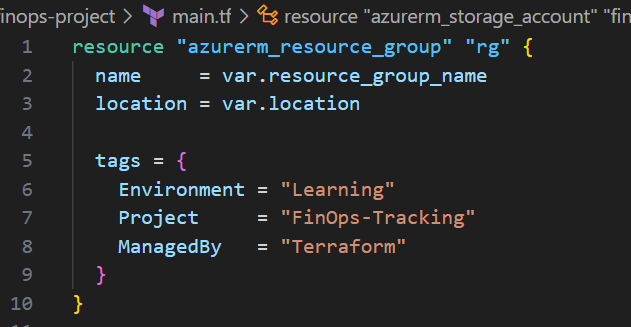
Part 1: Create a Resource Group (A Folder for Everything)
resource "azurerm_resource_group" "rg" {
  name     = var.resource_group_name
  location = var.location

  tags = {
    Environment = "Learning"
    Project     = "FinOps-Tracking"
    ManagedBy   = "Terraform"
  }
}
What this does: Creates a folder in Azure called “rg-my-finops-project” in East US. All our stuff goes in this folder.
Tags are like sticky notes: “This is for learning” so you remember later.
Part 2: Create Storage Account (Your Cloud Hard Drive)
resource "azurerm_storage_account" "finops_storage" {
  name                     = var.storage_account_name
  resource_group_name      = azurerm_resource_group.rg.name
  location                 = azurerm_resource_group.rg.location
  account_tier             = "Standard"
  account_replication_type = "LRS"
  account_kind             = "StorageV2"
  is_hns_enabled           = true  # This makes it a Data Lake!

  https_traffic_only_enabled       = true  # Security: encrypted traffic
  min_tls_version                 = "TLS1_2"  # Security: modern encryption
  allow_nested_items_to_be_public = false  # Security: keep stuff private

  tags = {
    Purpose = "FinOps-DataLake"
  }
}
What this does:
- Creates a storage account named
mystorageacct2025 - Standard tier: Cheaper, good for most uses (vs Premium = expensive, super fast)
- LRS: Keeps 3 copies in one datacenter (cheapest option)
- is_hns_enabled = true: This is the magic switch that turns regular storage into Data Lake (organized folders)

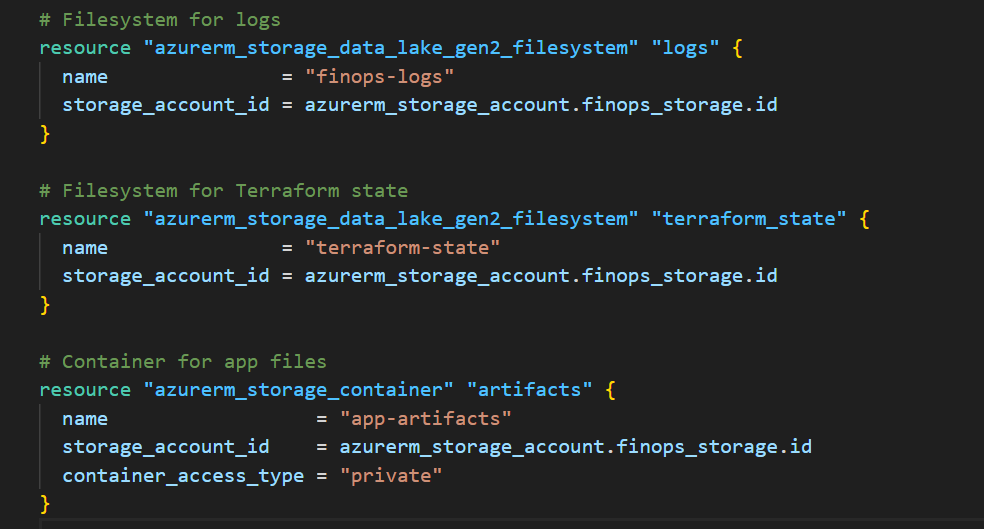
Part 3: Create Data Lake Filesystems (Organized Folders)
# Filesystem for logs
resource "azurerm_storage_data_lake_gen2_filesystem" "logs" {
  name               = "finops-logs"
  storage_account_id = azurerm_storage_account.finops_storage.id
}

# Filesystem for Terraform state
resource "azurerm_storage_data_lake_gen2_filesystem" "terraform_state" {
  name               = "terraform-state"
  storage_account_id = azurerm_storage_account.finops_storage.id
}

# Container for app files
resource "azurerm_storage_container" "artifacts" {
  name                  = "app-artifacts"
  storage_account_id  = azurerm_storage_account.finops_storage.name
  container_access_type = "private"
}
What this does: Creates 3 organized folders:
- finops-logs: Store activity logs
- terraform-state: Store Terraform’s memory
- app-artifacts: Store your app files
Part 4: Create Log Analytics (Security Camera System)
resource "azurerm_log_analytics_workspace" "finops_logs" {
  name                = "finops-logs-workspace"
  location            = azurerm_resource_group.rg.location
  resource_group_name = azurerm_resource_group.rg.name
  sku                 = "PerGB2018"
  retention_in_days   = 30  # Keep logs for 30 days

  tags = {
    Purpose = "Cost-Tracking"
  }
}
What this does: Creates a workspace that collects logs for 30 days.
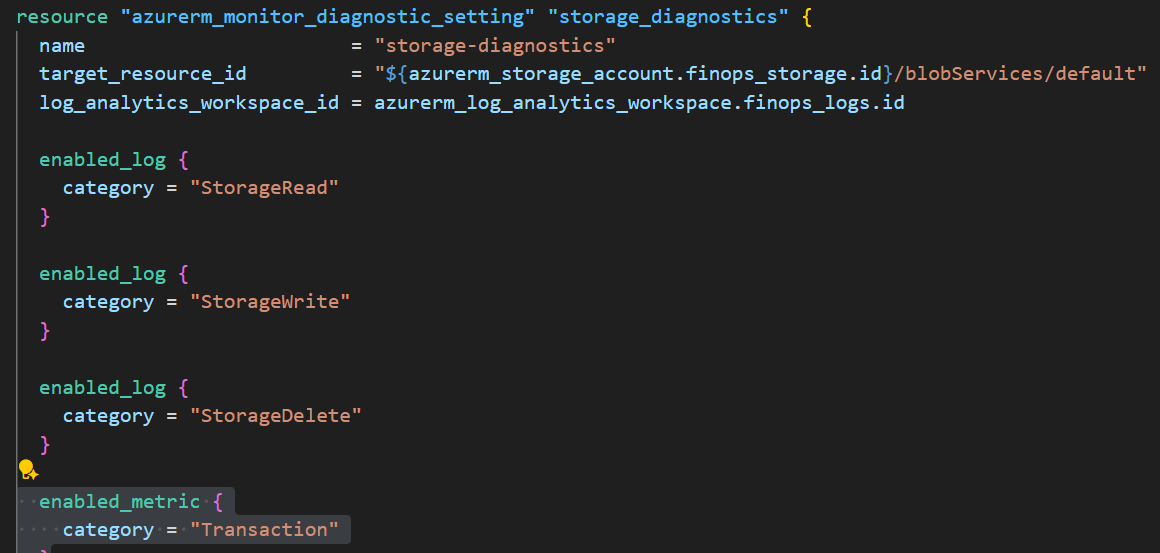
Part 5: Connect Storage Logs to Analytics
resource "azurerm_monitor_diagnostic_setting" "storage_diagnostics" {
  name                       = "storage-diagnostics"
  target_resource_id         = "${azurerm_storage_account.finops_storage.id}/blobServices/default"
  log_analytics_workspace_id = azurerm_log_analytics_workspace.finops_logs.id

  enabled_log {
    category = "StorageRead"
  }

  enabled_log {
    category = "StorageWrite"
  }

  enabled_log {
    category = "StorageDelete"
  }

   enabled_metric {
    category = "Transaction"
  }
}
What this does: Tells Azure “Send all storage activity (reads, writes, deletes) to Log Analytics”
Analogy: Like connecting your security camera to your phone so you can watch recordings.
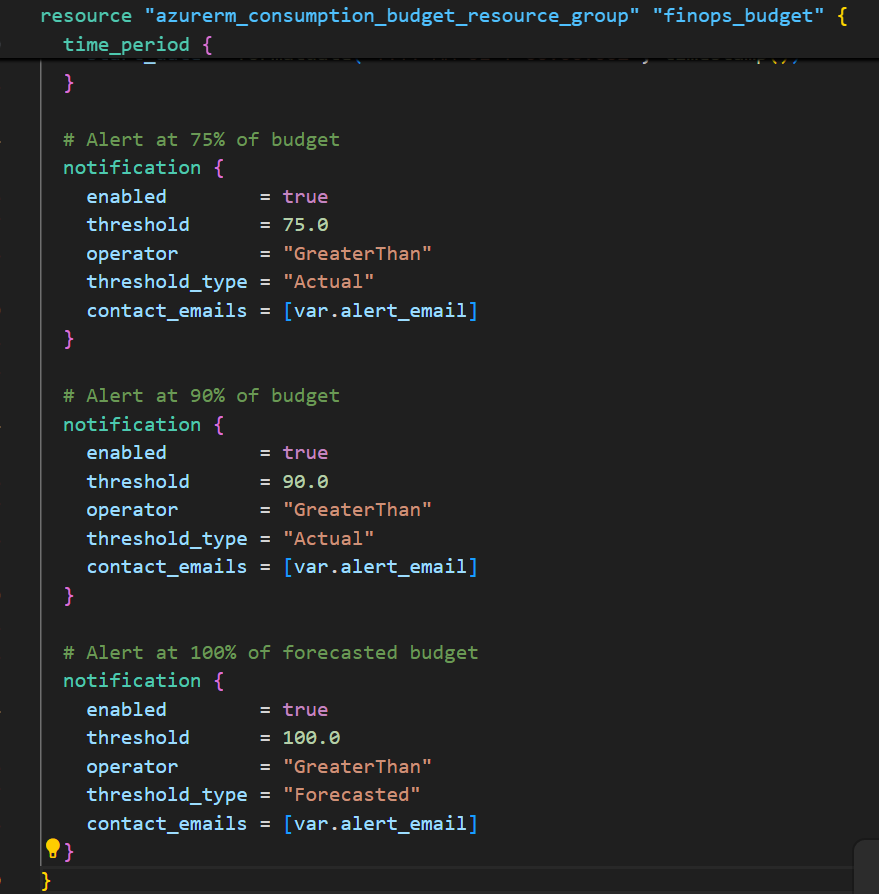
Part 6: Create Budget (Spending Limit)
resource "azurerm_consumption_budget_resource_group" "finops_budget" {
  name              = "finops-monthly-budget"
  resource_group_id = azurerm_resource_group.rg.id

  amount     = var.budget_amount  # $50
  time_grain = "Monthly"

  time_period {
    start_date = formatdate("YYYY-MM-01'T'00:00:00Z", timestamp())
  }

  # Alert at 75% of budget
  notification {
    enabled        = true
    threshold      = 75.0
    operator       = "GreaterThan"
    threshold_type = "Actual"
    contact_emails = [var.alert_email]
  }

  # Alert at 90% of budget
  notification {
    enabled        = true
    threshold      = 90.0
    operator       = "GreaterThan"
    threshold_type = "Actual"
    contact_emails = [var.alert_email]
  }

  # Alert at 100% of forecasted budget
  notification {
    enabled        = true
    threshold      = 100.0
    operator       = "GreaterThan"
    threshold_type = "Forecasted"
    contact_emails = [var.alert_email]
  }
}
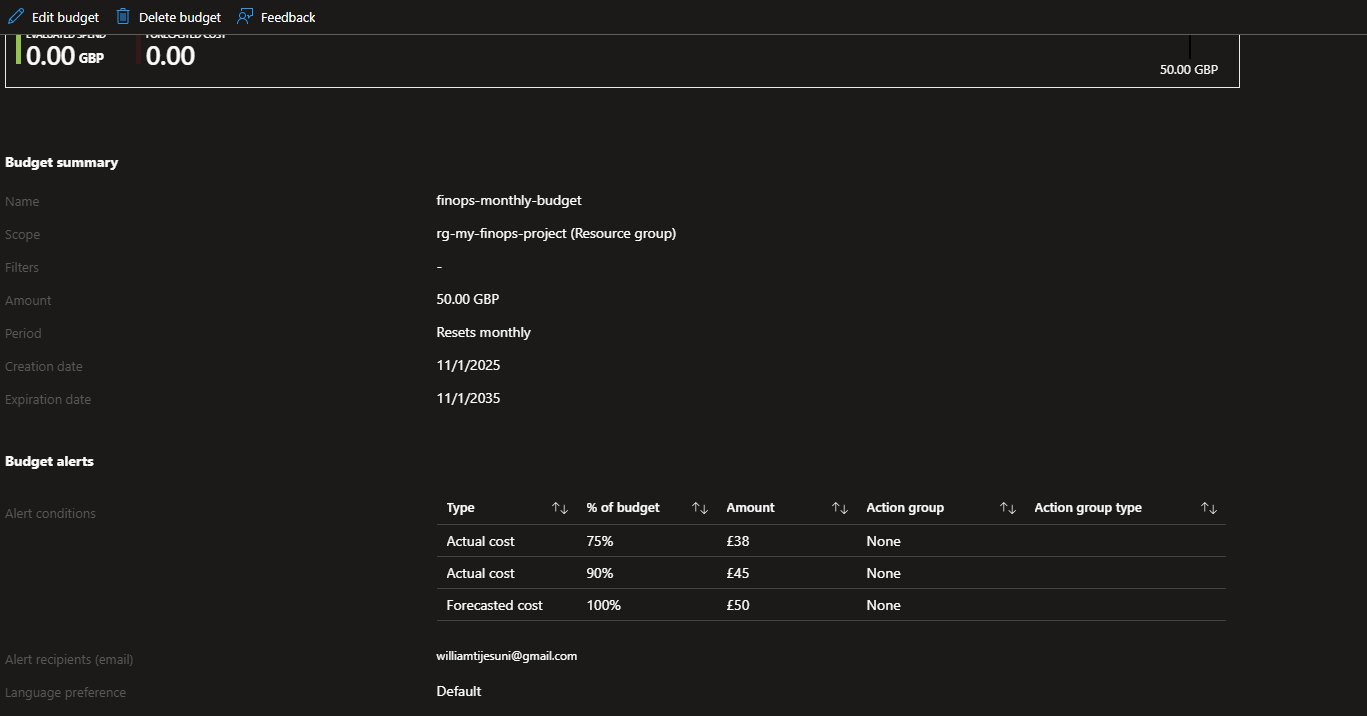
What this does:
- Sets a $50/month spending limit
- Sends 3 emails:
- At $37.50 (75%): “You’re getting close”
- At $45 (90%): “Warning! Almost there”
- At $50 projected: “You’re going to hit your limit”
Important: This doesn’t stop billing. It just warns you. You must manually turn off resources if needed.
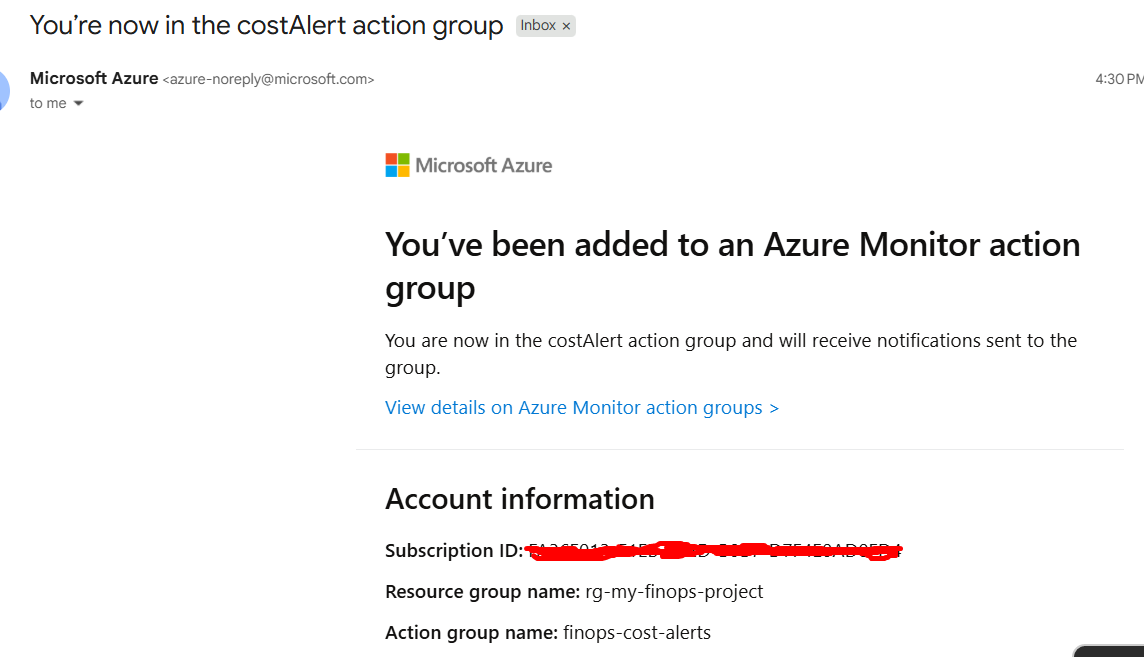
Part 7: Create Action Group (What Happens When Alert Fires)
resource "azurerm_monitor_action_group" "cost_alerts" {
  name                = "finops-cost-alerts"
  resource_group_name = azurerm_resource_group.rg.name
  short_name          = "costAlert"

  email_receiver {
    name          = "sendToAdmin"
    email_address = var.alert_email
  }
}
What this does: Defines who gets notified (you!) when budget alerts fire.
Later, you can add: SMS, phone calls, webhooks, automation

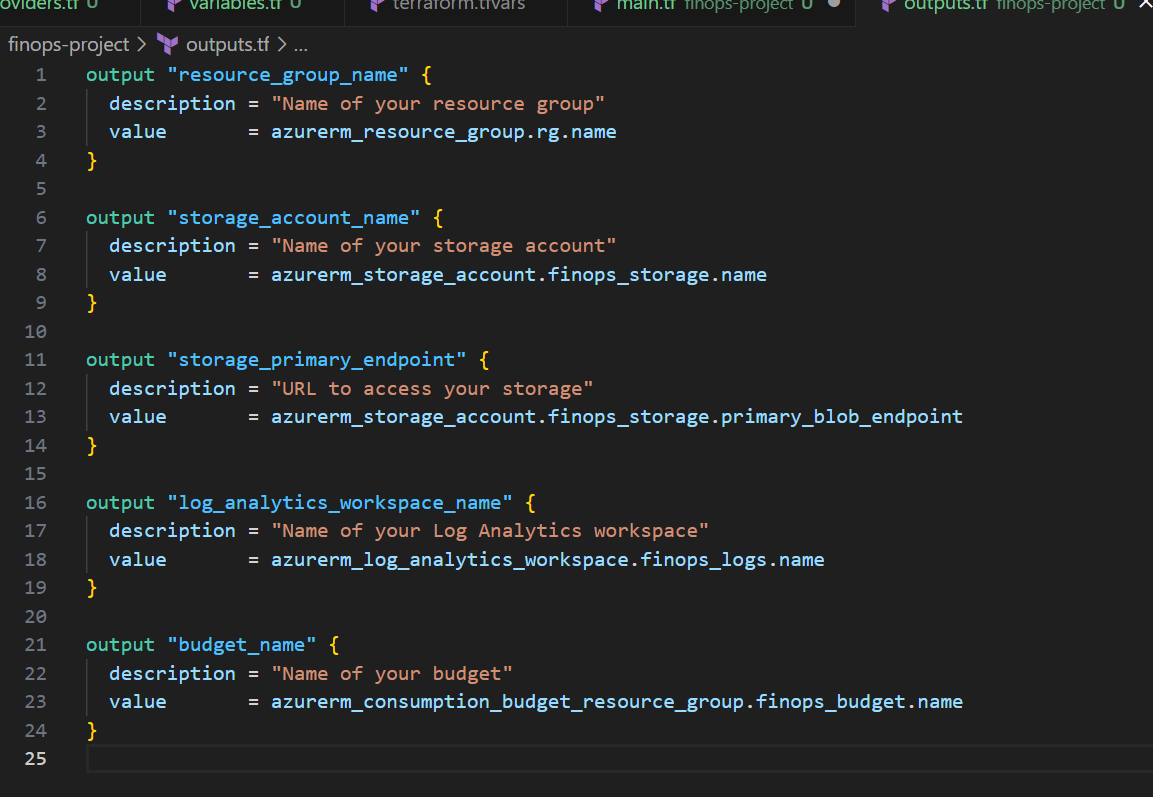
outputs.tf: Show Important Info After Building
output "resource_group_name" {
  description = "Name of your resource group"
  value       = azurerm_resource_group.rg.name
}

output "storage_account_name" {
  description = "Name of your storage account"
  value       = azurerm_storage_account.finops_storage.name
}

output "storage_primary_endpoint" {
  description = "URL to access your storage"
  value       = azurerm_storage_account.finops_storage.primary_blob_endpoint
}

output "log_analytics_workspace_name" {
  description = "Name of your Log Analytics workspace"
  value       = azurerm_log_analytics_workspace.finops_logs.name
}

output "budget_name" {
  description = "Name of your budget"
  value       = azurerm_consumption_budget_resource_group.finops_budget.name
}
What this does: After Terraform finishes building, it shows you important info like URLs and names.
Analogy: Like getting a receipt after ordering food: “Your order number is #42, pick up at counter 3”
Step 3: Deploy to Azure (The Moment of Truth)
Open your terminal (Command Prompt on Windows, Terminal on Mac/Linux):
# Go to your project folder
cd finops-project
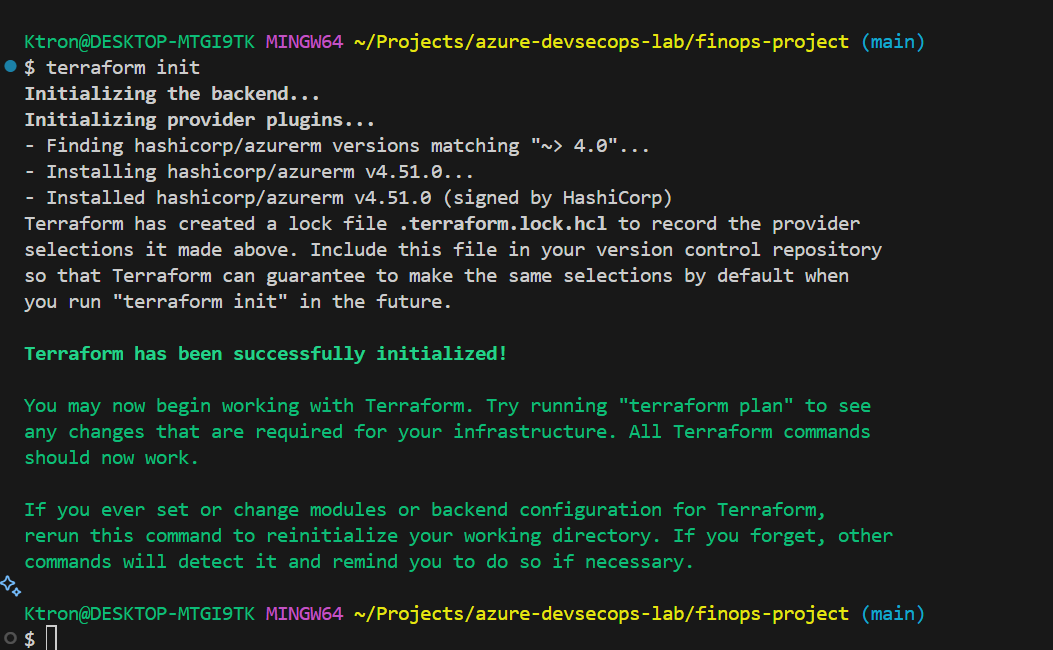
# Step 1: Initialize Terraform (downloads Azure provider)
terraform init
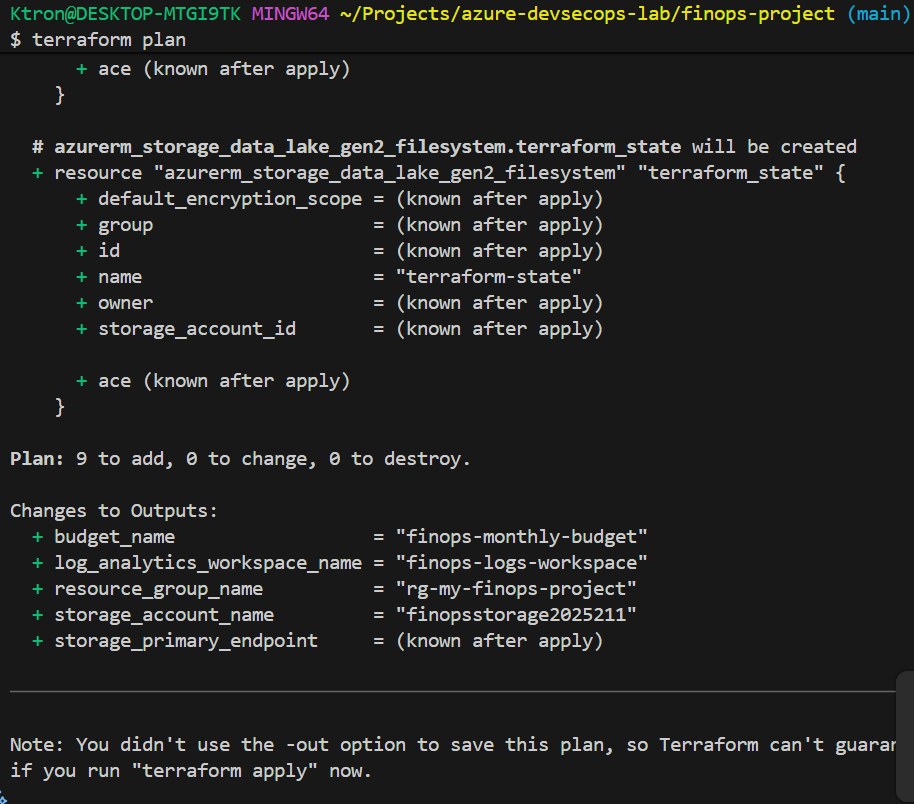
# Step 2: Check what will be built (preview)
terraform plan
# Step 3: Build everything (confirm with 'yes')
terraform apply
```
**What happens:**
1. `terraform init`: Downloads tools to talk to Azure (~30 seconds)
2. `terraform plan`: Shows what will be created (like a blueprint)
3. `terraform apply`: Actually builds everything (~2-3 minutes)
You'll see output like:
```
Apply complete! Resources: 8 added, 0 changed, 0 destroyed.
Outputs:
storage_account_name = "mystorageacct2025"
log_analytics_workspace_name = "finops-logs-workspace"
budget_name = "finops-monthly-budget"
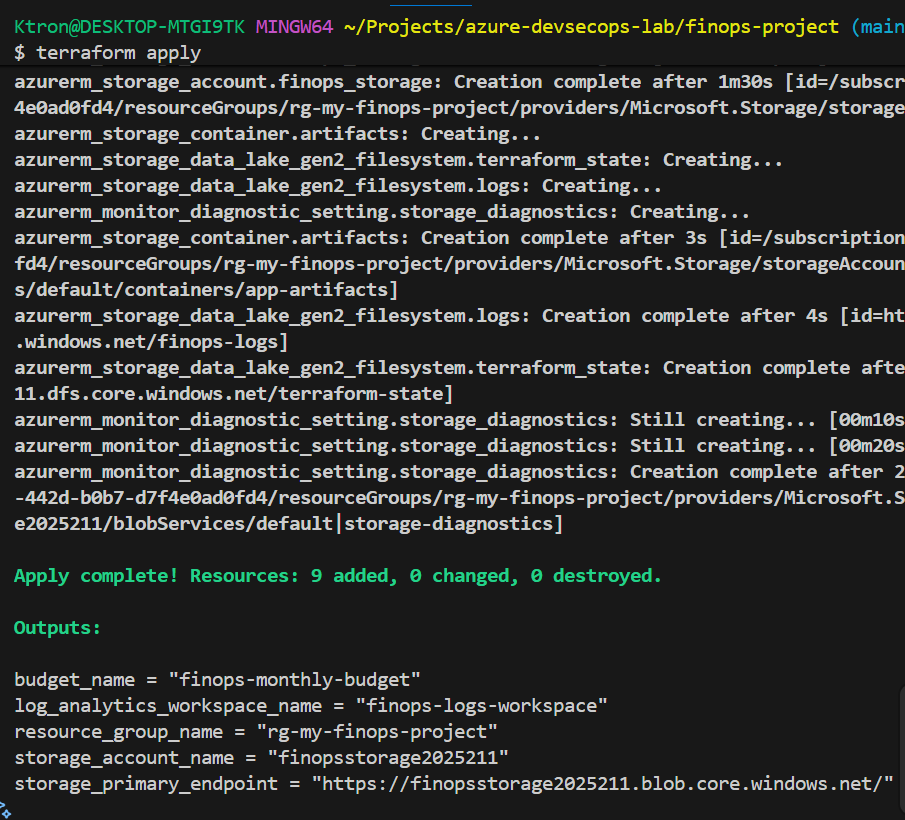
Congratulations! Your infrastructure is live!
Step 4: Verify Everything in Azure Portal
Go to https://portal.azure.com and log in.
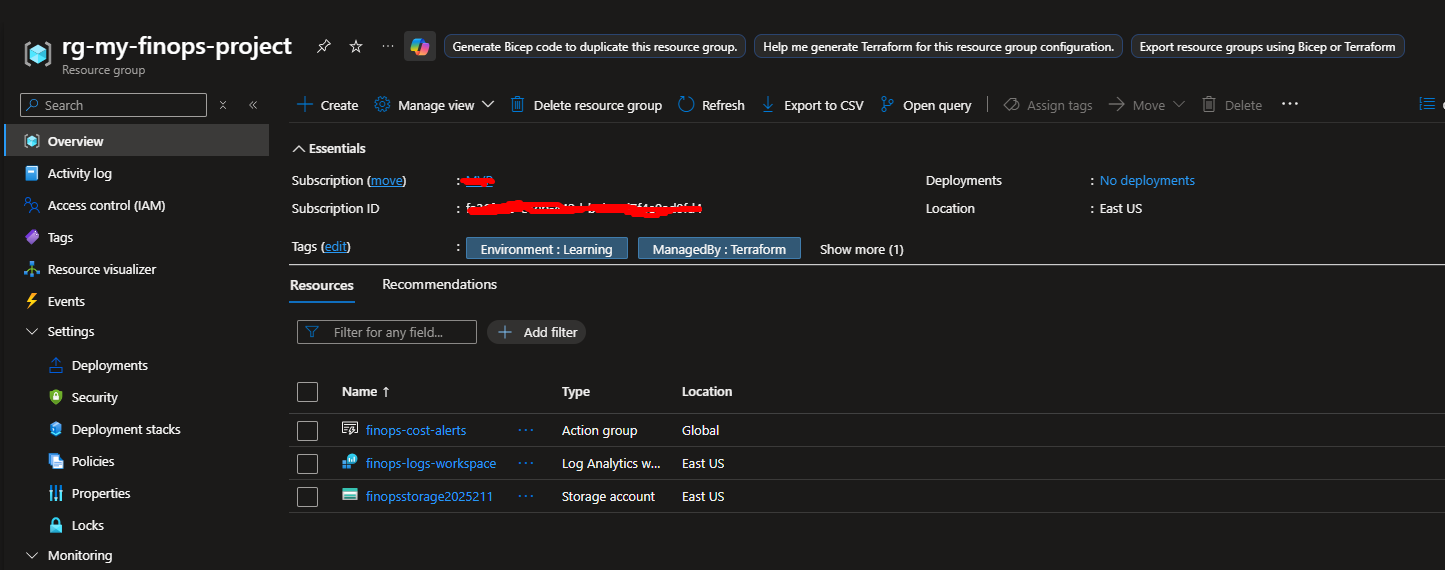
Check 1: Resource Group
- Search for “Resource groups” in the top search bar
- Find your group (e.g.,
rg-my-finops-project) - Click it you should see the resources:
Check 2: Storage Account
- Click on your storage account (e.g.,
mystorageacct2025) - On the left menu, click “Data storage” → “Containers”
- You should see:
app-artifactsfinops-logsterraform-state

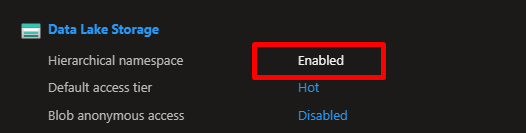
Check 3: Data Lake Verification
- Still in storage account, click “Settings” → “Data Lake Gen2”
- Verify “Hierarchical namespace” says “Enabled”
This confirms: Your storage is a Data Lake (not just regular storage)
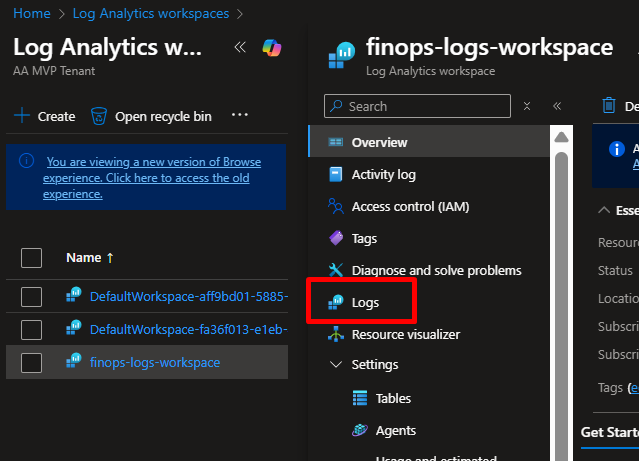
Check 4: Log Analytics
- Search for “Log Analytics workspaces” in portal
- Click your workspace (
finops-logs-workspace) - Click “Logs” in left menu
- Run this query in the query box:
StorageBlobLogs
| where TimeGenerated > ago(1h)
| take 10
What this does: Shows the last 10 storage activities in the past hour
If you see “No results”: That’s normal nothing’s happened yet. Come back in an hour after some activity.

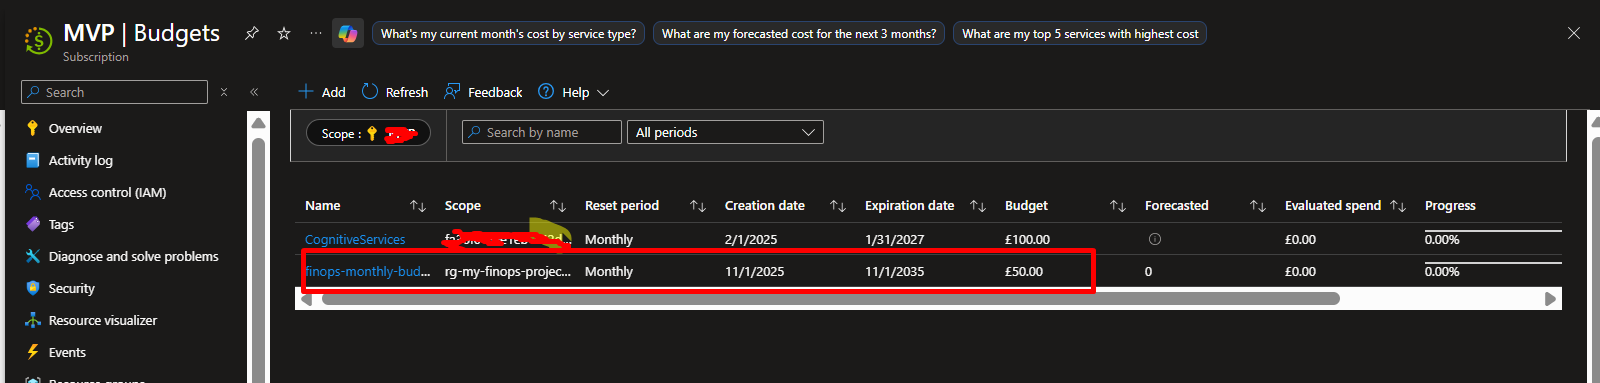
Check 5: Budget
- Search for “Cost Management + Billing” in portal
- Click “Cost Management” → “Budgets”
- Find your budget (
finops-monthly-budget) - Click it to see:
- Amount: $50
- Current spend: $0.xx (very small so far)
- Alerts: 3 configured (75%, 90%, 100%)
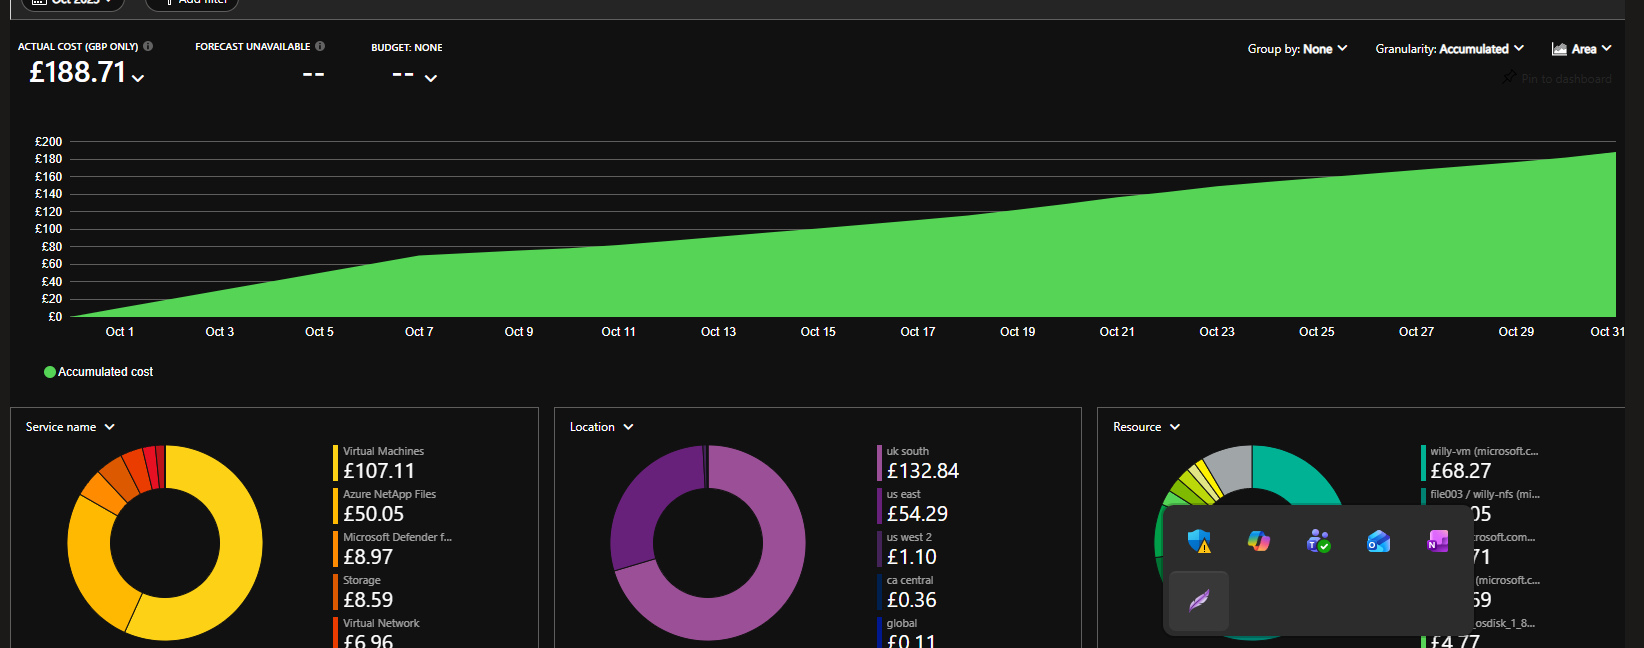
Step 5: View Cost Dashboard
- In portal, go to “Cost Management” → “Cost analysis”
- At top, filter by:
- Scope: Your resource group
- Time range: Last 7 days
- You’ll see a chart showing daily costs
Right now: Probably just a few cents (Storage is cheap!)
Click different views:
- Accumulated cost: Total so far this month
- Daily cost: How much per day
- Cost by resource: Which resource costs the most
- Cost by service: Storage vs Compute vs Network
Create a Custom Dashboard
- In Cost analysis, click “Save” → “Save as”
- Name it “My FinOps Dashboard”
- Click “Pin to dashboard” → “Create new dashboard”
- Name dashboard “FinOps Control Center”
Now you have a custom homepage showing your costs!

Enable Terraform Remote State (Advanced)
Now that storage is created, let’s move Terraform state to the cloud:
Create a new file backend.tf:
terraform {
  backend "azurerm" {
    resource_group_name  = "rg-my-finops-project"
    storage_account_name = "mystorageacct2025"  # Your storage name
    container_name       = "terraform-state"
    key                  = "finops.tfstate"
  }
}

Then run:
terraform init -migrate-state
Type yes when asked.
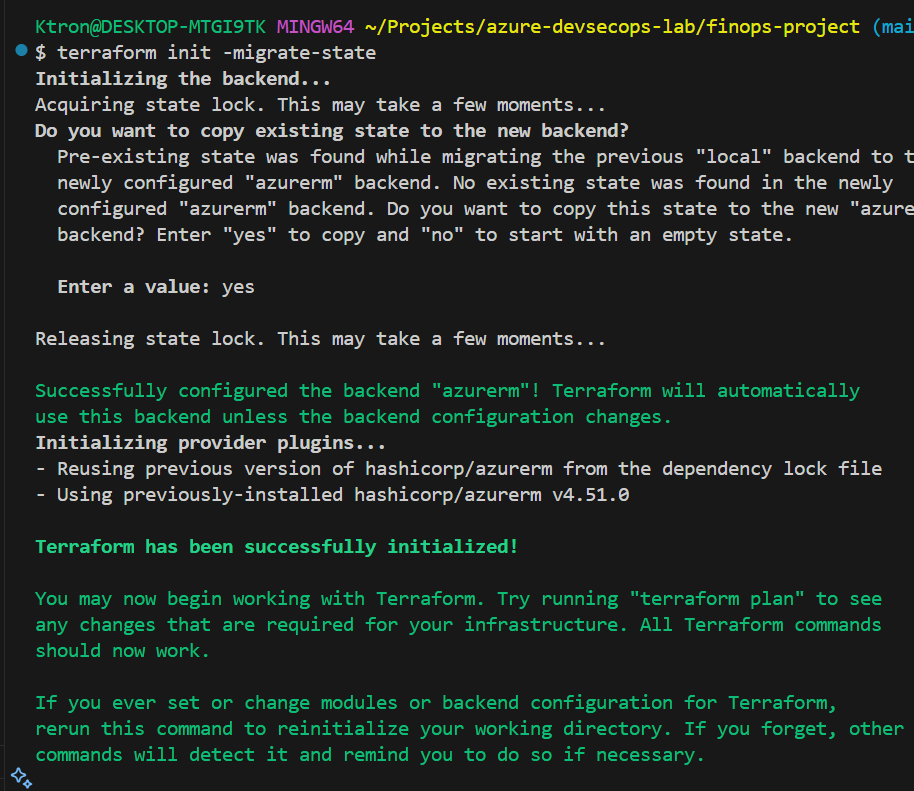
What happened: Your Terraform state file moved from your laptop to Azure Storage.
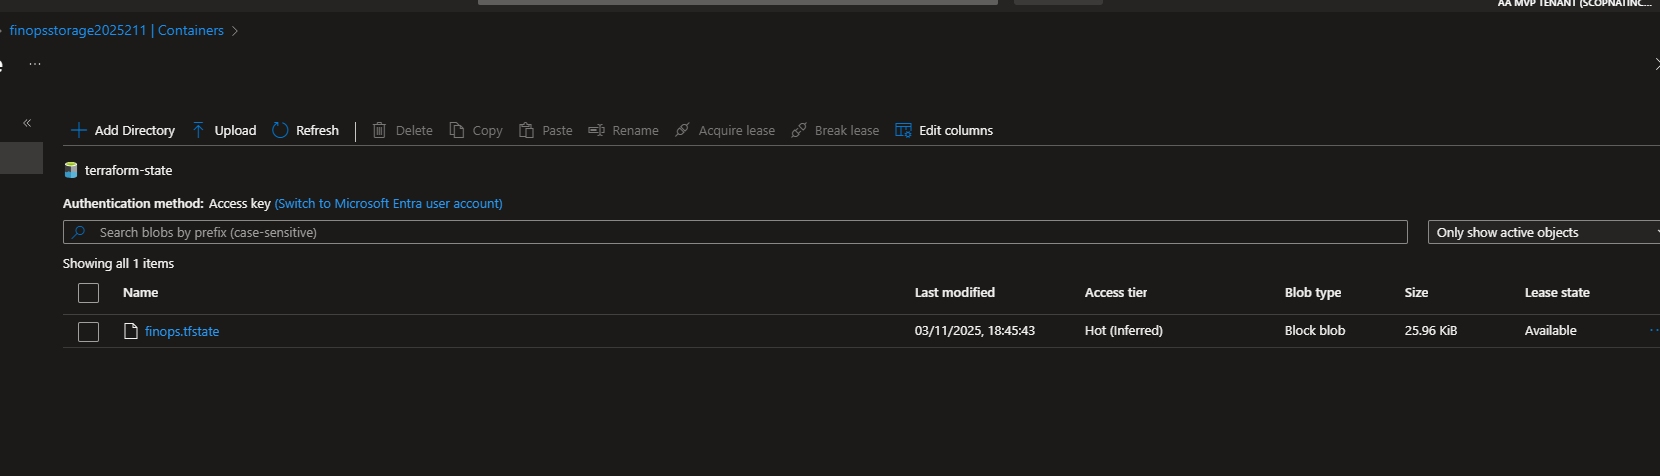
Verify:
- Go to storage account in portal
- Open container
terraform-state - You should see a file
finops.tfstate
Now your state is backed up in the cloud!
leaning Up (Important!)
When you’re done learning, delete everything to avoid charges:
# Destroy all resources
terraform destroy
Type yes when prompted.
This deletes:
- Storage account
- Log Analytics workspace
- Budget
- Everything built by Terraform
Conclusion
This project reminded me that DevOps isn’t just automation it’s awareness.
Azure’s FinOps tools show how every design choice SKU size, replication type, retention days translates directly into cost and efficiency.
And that’s where cloud craftsmanship meets business value.


Leave a comment