
I pushed to main and watched production go live instantly—no tests, no review, no guardrails. In that moment of panic, I learned the difference between automation… and responsible automation.
Overview
Think of this like a factory assembly line for code:
- Developer commits code → Git notices the change
- Build Station → Code gets tested and packaged into a container
- Quality Check → Security scans and code analysis
- Staging Area → Deploy to a test environment (like production, but safe)
- Human Checkpoint → Someone (you!) manually approves
- Production → Deploy the exact same package to real users
Key insight: The same container that passes all tests in staging goes to production. No surprises!
Understanding Azure Container Apps (ACA)
“Wait, what’s a Container App?”
Think of it like this: Traditional hosting requires you to manage servers, update operating systems, configure networks, etc. Container Apps is like having a magical host that does all that for you. You just say “run my app” and Azure handles the rest.
Why I chose Azure Container Apps:
- No servers to manage (serverless!)
- Automatically scales when traffic increases
- Built-in HTTPS and logging
- Pay only for what you use
- Perfect for learning DevOps without Kubernetes complexity
Setting Up Infrastructure (The Foundation)
What is Terraform? It’s like writing a recipe for your cloud infrastructure. Instead of clicking around the Azure portal, you write code that says “I want these resources” and Terraform creates them.
Create Your Project Structure
# Create a new directory
mkdir git-to-prod-pipeline
cd git-to-prod-pipeline

# Create necessary files
touch main.tf
touch variables.tf
touch outputs.tf

The Infrastructure Code
Here’s what we’re creating:
- Resource Group: A folder to organize all our Azure resources
- Container Registry (ACR): Like Docker Hub, but private
- Container Apps Environment: The hosting environment for our app
- Log Analytics: Where we’ll see what’s happening
- Key Vault: Secure storage for secrets (like passwords)
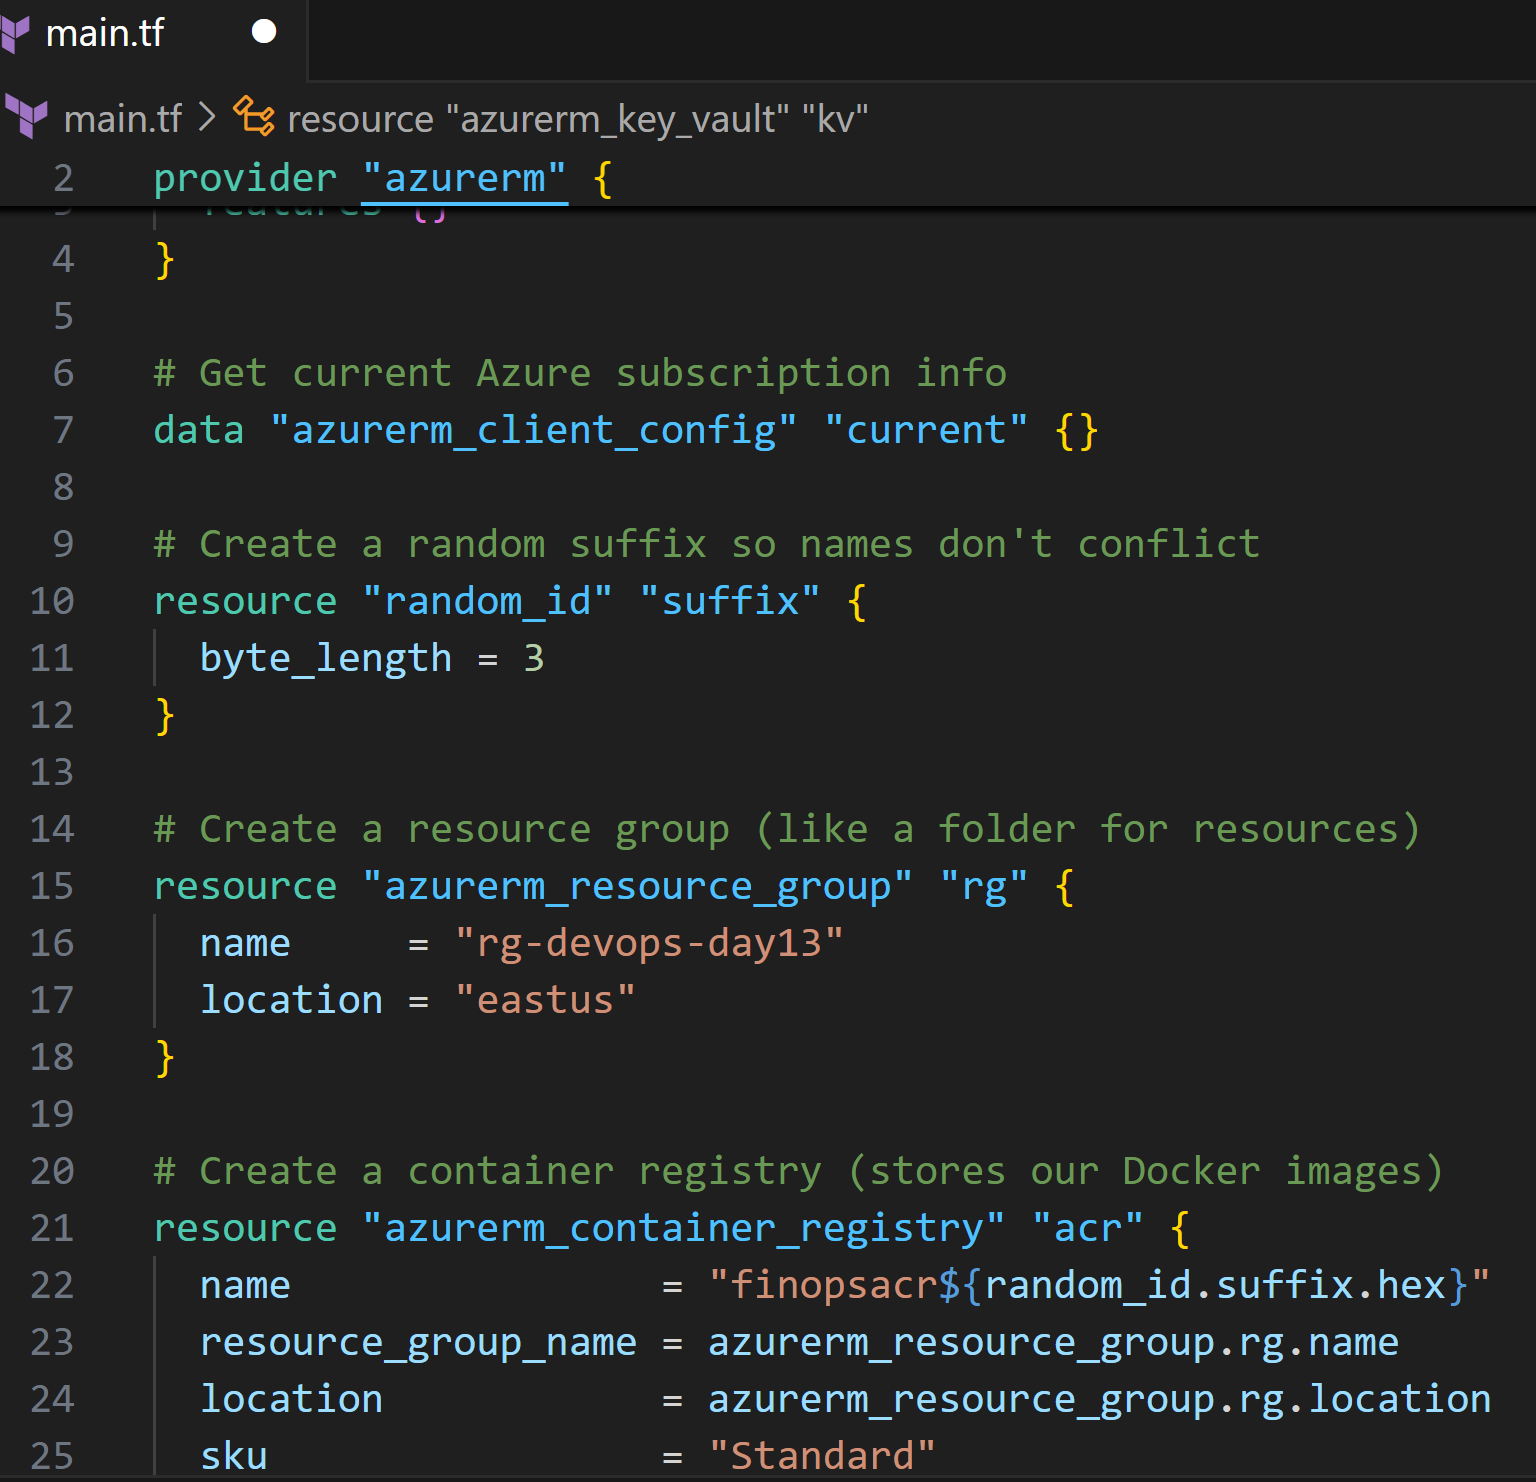
main.tf
# Tell Terraform we're using Azure
provider "azurerm" {
  features {}
}

# Get current Azure subscription info
data "azurerm_client_config" "current" {}

# Create a random suffix so names don't conflict
resource "random_id" "suffix" {
  byte_length = 3
}

# Create a resource group (like a folder for resources)
resource "azurerm_resource_group" "rg" {
  name     = "rg-devops-day13"
  location = "eastus"
}

# Create a container registry (stores our Docker images)
resource "azurerm_container_registry" "acr" {
  name                = "finopsacr${random_id.suffix.hex}"
  resource_group_name = azurerm_resource_group.rg.name
  location            = azurerm_resource_group.rg.location
  sku                 = "Standard"
  admin_enabled       = false  # We'll use service principals (more secure)
}

# Create Log Analytics workspace (for monitoring)
resource "azurerm_log_analytics_workspace" "law" {
  name                = "law-devops-day13"
  location            = azurerm_resource_group.rg.location
  resource_group_name = azurerm_resource_group.rg.name
  sku                 = "PerGB2018"
  retention_in_days   = 30
}

# Create Container Apps environment
resource "azurerm_container_app_environment" "aca_env" {
  name                       = "aca-env-day13"
  location                   = azurerm_resource_group.rg.location
  resource_group_name        = azurerm_resource_group.rg.name
  log_analytics_workspace_id = azurerm_log_analytics_workspace.law.id
}

# Create Key Vault (for storing secrets)
resource "azurerm_key_vault" "kv" {
  name                        = "kv-day13-${random_id.suffix.hex}"
  location                    = azurerm_resource_group.rg.location
  resource_group_name         = azurerm_resource_group.rg.name
  tenant_id                   = data.azurerm_client_config.current.tenant_id
  sku_name                    = "standard"
  soft_delete_retention_days  = 7
  purge_protection_enabled    = false  # Set true in production
}
outputs.tf (these values we’ll need later)
output "acr_login_server" {
  value       = azurerm_container_registry.acr.login_server
  description = "The ACR login server URL"
}

output "acr_name" {
  value       = azurerm_container_registry.acr.name
  description = "The ACR name"
}

output "aca_env_id" {
  value       = azurerm_container_app_environment.aca_env.id
  description = "Container Apps Environment ID"
}

output "resource_group_name" {
  value       = azurerm_resource_group.rg.name
  description = "Resource Group name"
}

output "key_vault_name" {
  value       = azurerm_key_vault.kv.name
  description = "Key Vault name"
}

Deploy the Infrastructure
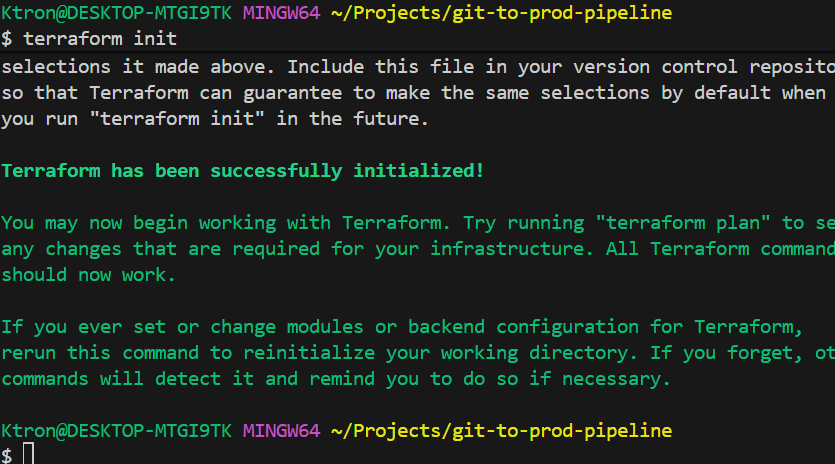
# Initialize Terraform (downloads Azure provider)
terraform init

# See what will be created (dry run)
terraform plan

# Create the resources (type 'yes' when prompted)
terraform apply
This will take 3-5 minutes. ☕ Grab a coffee!


IMPORTANT: Save the output values! You’ll see something like:
acr_login_server = "finopsacrabcd123.azurecr.io"
resource_group_name = "rg-devops-day13"
Write these down or copy to a notepad!
Step 3: Creating a Simple Application
Let’s create a basic Node.js API to deploy. Don’t worry you can replace this with your own app later.
# Create app directory
mkdir app
cd app
npm init -y
npm install express

app/index.js
const express = require('express');
const app = express();
const port = process.env.PORT || 80;

app.get('/', (req, res) => {
  res.json({
    message: 'Hello from Azure Container Apps!',
    environment: process.env.NODE_ENV || 'development',
    version: '1.0.0'
  });
});

app.get('/health', (req, res) => {
  res.json({ status: 'healthy', timestamp: new Date() });
});

app.listen(port, '0.0.0.0', () => {
  console.log(`Server running on port ${port}`);
});

app/package.json (update the scripts section)
{
  "name": "finops-app",
  "version": "1.0.0",
  "main": "index.js",
  "scripts": {
    "start": "node index.js",
    "test": "echo 'Running tests...' && exit 0"
  },
  "dependencies": {
    "express": "^4.18.0"
  }
}

Test it locally:
node index.js
# Open browser to http://localhost:80


Step 4: Containerizing the Application
What’s a container? Think of it like a lunchbox that contains your app and everything it needs to run (Node.js, libraries, etc.). The same lunchbox works on your laptop, the staging server, and production.
app/Dockerfile
# Stage 1: Build stage (we compile/prepare here)
FROM node:18-alpine AS builder
WORKDIR /app

# Copy package files first (for better caching)
COPY package*.json ./

# Install dependencies
RUN npm ci --only=production

# Copy application code
COPY . .

# Stage 2: Runtime stage (smaller, production-ready image)
FROM node:18-alpine
WORKDIR /app

# Copy everything from builder
COPY --from=builder /app ./

# Set environment variable
ENV NODE_ENV=production

# Expose port
EXPOSE 80

# Run the app
CMD ["node", "index.js"]

Why two stages? The “builder” stage has all the tools to build your app. The “runtime” stage is lean just what’s needed to run it. This makes your final container smaller and more secure!
Test building it:
cd app
docker build -t finops-app:test .
docker run -p 80:80 finops-app:test


Step 5: Setting Up Azure DevOps
Create a Project
- Go to dev.azure.com
- Click “New Project”
- Name it “FinOps-Pipeline”
- Click “Create”

Create a Git Repository
# In your day13-cicd-pipeline directory
git init
git add .
git commit -m "Initial commit"

# Add Azure DevOps remote (get URL from Azure DevOps)
git remote add origin https://dev.azure.com/yourorg/FinOps-Pipeline/_git/FinOps-Pipeline
git push -u origin main

Create Service Connection (Azure DevOps ↔ Azure)
This lets Azure DevOps talk to your Azure account.
Step 1: Create a Service Principal
# This creates an identity for the pipeline
az ad sp create-for-rbac --name "pipeline-sp-day13" --role contributor \
  --scopes /subscriptions/YOUR_SUBSCRIPTION_ID/resourceGroups/rg-devops-day13
You’ll get output like this – SAVE IT!
{
  "appId": "12345678-1234-1234-1234-123456789abc",
  "displayName": "pipeline-sp-day13",
  "password": "super-secret-password",
  "tenant": "87654321-4321-4321-4321-abcdefghijkl"
}
Step 2: Grant ACR Access
# Get ACR ID
ACR_ID=$(az acr show --name YOUR_ACR_NAME --query id --output tsv)

# Grant push/pull permissions
az role assignment create --assignee YOUR_APP_ID \
  --role AcrPush --scope $ACR_ID

az role assignment create --assignee YOUR_APP_ID \
  --role AcrPull --scope $ACR_ID

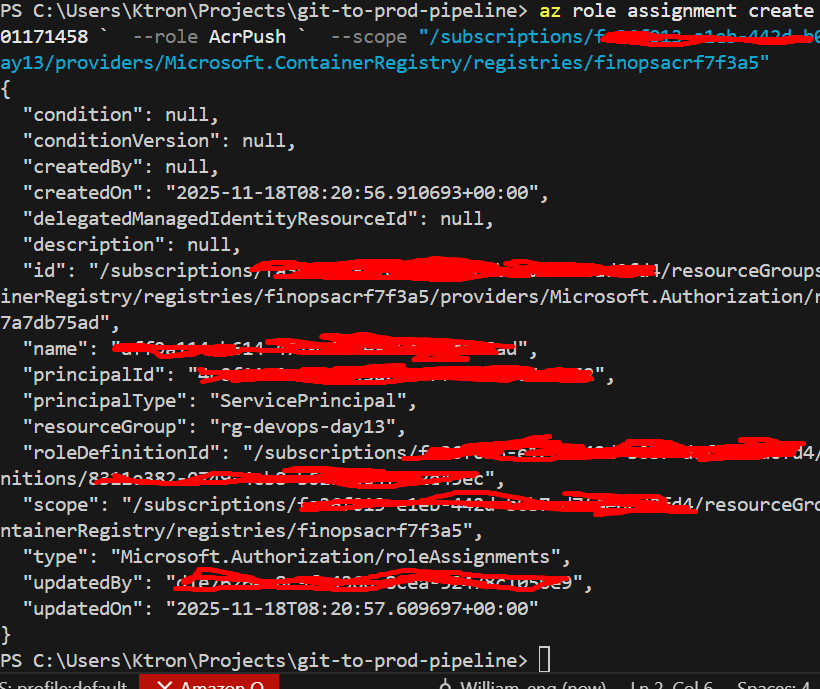
Note Here: I used Powershell to run the the Azcli command, this is because Sometimes Git Bash on Windows has issues with Azure CLI
PS: Use Linux PC (on a light note)
Step 3: Add to Azure DevOps
- In Azure DevOps: Project Settings → Service connections
- Click “New service connection”
- Choose “Azure Resource Manager”
- Choose “Service principal (manual)”
- Fill in the details from the JSON above
- Name it:
ACR-ServiceConnection - Click “Verify and save”

Step 6: Create Pipeline Variables
We need to tell the pipeline about our infrastructure.
- In Azure DevOps: Pipelines → Library
- Click “+ Variable group”
- Name it: “Pipeline-Config”
- Add these variables:
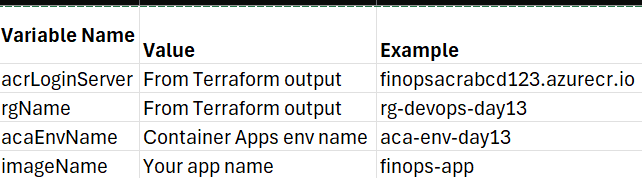
- Click “Save”

Step 7: The Pipeline YAML (The Heart of It All)
This is where the magic happens! Each stage is explained.
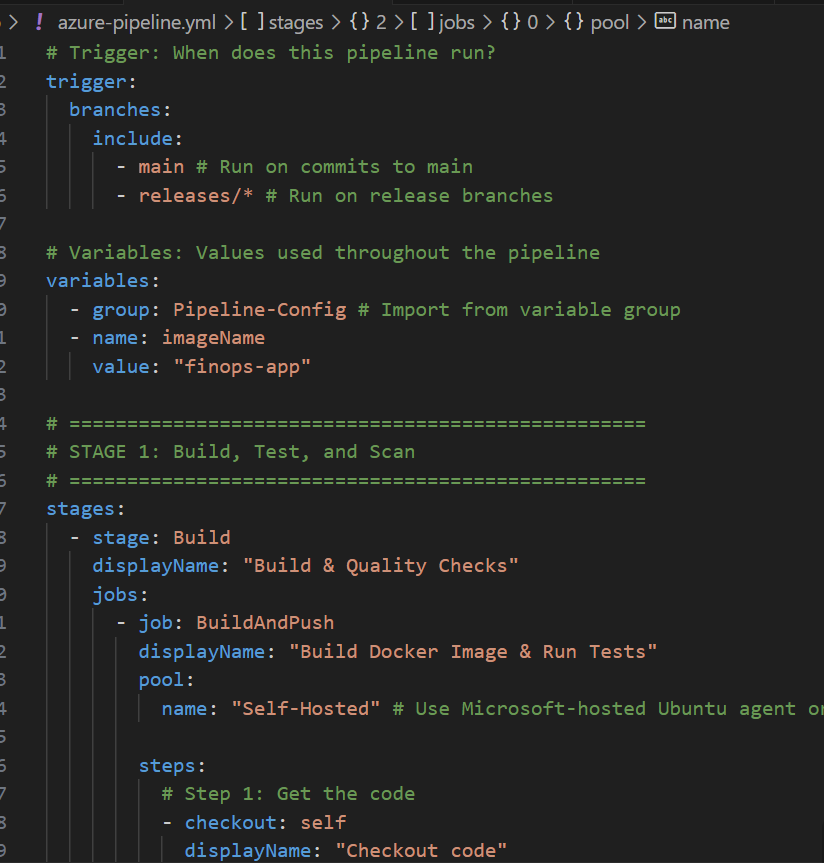
azure-pipelines.yml (in project root)
# Trigger: When does this pipeline run?
trigger:
  branches:
    include:
      - main        # Run on commits to main
      - releases/*  # Run on release branches

# Variables: Values used throughout the pipeline
variables:
  - group: Pipeline-Config  # Import from variable group
  - name: imageName
    value: 'finops-app'

# ==================================================
# STAGE 1: Build, Test, and Scan
# ==================================================
stages:
- stage: Build
  displayName: 'Build & Quality Checks'
  jobs:
  - job: BuildAndPush
    displayName: 'Build Docker Image & Run Tests'
    pool:
      vmImage: 'ubuntu-latest'  # Use Microsoft-hosted Ubuntu agent or your custom runner

    steps:
    # Step 1: Get the code
    - checkout: self
      displayName: 'Checkout code'

    # Step 2: Setup Node.js
    - task: NodeTool@0
      displayName: 'Install Node.js'
      inputs:
        versionSpec: '18.x'

    # Step 3: Install dependencies and run unit tests
    - script: |
        cd app
        npm ci
        npm test
      displayName: 'Install dependencies & run tests'
      # If tests fail, pipeline stops here!

    # Step 4: Build and push Docker image to ACR
    - task: Docker@2
      displayName: 'Build and push image to ACR'
      inputs:
        containerRegistry: 'ACR-ServiceConnection'  # The connection we created
        repository: '$(imageName)'
        command: 'buildAndPush'
        Dockerfile: 'app/Dockerfile'
        tags: |
          $(Build.BuildId)
          latest
      # This creates tags like: finops-app:12345 and finops-app:latest

    # Step 5: Scan for security vulnerabilities
    - task: Bash@3
      displayName: 'Security scan with Trivy'
      inputs:
        targetType: 'inline'
        script: |
          # Install Trivy
          wget -qO - https://aquasecurity.github.io/trivy-repo/deb/public.key | sudo apt-key add -
          echo "deb https://aquasecurity.github.io/trivy-repo/deb $(lsb_release -sc) main" | sudo tee /etc/apt/sources.list.d/trivy.list
          sudo apt-get update
          sudo apt-get install trivy -y

          # Scan the image we just built
          trivy image $(acrLoginServer)/$(imageName):$(Build.BuildId) \
            --severity HIGH,CRITICAL \
            --exit-code 1
          # exit-code 1 means: fail the build if vulnerabilities found

# ==================================================
# STAGE 2: Deploy to Staging
# ==================================================
- stage: DeployStaging
  displayName: 'Deploy to Staging Environment'
  dependsOn: Build  # Only run if Build stage succeeded
  jobs:
  - deployment: DeployToStaging
    displayName: 'Deploy to ACA Staging'
    environment: 'staging'  # Create this in Azure DevOps
    pool:
      vmImage: 'ubuntu-latest'

    strategy:
      runOnce:
        deploy:
          steps:
          # Deploy to Container Apps
          - task: AzureCLI@2
            displayName: 'Deploy container to staging'
            inputs:
              azureSubscription: 'ACR-ServiceConnection'
              scriptType: 'bash'
              scriptLocation: 'inlineScript'
              inlineScript: |
                # Variables
                IMAGE="$(acrLoginServer)/$(imageName):$(Build.BuildId)"
                APP_NAME="finops-app-staging"

                echo "Deploying image: $IMAGE"

                # Check if app exists
                if az containerapp show --name $APP_NAME --resource-group $(rgName) &> /dev/null; then
                  echo "Updating existing app..."
                  az containerapp update \
                    --name $APP_NAME \
                    --resource-group $(rgName) \
                    --image $IMAGE
                else
                  echo "Creating new app..."
                  az containerapp create \
                    --name $APP_NAME \
                    --resource-group $(rgName) \
                    --environment $(acaEnvName) \
                    --image $IMAGE \
                    --registry-server $(acrLoginServer) \
                    --registry-identity system \
                    --ingress external \
                    --target-port 80 \
                    --env-vars NODE_ENV=staging \
                    --min-replicas 1 \
                    --max-replicas 3
                fi

                # Get the app URL
                FQDN=$(az containerapp show \
                  --name $APP_NAME \
                  --resource-group $(rgName) \
                  --query properties.configuration.ingress.fqdn \
                  --output tsv)

                echo "Staging URL: https://$FQDN"
                echo "##vso[task.setvariable variable=stagingUrl]https://$FQDN"

          # Wait for app to be ready
          - task: Bash@3
            displayName: 'Health check'
            inputs:
              targetType: 'inline'
              script: |
                echo "Waiting for app to be healthy..."
                for i in {1..10}; do
                  if curl -f $(stagingUrl)/health; then
                    echo "App is healthy!"
                    exit 0
                  fi
                  echo "Attempt $i failed, retrying in 10s..."
                  sleep 10
                done
                echo "Health check failed!"
                exit 1

          # Run integration tests
          - task: Bash@3
            displayName: 'Integration tests'
            inputs:
              targetType: 'inline'
              script: |
                echo "Running integration tests against $(stagingUrl)"

                # Test 1: Check root endpoint
                RESPONSE=$(curl -s $(stagingUrl)/)
                if echo $RESPONSE | grep -q "Hello from Azure Container Apps"; then
                  echo "✅ Root endpoint test passed"
                else
                  echo "❌ Root endpoint test failed"
                  exit 1
                fi

                # Test 2: Check health endpoint
                if curl -f $(stagingUrl)/health; then
                  echo "✅ Health endpoint test passed"
                else
                  echo "❌ Health endpoint test failed"
                  exit 1
                fi

                echo "All integration tests passed!"

# ==================================================
# STAGE 3: Deploy to Production (with approval)
# ==================================================
- stage: DeployProduction
  displayName: 'Deploy to Production'
  dependsOn: DeployStaging  # Only run if staging succeeded
  jobs:
  - deployment: DeployToProd
    displayName: 'Deploy to ACA Production'
    environment: 'production'  # Create this with approvers!
    pool:
      vmImage: 'ubuntu-latest'

    strategy:
      runOnce:
        deploy:
          steps:
          # Deploy to production
          - task: AzureCLI@2
            displayName: 'Deploy container to production'
            inputs:
              azureSubscription: 'ACR-ServiceConnection'
              scriptType: 'bash'
              scriptLocation: 'inlineScript'
              inlineScript: |
                IMAGE="$(acrLoginServer)/$(imageName):$(Build.BuildId)"
                APP_NAME="finops-app-prod"

                echo "Deploying to PRODUCTION: $IMAGE"

                if az containerapp show --name $APP_NAME --resource-group $(rgName) &> /dev/null; then
                  echo "Updating production app..."
                  az containerapp update \
                    --name $APP_NAME \
                    --resource-group $(rgName) \
                    --image $IMAGE
                else
                  echo "Creating production app..."
                  az containerapp create \
                    --name $APP_NAME \
                    --resource-group $(rgName) \
                    --environment $(acaEnvName) \
                    --image $IMAGE \
                    --registry-server $(acrLoginServer) \
                    --registry-identity system \
                    --ingress external \
                    --target-port 80 \
                    --env-vars NODE_ENV=production \
                    --min-replicas 2 \
                    --max-replicas 10
                fi

                PROD_URL=$(az containerapp show \
                  --name $APP_NAME \
                  --resource-group $(rgName) \
                  --query properties.configuration.ingress.fqdn \
                  --output tsv)

                echo "🚀 Production URL: https://$PROD_URL"

          # Verify production deployment
          - task: Bash@3
            displayName: 'Verify production'
            inputs:
              targetType: 'inline'
              script: |
                echo "Verifying production deployment..."
                sleep 15

                PROD_URL=$(az containerapp show \
                  --name finops-app-prod \
                  --resource-group $(rgName) \
                  --query properties.configuration.ingress.fqdn \
                  --output tsv)

                if curl -f https://$PROD_URL/health; then
                  echo "✅ Production is healthy!"
                else
                  echo "❌ Production health check failed!"
                  exit 1
                fi
Step 8: Setting Up Environments (The Approval Gate)
This is crucial! We want a human to approve before production.
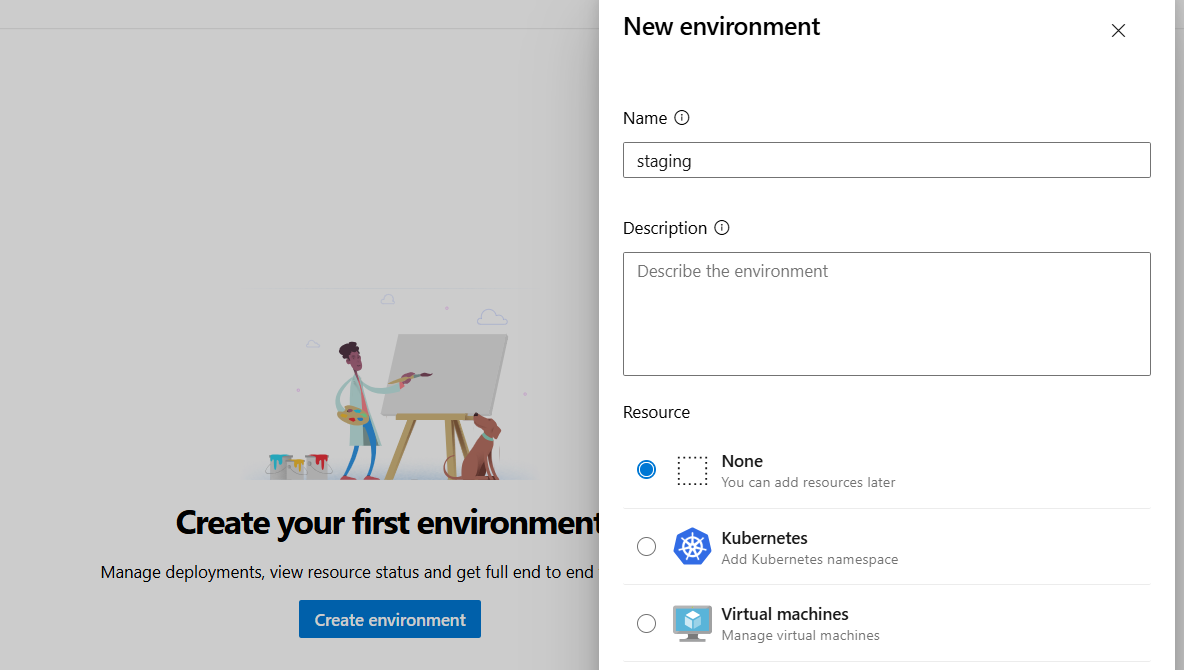
Create Staging Environment
- Azure DevOps → Pipelines → Environments
- Click “New environment”
- Name:
staging - Click “Create”
Create Production Environment (with approval)
- Click “New environment”
- Name:
production - Click “Create”
- Click on the
productionenvironment - Click the “…” menu → “Approvals and checks”
- Click “+ Add” → “Approvals”
- Add yourself (or your team) as approvers
- Set timeout: 30 days
- Click “Create”

Now, every production deployment will wait for your approval!
Step 9: Running Your First Pipeline
# Make sure everything is committed
git add .
git commit -m "Add pipeline configuration"
git push origin main

Create the Pipeline in Azure DevOps
- Go to Pipelines → Pipelines
- Click “New pipeline”
- Select “Azure Repos Git”
- Select your repository
- Choose “Existing Azure Pipelines YAML file”
- Select
/azure-pipelines.yml - Click “Run”

Watch the magic happen! 🎉
What You’ll See
- Build Stage (~5 minutes)
- Code checkout
- Tests running
- Docker build
- Image pushed to ACR
- Security scan
- Staging Stage (~3 minutes)
- Container deployed
- Health checks
- Integration tests
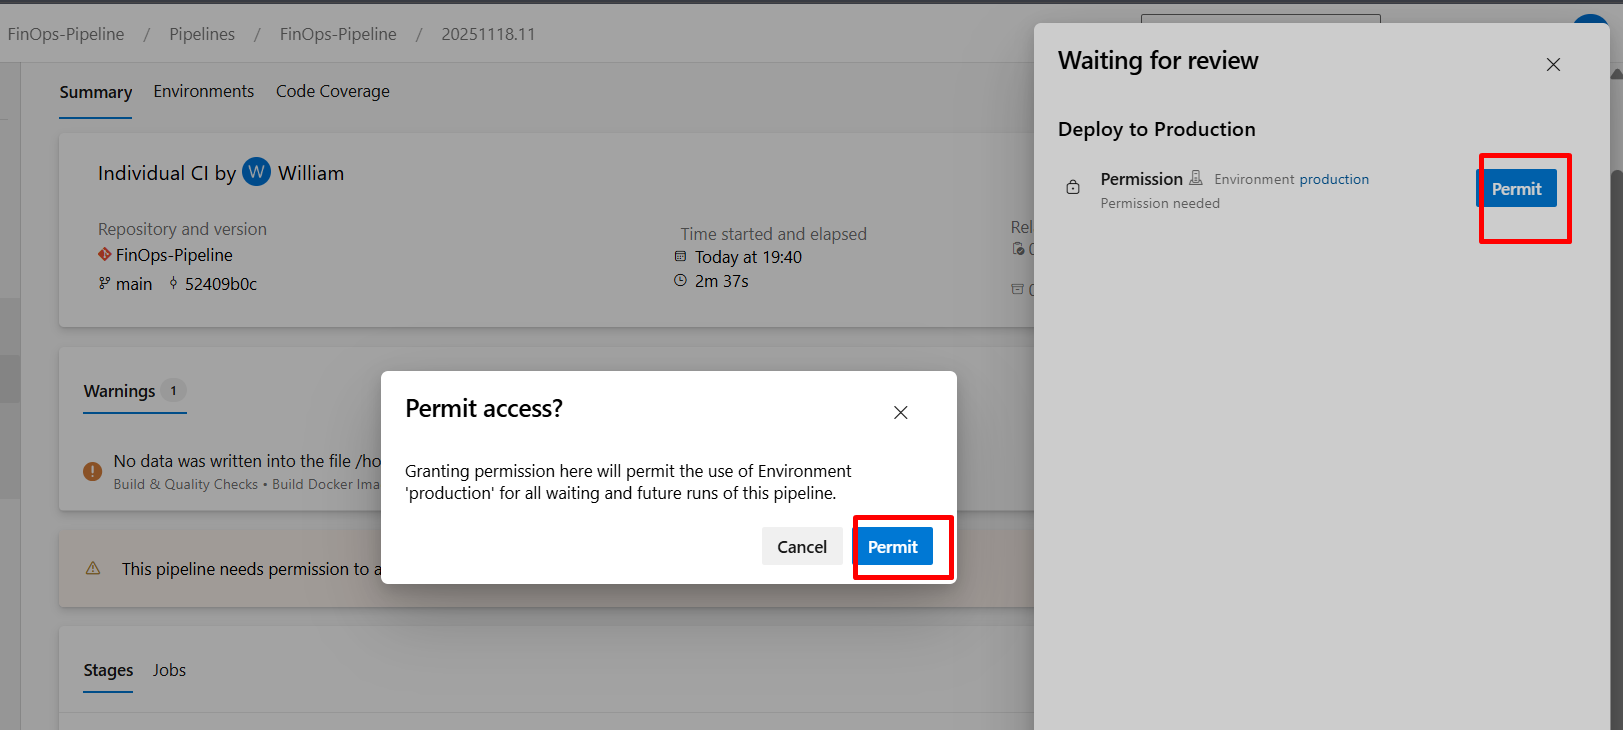
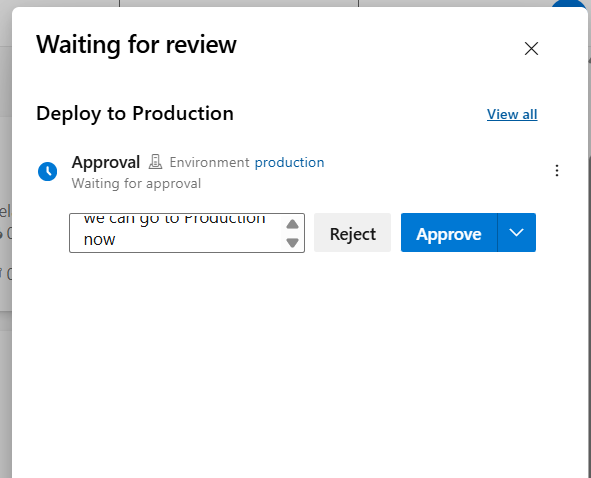
- Production Stage (waiting for you!)
- You’ll get an email/notification
- Review the staging deployment
- Click “Approve” or “Reject”
- If approved, deployment continues


Observability & Monitoring
The Container Apps environment automatically forwards logs to Log Analytics. I also:
- Added Application Insights SDK to the app for telemetry
- Created a post-deployment health check:
az monitor metrics list --resource finops-app-staging --resource-group rg-devops-day13 --resource-type Microsoft.App/containerApps --metric Requests --start-time (Get-Date).ToUniversalTime().AddMinutes(-5).ToString("yyyy-MM-ddTHH:mm:ssZ")
Key Takeaways
- Immutable artifacts: The same image that passes tests in staging goes to prod—no rebuild surprises
- Quality gates: Tests, scans, and approvals catch issues before production
- Visibility: Every stage logs to the same workspace, full traceability
- Container Apps: Modern, serverless deployment without K8s complexity
BONUS AI LOG TEST
Part 1: Set Up Azure Storage
Step 1: Create Storage Account
- Azure Portal → Click “+ Create a resource”
- Search: “Storage account”
- Click “Create”
Configuration:
- Subscription: Your subscription
- Resource Group:
rg-devops-day13 - Storage account name:
aitest+ random numbers (e.g.,aitest20241119)- Must be globally unique, 3-24 chars, lowercase only
- Region:
East US - Performance:
Standard - Redundancy:
Locally-redundant storage (LRS)
- Click “Review + create” → “Create”
- Wait ~1 minute for deployment
- Click “Go to resource”

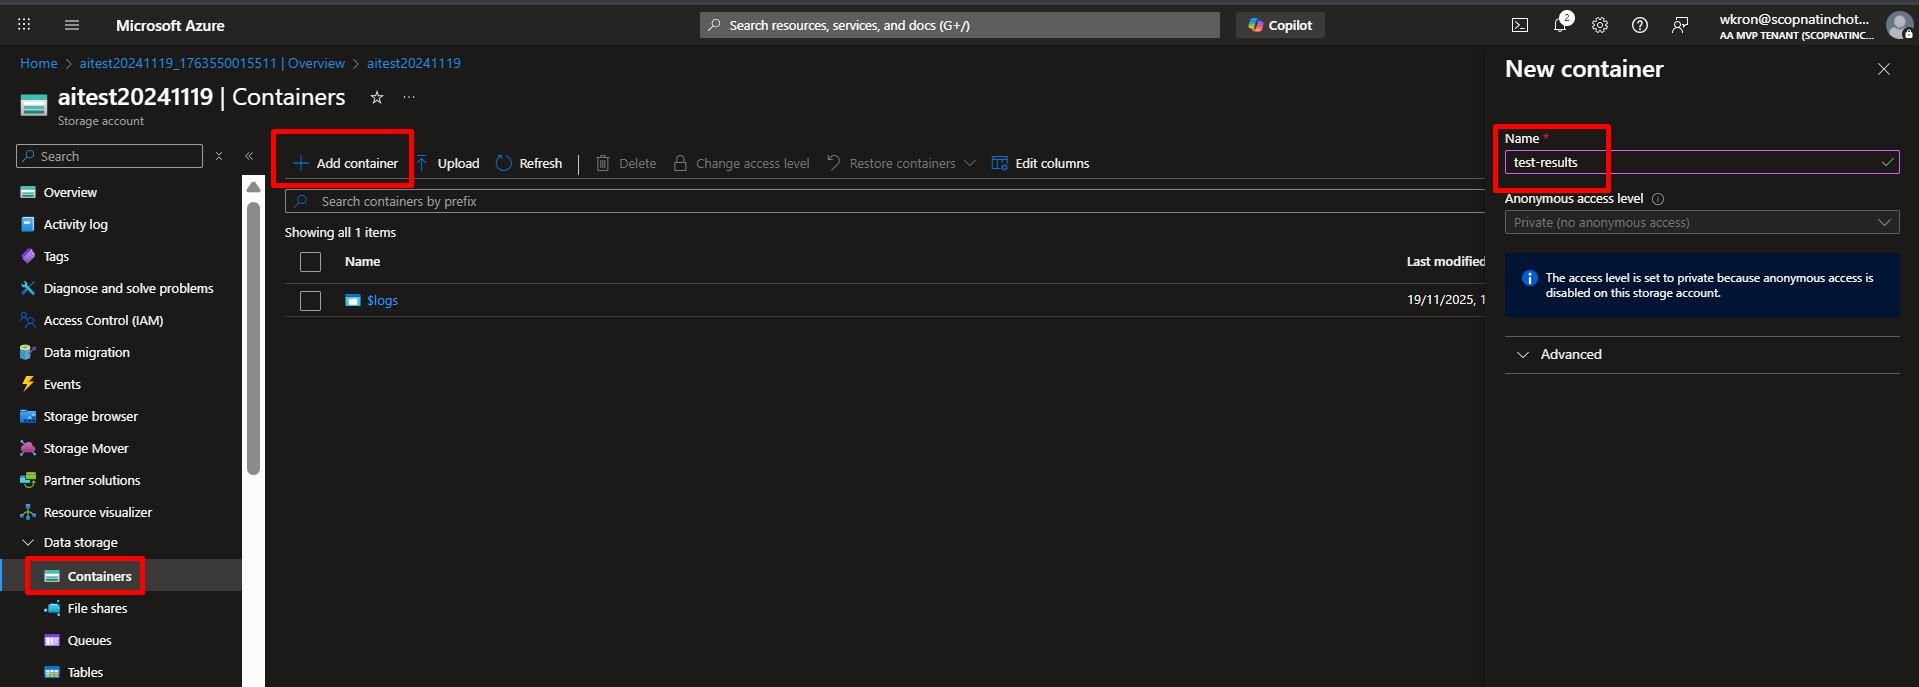
Step 2: Create Container for Test Files
- In your storage account, left menu → “Containers”
- Click “+ Container”
- Name:
test-results - Public access level:
Private - Click “Create”
Step 3: Upload a Sample Test Result File
Let’s create a sample test result to work with.
- On your local computer, create a file called
sample-test.xml:
<?xml version="1.0" encoding="UTF-8"?>
<testsuites>
  <testsuite name="API Tests" tests="5" failures="2" errors="0" time="2.345">
    <testcase classname="api.UserTests" name="test_create_user" time="0.123">
      <!-- This test passed -->
    </testcase>
    <testcase classname="api.UserTests" name="test_login" time="0.456">
      <failure message="Connection timeout">
        Error: Connection to database timed out after 30 seconds
        Expected: Successful login
        Actual: TimeoutError
        Stack trace:
          at Database.connect (db.js:45)
          at User.authenticate (user.js:23)
      </failure>
    </testcase>
    <testcase classname="api.ProductTests" name="test_get_products" time="0.234">
      <!-- This test passed -->
    </testcase>
    <testcase classname="api.ProductTests" name="test_create_product" time="0.567">
      <failure message="Validation failed">
        Error: Product validation failed - missing required field 'price'
        Expected: Product created successfully
        Actual: ValidationError: price is required
        Stack trace:
          at Product.validate (product.js:78)
          at Product.save (product.js:102)
      </failure>
    </testcase>
    <testcase classname="api.OrderTests" name="test_create_order" time="0.965">
      <!-- This test passed -->
    </testcase>
  </testsuite>
</testsuites>

- Upload the file:
- In Azure Portal, your storage account → “Containers” → Click “test-results”
- Click “Upload”
- Click “Browse for files” → Select your
sample-test.xml - Click “Upload”

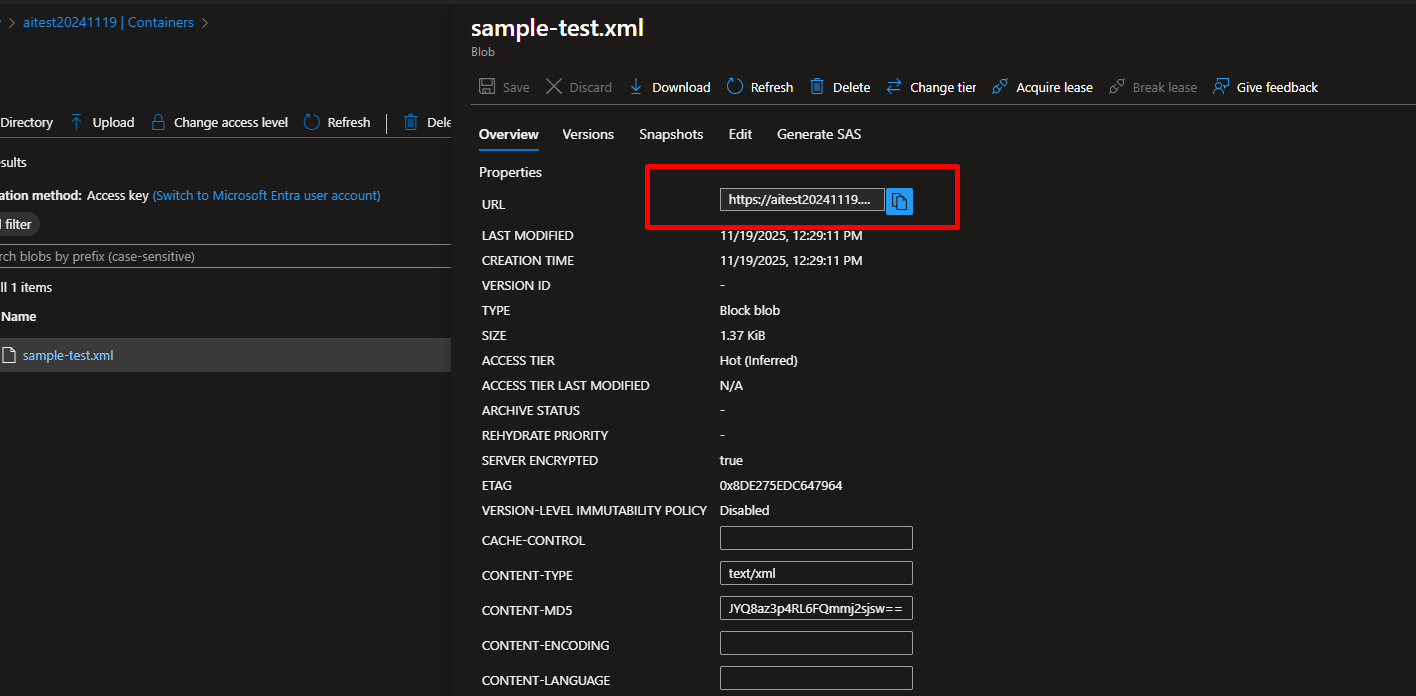
- Get the file URL:
- Click on the uploaded file:
sample-test.xml - Copy the URL (looks like:
https://aitest20241119.blob.core.windows.net/test-results/sample-test.xml) - Save this URL in Notepad
Step 4: Generate SAS Token (for secure access)
- Click on your uploaded file:
sample-test.xml - Click “Generate SAS” tab at the left tab
- Permissions: Check
Read - Start time: Today’s date
- Expiry time: Tomorrow (or 1 week from now)
- Click “Generate SAS token and URL”
- Copy the “Blob SAS URL” (this includes the token)
- Save in Notepad as:
FILE_URL_WITH_SAS

Part 2: Set Up Azure OpenAI Service
Step 1: Create Azure OpenAI Resource
- Azure Portal → “+ Create a resource”
- Search: “Azure OpenAI”
- Click “Create”
Configuration:
- Subscription: Your subscription
- Resource Group:
rg-devops-day13 - Region: Choose one with GPT-4 availability:
East US,South Central US,West Europe, orFrance Central- Name:
openai-test-analyzer - Pricing tier:
Standard S0
- Click “Review + create” → “Create”
- Wait 2-3 minutes
- Click “Go to resource”

Step 2: Deploy GPT-4 Model
- In your Azure OpenAI resource, click “Explore AI Foundry Portal” button
- Or go directly to: https://ai.azure.com
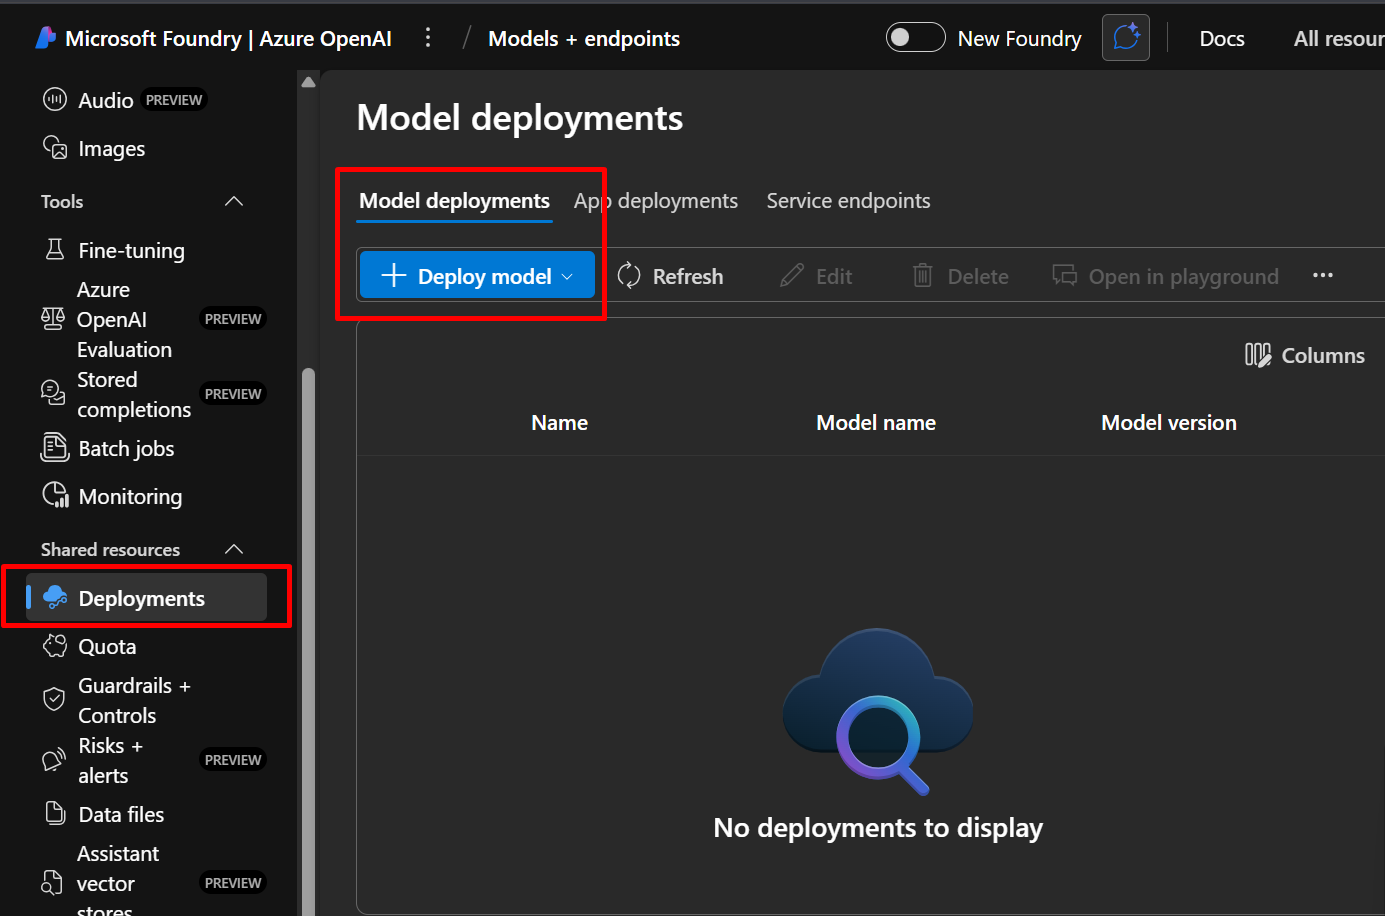
- Click “Deployments” in the left sidebar
- Click “+ Create new deployment” or “Deploy model”
Configuration:
- Click “Select a model” → Choose “gpt-4” or “gpt-4o”
- If not available, use “gpt-35-turbo” for testing
- Deployment name:
test-analyzer - Deployment type:
Standard - Tokens per minute rate limit:
100K(for testing) - Click “Create”
Wait ~1 minute for deployment.

Step 3: Get Your API Credentials
- In Azure OpenAI Studio, click on your deployment:
test-analyzer - Click “Playground” → “Chat”
- On the right side, click “View code”
- You’ll see code samples with your credentials

Copy these values:
- Endpoint:
https://openai-test-analyzer.openai.azure.com/ - Key: Click “Show key” in the code sample
- Deployment name:
test-analyzer

Or get them from Azure Portal:
- Go back to Azure Portal → Your OpenAI resource
- Click “Keys and Endpoint” (left menu)
- Copy:
- Endpoint
- KEY 1
Save all in Notepad:
Part 3: Test OpenAI in the Portal (Playground)
Let’s test the AI with our test results manually first.
Step 1: Download Your Test File Content
- Go to Storage Account → Containers → test-results → sample-test.xml
- Click “Edit” or “Download”
- Copy the entire XML content
Step 2: Test in OpenAI Playground
- Azure OpenAI Studio → “Chat playground”
- Select your deployment:
test-analyzer - In the System message box, paste:
You are an expert test automation engineer. Analyze JUnit test results and provide:
1. A concise summary of what failed
2. Likely root causes
3. Recommended fixes
4. Confidence score (0-100) Format your response as JSON. 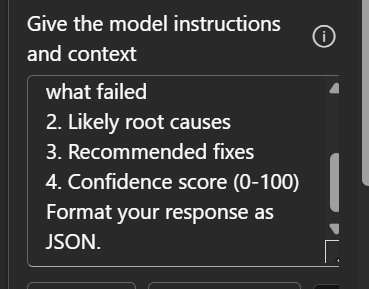
- In the User message box, paste:
Analyze these test results:
<?xml version="1.0" encoding="UTF-8"?>
<testsuites>
  <testsuite name="API Tests" tests="5" failures="2" errors="0" time="2.345">
    <testcase classname="api.UserTests" name="test_create_user" time="0.123"/>
    <testcase classname="api.UserTests" name="test_login" time="0.456">
      <failure message="Connection timeout">
        Error: Connection to database timed out after 30 seconds
        Expected: Successful login
        Actual: TimeoutError
      </failure>
    </testcase>
    <testcase classname="api.ProductTests" name="test_get_products" time="0.234"/>
    <testcase classname="api.ProductTests" name="test_create_product" time="0.567">
      <failure message="Validation failed">
        Error: Product validation failed - missing required field 'price'
        Expected: Product created successfully
        Actual: ValidationError: price is required
      </failure>
    </testcase>
    <testcase classname="api.OrderTests" name="test_create_order" time="0.965"/>
  </testsuite>
</testsuites>
- Click “Run” or press Ctrl+Enter

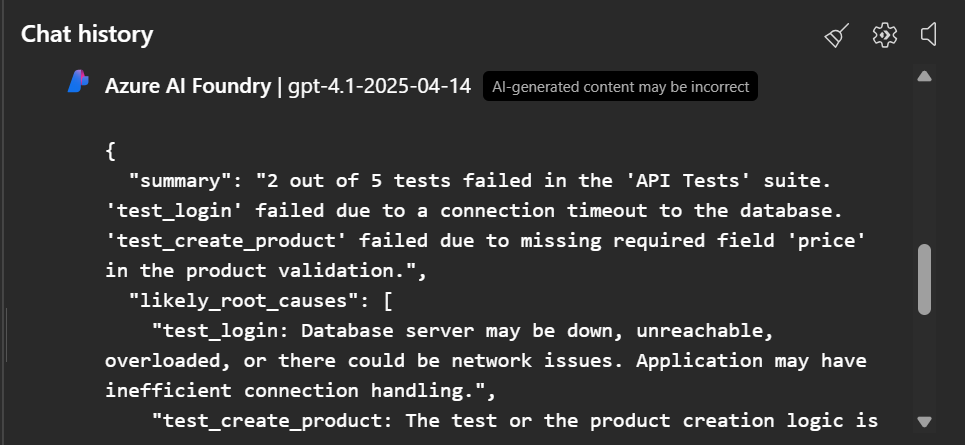
You should see a response like:
{
  "summary": "2 out of 5 tests failed in the API test suite. Failures are related to database connectivity and data validation issues.",
  "root_causes": [
    "Database connection timeout (30 seconds) - indicates network issues, database overload, or incorrect connection configuration",
    "Missing required field validation - 'price' field is not being set before product creation"
  ],
  "recommendations": [
    "Check database connection string and network connectivity",
    "Increase database connection timeout or optimize queries",
    "Add validation to ensure 'price' field is populated before calling create_product",
    "Implement retry logic for database connections",
    "Add input validation tests before integration tests"
  ],
  "confidence_score": 90,
  "additional_notes": "Both failures appear to be integration issues rather than logic errors. The database timeout suggests infrastructure problems, while the validation error indicates missing test data setup."
}
If you see this, your OpenAI setup is working!
Part 4: Create Azure Function to Automate This
Now let’s build a function that does this automatically.
Step 1: Create Flex Consumption Function App
- Azure Portal → “+ Create a resource”
- Search: “Function App” → “Create”
NEW: You’ll see “Select a hosting option” page
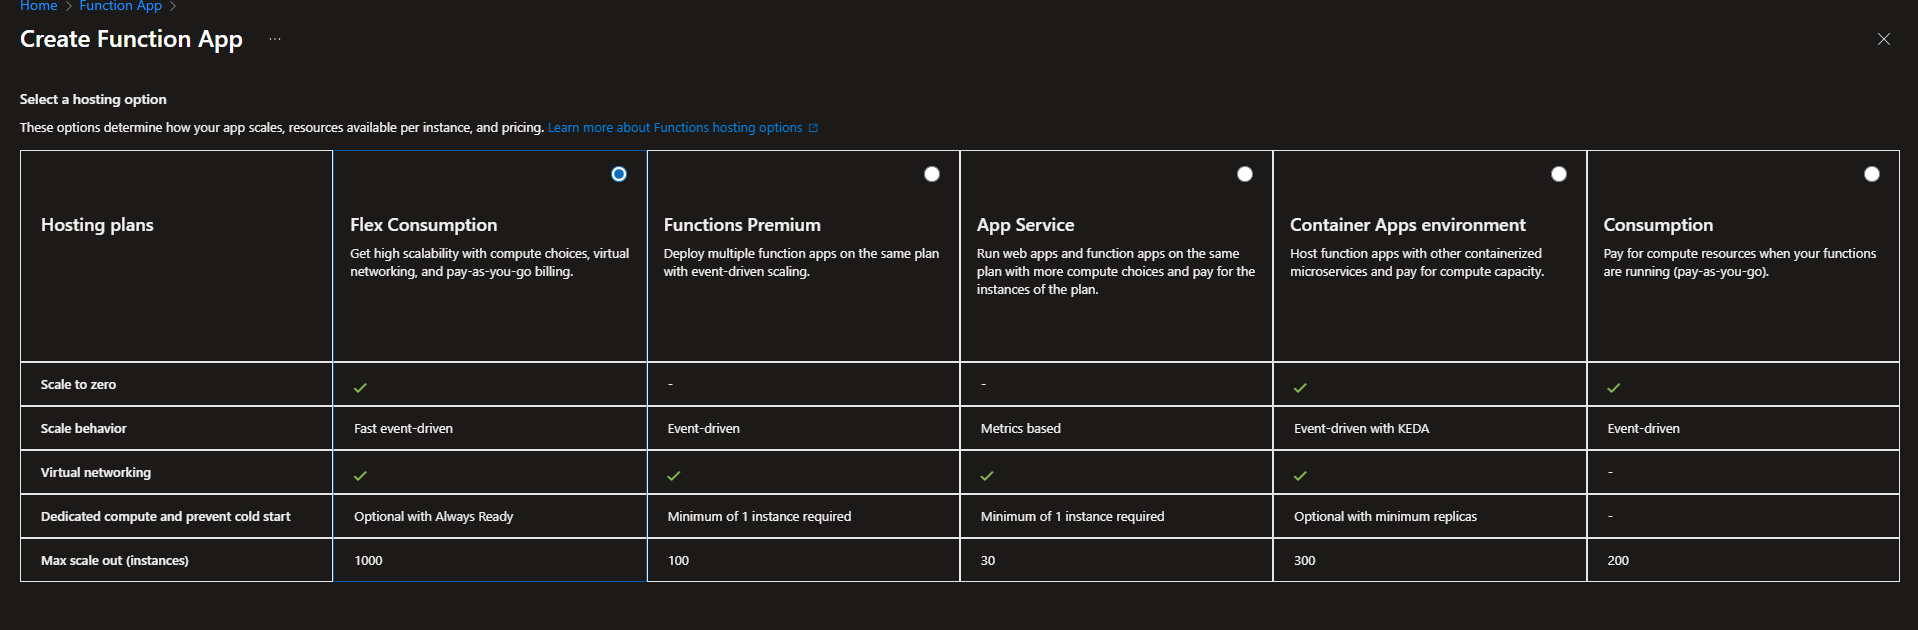
- Under “Select a hosting option”, choose:
- Flex Consumption → “Select”
Note: This is the recommended serverless plan with faster scaling and better features
On the Basics page:
Subscription: Your subscription
Resource Group: rg-devops-day13
Function App name: testanalyzer + randome.g., testanalyzer2024nov
Region: East US
Runtime stack: Python (Python 3.11 recommended)
Version: 3.11 (Latest stable)- Click “Next: Storage”
On the Storage page:
- Storage account: Accept default (creates new) or select existing
- Keep default settings
- Click “Next: Monitoring”
On the Monitoring page:
- Enable Application Insights: Yes (checked)
- Application Insights: Create new or use existing
- Log Analytics Workspace: Create new or select existing
- Click “Next: Authentication” (NEW tab in Flex Consumption)
On the Authentication page:
- Authentication type: Managed identity for all resources (Recommended)
- This automatically creates a system-assigned managed identity
- More secure than connection strings
- Click “Review + create”
- Review your settings
- Click “Create”
- Wait 2-3 minutes for deployment
- Click “Go to resource”

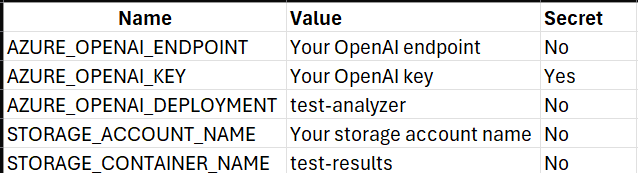
Step 2: Configure Environment Variables
- In your Function App, click “Environment variables” (left menu under Settings)
- Click “Add under app setting”
Add these one by one (click “+ New application setting” for each):
- Click “Save” at the top
- Click “Continue” when prompted
Step 3: Create the Function
- In your Function App, click “Functions” (left menu)
- Click “+ Create”
- Development environment:
Develop in portal - Select a template:
HTTP trigger - Template details:
- Function name:
AnalyzeTest - Authorization level:
Function
- Function name:
- Click “Create”
Step 4: Add the Code
- Click on your new function:
AnalyzeTest - Click “Code + Test” (left menu)
- You’ll see
__init__.py– replace ALL content with:
python
import logging
import json
import os
import azure.functions as func
from azure.storage.blob import BlobServiceClient
from openai import AzureOpenAI
import xml.etree.ElementTree as ET

def main(req: func.HttpRequest) -> func.HttpResponse:
    logging.info('Test analyzer function triggered')

    try:
        # Get blob name from request
        req_body = req.get_json()
        blob_name = req_body.get('blob_name', 'sample-test.xml')

        logging.info(f'Analyzing blob: {blob_name}')

        # Step 1: Download test results from blob storage
        storage_account = os.environ['STORAGE_ACCOUNT_NAME']
        container_name = os.environ['STORAGE_CONTAINER_NAME']

        connection_string = f"DefaultEndpointsProtocol=https;AccountName={storage_account};AccountKey={os.environ.get('STORAGE_ACCOUNT_KEY', '')};EndpointSuffix=core.windows.net"

        # For managed identity (more secure)
        from azure.identity import DefaultAzureCredential
        credential = DefaultAzureCredential()
        blob_service_client = BlobServiceClient(
            account_url=f"https://{storage_account}.blob.core.windows.net",
            credential=credential
        )

        blob_client = blob_service_client.get_blob_client(
            container=container_name,
            blob=blob_name
        )

        xml_content = blob_client.download_blob().readall().decode('utf-8')
        logging.info('Test results downloaded successfully')

        # Step 2: Parse the XML
        test_summary = parse_junit_xml(xml_content)
        logging.info(f'Parsed test results: {test_summary}')

        # Step 3: Send to OpenAI for analysis
        ai_analysis = analyze_with_openai(xml_content, test_summary)
        logging.info('AI analysis completed')

        # Step 4: Return results
        response = {
            "test_summary": test_summary,
            "ai_insights": ai_analysis,
            "status": "success"
        }

        return func.HttpResponse(
            json.dumps(response, indent=2),
            mimetype="application/json",
            status_code=200
        )

    except Exception as e:
        logging.error(f'Error: {str(e)}', exc_info=True)
        return func.HttpResponse(
            json.dumps({
                "status": "error",
                "message": str(e)
            }),
            mimetype="application/json",
            status_code=500
        )

def parse_junit_xml(xml_content):
    """Parse JUnit XML test results"""
    try:
        root = ET.fromstring(xml_content)

        total_tests = 0
        failures = 0
        errors = 0
        failed_tests = []

        # Find all testsuites
        for testsuite in root.findall('.//testsuite'):
            total_tests += int(testsuite.get('tests', 0))
            failures += int(testsuite.get('failures', 0))
            errors += int(testsuite.get('errors', 0))

            # Get details of failed tests
            for testcase in testsuite.findall('.//testcase'):
                failure = testcase.find('failure')
                error = testcase.find('error')

                if failure is not None or error is not None:
                    element = failure if failure is not None else error
                    failed_tests.append({
                        'name': testcase.get('name'),
                        'class': testcase.get('classname'),
                        'message': element.get('message', ''),
                        'details': element.text or ''
                    })

        return {
            'total': total_tests,
            'passed': total_tests - failures - errors,
            'failures': failures,
            'errors': errors,
            'failed_tests': failed_tests
        }
    except Exception as e:
        logging.error(f'XML parsing error: {str(e)}')
        return {
            'total': 0,
            'passed': 0,
            'failures': 0,
            'errors': 0,
            'failed_tests': [],
            'error': str(e)
        }

def analyze_with_openai(xml_content, test_summary):
    """Use Azure OpenAI to analyze test failures"""
    try:
        client = AzureOpenAI(
            api_key=os.environ['AZURE_OPENAI_KEY'],
            api_version="2024-02-01",
            azure_endpoint=os.environ['AZURE_OPENAI_ENDPOINT']
        )

        # Build prompt
        prompt = f"""Analyze these JUnit test results:

Test Summary:
- Total tests: {test_summary['total']}
- Passed: {test_summary['passed']}
- Failed: {test_summary['failures']}
- Errors: {test_summary['errors']}

Failed Tests Details:
{json.dumps(test_summary['failed_tests'], indent=2)}

Provide a JSON response with:
1. "summary": Brief overview (2-3 sentences)
2. "root_causes": Array of likely root causes
3. "recommendations": Array of specific fixes
4. "confidence_score": Your confidence (0-100)
5. "priority": "high", "medium", or "low"

Be specific and actionable."""

        response = client.chat.completions.create(
            model=os.environ['AZURE_OPENAI_DEPLOYMENT'],
            messages=[
                {
                    "role": "system",
                    "content": "You are an expert test automation engineer. Analyze test failures and provide actionable insights in JSON format only."
                },
                {
                    "role": "user",
                    "content": prompt
                }
            ],
            temperature=0.3,
            max_tokens=1000,
            response_format={ "type": "json_object" }
        )

        ai_response = response.choices[0].message.content
        return json.loads(ai_response)

    except Exception as e:
        logging.error(f'OpenAI error: {str(e)}')
        return {
            "error": str(e),
            "summary": "AI analysis unavailable"
        }
- Click “Save” (top left)
Step 5: Add requirements.txt
- Still in “Code + Test”, click the dropdown next to
__init__.py - Click “+ Add”
- Filename:
requirements.txt - Content:
txt
azure-functions
azure-storage-blob
azure-identity
openai>=1.0.0
```

5. Click **"Save"**

### Step 6: Grant Function Access to Storage

1. Go back to your **Storage Account** (`aitest20241119`)
2. Click **"Access Control (IAM)"** (left menu)
3. Click **"+ Add"** → **"Add role assignment"**
4. **Role**: Search and select **"Storage Blob Data Reader"**
5. Click **"Next"**
6. **Assign access to**: `Managed identity`
7. Click **"+ Select members"**
8. **Managed identity**: `Function App`
9. Select your function app: `testanalyzer2024`
10. Click **"Select"**
11. Click **"Review + assign"** → **"Review + assign"**

---

## Part 5: Test Your Function in the Portal

### Step 1: Get the Function URL

1. Go to your Function App → **"Functions"** → Click **"AnalyzeTest"**
2. Click **"Get Function URL"**
3. Copy the URL (includes the function key)
4. Should look like:
```
https://testanalyzer2024.azurewebsites.net/api/AnalyzeTest?code=abc123...
Step 2: Test Using the Portal Test Tool
- In your function: “AnalyzeTest”, click “Test/Run” (top menu)
- HTTP method:
POST - Body:
json
{
  "blob_name": "sample-test.xml"
}
- Click “Run”
Step 3: View the Response
You should see output like:
json
{
  "test_summary": {
    "total": 5,
    "passed": 3,
    "failures": 2,
    "errors": 0,
    "failed_tests": [
      {
        "name": "test_login",
        "class": "api.UserTests",
        "message": "Connection timeout",
        "details": "Error: Connection to database timed out after 30 seconds..."
      },
      {
        "name": "test_create_product",
        "class": "api.ProductTests",
        "message": "Validation failed",
        "details": "Error: Product validation failed - missing required field 'price'..."
      }
    ]
  },
  "ai_insights": {
    "summary": "Two critical test failures detected: database connectivity timeout and missing required field validation. These indicate infrastructure and data validation issues that need immediate attention.",
    "root_causes": [
      "Database connection timeout after 30 seconds - likely network latency or database resource exhaustion",
      "Missing 'price' field validation - inadequate input validation before product creation",
      "Possible test environment configuration issues"
    ],
    "recommendations": [
      "Investigate database connection pool settings and increase timeout threshold",
      "Review network connectivity between application and database servers",
      "Implement comprehensive input validation for product creation API",
      "Add pre-condition checks in tests to ensure required fields are present",
      "Consider adding connection retry logic with exponential backoff"
    ],
    "confidence_score": 88,
    "priority": "high"
  },
  "status": "success"
}
✅ If you see this, everything is working!
Step 4: View Function Logs
- In your Function App, click “Log stream” (left menu under Monitoring)
- You’ll see real-time logs as your function runs
- Look for:
Test analyzer function triggeredAnalyzing blob: sample-test.xmlTest results downloaded successfullyAI analysis completed
Part 6: Test with Different Test Results
Let’s upload more test scenarios and analyze them.
Scenario 1: All Tests Pass
- Create
all-pass-test.xml:
xml
<?xml version="1.0" encoding="UTF-8"?>
<testsuites>
  <testsuite name="Happy Path Tests" tests="3" failures="0" errors="0" time="1.234">
    <testcase classname="api.Tests" name="test_successful_login" time="0.234"/>
    <testcase classname="api.Tests" name="test_data_retrieval" time="0.456"/>
    <testcase classname="api.Tests" name="test_logout" time="0.544"/>
  </testsuite>
</testsuites>
- Upload to storage:
test-resultscontainer - Test function with:
json
{
  "blob_name": "all-pass-test.xml"
}
Scenario 2: Critical Failure
- Create
critical-failure.xml:
xml
<?xml version="1.0" encoding="UTF-8"?>
<testsuites>
  <testsuite name="Critical Tests" tests="4" failures="3" errors="1" time="5.678">
    <testcase classname="security.Tests" name="test_authentication" time="1.234">
      <failure message="Authentication bypass detected">
        CRITICAL: User was able to access protected resources without valid token
        Security vulnerability detected in authentication middleware
      </failure>
    </testcase>
    <testcase classname="data.Tests" name="test_sql_injection_prevention" time="2.345">
      <failure message="SQL injection vulnerability">
        SQL injection possible in user search endpoint
        Malicious input: ' OR '1'='1 was not sanitized
      </failure>
    </testcase>
    <testcase classname="api.Tests" name="test_rate_limiting" time="0.567">
      <failure message="Rate limiting not working">
        Made 1000 requests in 1 second without being blocked
        Rate limiter appears to be disabled or misconfigured
      </failure>
    </testcase>
    <testcase classname="system.Tests" name="test_memory_usage" time="1.532">
      <error message="Out of memory">
        Application crashed due to memory exhaustion
        Memory usage exceeded 16GB before failure
      </error>
    </testcase>
  </testsuite>
</testsuites>
- Upload and test
You should get AI analysis highlighting the security issues with high priority!
Part 7: Create a Simple Web Interface (Optional)
Let’s create a simple HTML page to test your function without using curl.
Step 1: Create test-analyzer.html
html
<!DOCTYPE html>
<html>
<head>
    <title>Test Result Analyzer</title>
    <style>
        body {
            font-family: Arial, sans-serif;
            max-width: 1000px;
            margin: 50px auto;
            padding: 20px;
        }
        .container {
            background: #f5f5f5;
            padding: 30px;
            border-radius: 10px;
        }
        h1 {
            color: #0078d4;
        }
        input, button {
            padding: 10px;
            margin: 10px 0;
            width: 100%;
            box-sizing: border-box;
        }
        button {
            background: #0078d4;
            color: white;
            border: none;
            cursor: pointer;
            font-size: 16px;
        }
        button:hover {
            background: #005a9e;
        }
        #result {
            margin-top: 20px;
            padding: 20px;
            background: white;
            border-radius: 5px;
            white-space: pre-wrap;
            font-family: monospace;
            max-height: 600px;
            overflow: auto;
        }
        .loading {
            color: #0078d4;
            font-style: italic;
        }
        .error {
            color: #d13438;
        }
        .success {
            color: #107c10;
        }
    </style>
</head>
<body>
    <div class="container">
        <h1>🤖 AI Test Result Analyzer</h1>

        <label for="functionUrl">Function URL:</label>
        <input type="text" id="functionUrl" placeholder="https://testanalyzer2024.azurewebsites.net/api/AnalyzeTest?code=...">

        <label for="blobName">Test Result File Name:</label>
        <input type="text" id="blobName" value="sample-test.xml" placeholder="sample-test.xml">

        <button onclick="analyzeTests()">🔍 Analyze Tests</button>

        <div id="result"></div>
    </div>

    <script>
        async function analyzeTests() {
            const functionUrl = document.getElementById('functionUrl').value;
            const blobName = document.getElementById('blobName').value;
            const resultDiv = document.getElementById('result');

            if (!functionUrl) {
                resultDiv.innerHTML = '<span class="error">❌ Please enter your Function URL</span>';
                return;
            }

            resultDiv.innerHTML = '<span class="loading">⏳ Analyzing test results...</span>';

            try {
                const response = await fetch(functionUrl, {
                    method: 'POST',
                    headers: {
                        'Content-Type': 'application/json'
                    },
                    body: JSON.stringify({
                        blob_name: blobName
                    })
                });

                const data = await response.json();

                if (response.ok) {
                    displayResults(data);
                } else {
                    resultDiv.innerHTML = `<span class="error">❌ Error: ${data.message || 'Unknown error'}</span>`;
                }
            } catch (error) {
                resultDiv.innerHTML = `<span class="error">❌ Error: ${error.message}</span>`;
            }
        }

        function displayResults(data) {
            const resultDiv = document.getElementById('result');
            const summary = data.test_summary;
            const ai = data.ai_insights;

            let html = '<div class="success">✅ Analysis Complete!</div><br>';

            html += '<strong>📊 Test Summary:</strong><br>';
            html += `Total Tests: ${summary.total}<br>`;
            html += `✅ Passed: ${summary.passed}<br>`;
            html += `❌ Failed: ${summary.failures}<br>`;
            html += `⚠️ Errors: ${summary.errors}<br><br>`;

            if (summary.failed_tests && summary.failed_tests.length > 0) {
                html += '<strong>❌ Failed Tests:</strong><br>';
                summary.failed_tests.forEach(test => {
                    html += `<br>• ${test.name} (${test.class})<br>`;
                    html += `  Message: ${test.message}<br>`;
                });
                html += '<br>';
            }

            if (ai && !ai.error) {
                html += '<strong>🤖 AI Insights:</strong><br><br>';
                html += `<strong>Summary:</strong> ${ai.summary}<br><br>`;

                if (ai.root_causes) {
                    html += '<strong>Root Causes:</strong><br>';
                    ai.root_causes.forEach(cause => {
                        html += `• ${cause}<br>`;
                    });
                    html += '<br>';
                }

                if (ai.recommendations) {
                    html += '<strong>💡 Recommendations:</strong><br>';
                    ai.recommendations.forEach(rec => {
                        html += `• ${rec}<br>`;
                    });
                    html += '<br>';
                }

                html += `<strong>Confidence Score:</strong> ${ai.confidence_score}%<br>`;
                html += `<strong>Priority:</strong> ${ai.priority || 'N/A'}<br>`;
            }

            resultDiv.innerHTML = html;
        }
    </script>
</body>
</html>
Step 2: Test It
- Save this file on your computer
- Open it in your web browser
- Paste your Function URL (with the
?code=...part) - Enter:
sample-test.xml - Click “Analyze Tests”
You should see a nice formatted output!
Part 8: Monitor and Debug
View Function Metrics
- Function App → “Overview”
- You’ll see:
- Function Execution Count
- Function Execution Units
- Success Rate
View Detailed Logs
- Function App → “Logs” (under Monitoring)
- Click “Application Insights”
- You can query logs with:
kusto
traces
| where timestamp > ago(1h)
| where message contains "Test analyzer"
| order by timestamp desc
Check Storage Access
- Storage Account → “Monitoring” → “Insights”
- See blob access patterns
Summary: What You’ve Built! 🎉
✅ Azure Storage – Stores test result files ✅ Azure OpenAI – Analyzes test failures with AI ✅ Azure Function – Automates the entireRetry
This response paused because Claude reached its max length for a message. Hit continue to nudge Claude along.Continue


Leave a comment