
So you’ve trained a machine learning model and now you want to deploy it so others can use it? This guide will walk you through deploying a scikit-learn model to Azure Machine Learning using the Azure Portal – no complex code required for deployment!
By the end of this tutorial, you’ll have a working REST API endpoint that anyone can call to get predictions from your model.
What You’ll Learn
- How to train and save a machine learning model
- How to register your model in Azure ML
- How to create a deployment environment
- How to write a scoring script
- How to deploy your model as a REST API
- How to test your deployed model
What You’ll Need
- An Azure subscription
- Python installed on your computer (Python 3.10 recommended)
- Basic understanding of machine learning concepts
- A code editor (VS Code, Notepad++, or even Notepad)
Understanding the Big Picture
Before we dive in, let’s understand what we’re building:
Your Local Computer          →          Azure Cloud
------------------                      ------------
1. Train Model               →     2. Register Model
3. Create scoring script     →     4. Create Environment
5. Upload everything         →     6. Deploy as API
                                   7. Test & Use API
What is deployment? Deployment means taking your trained model and making it available as a web service that can receive data and return predictions. Think of it like publishing a website; once deployed, anyone with the right credentials can send data to your model and get predictions back.
Part 1: Setting Up Your Local Environment
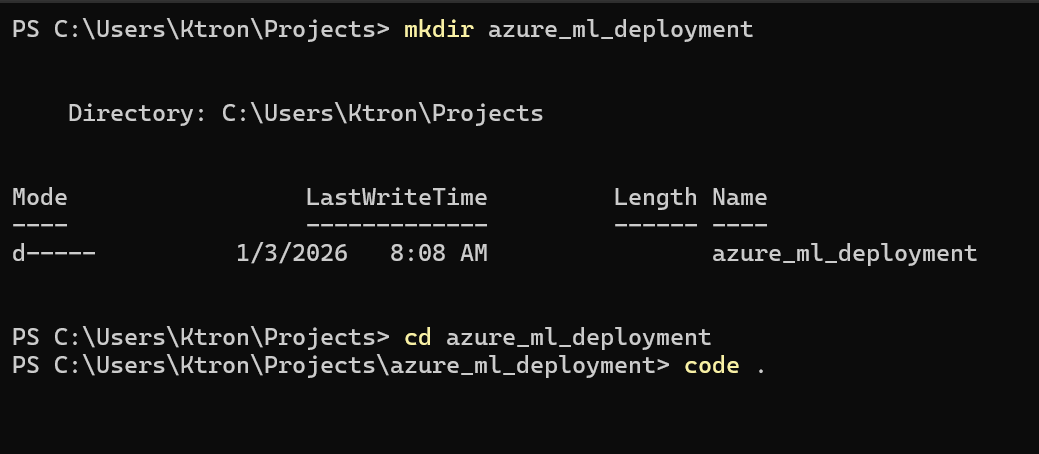
Step 1.1: Create a Project Folder
First, create a folder on your computer for this project:
# Create project directory
mkdir azure_ml_deployment
cd azure_ml_deployment
Step 1.2: Create a Virtual Environment
A virtual environment is like a clean room for your Python project – it keeps all your packages separate from other projects.
# Create virtual environment
python -m venv mlops_env

or on windows

py -3.10 -m venv .\mlops_env

# Activate it (Windows Git Bash or Mac/Linux)
source mlops_env/Scripts/activate

# On Windows Command Prompt, use:
# .\mlops_env\Scripts\activate.ps1
What’s happening?
python -m venv mlops_envcreates a new isolated Python environmentsource mlops_env/Scripts/activateactivates it (you’ll see(mlops_env)in your terminal)
Step 1.3: Install Required Packages
Now install the exact versions we’ll use:
python -m pip install --upgrade pip setuptools wheel
pip install numpy==1.22.4 scikit-learn==1.1.3 joblib==1.2.0
Why these specific versions? Azure ML’s environments we will use, use these versions. Using the same versions locally ensures your model will work when deployed. This is called version compatibility , it’s crucial!

Part 2: Training and Saving Your Model
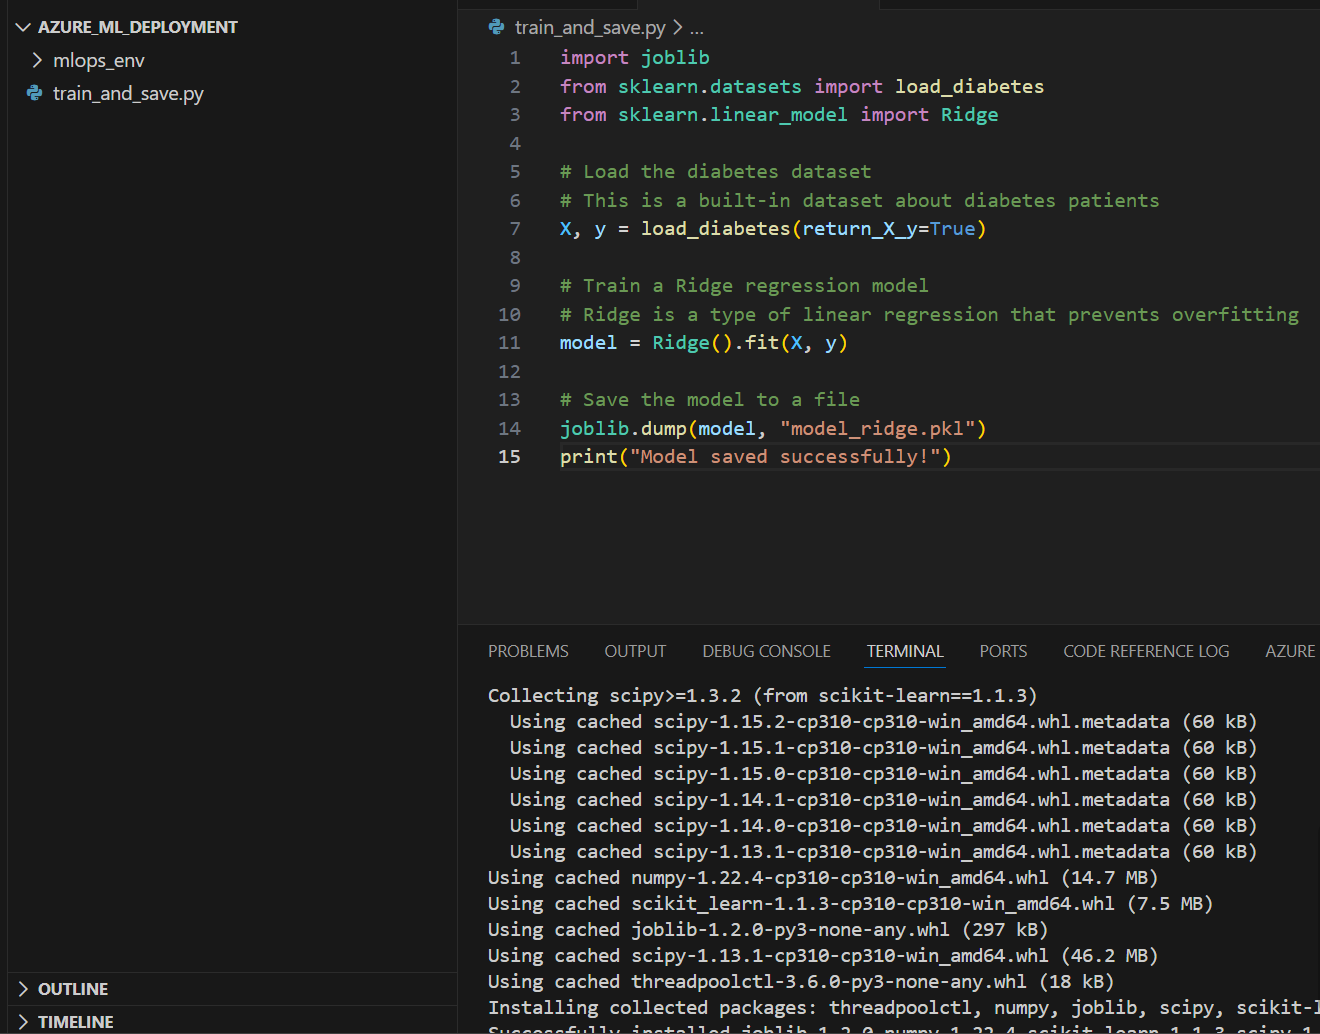
Step 2.1: Create the Training Script
Create a file called train_and_save.py:
import joblib
from sklearn.datasets import load_diabetes
from sklearn.linear_model import Ridge

# Load the diabetes dataset
# This is a built-in dataset about diabetes patients
X, y = load_diabetes(return_X_y=True)

# Train a Ridge regression model
# Ridge is a type of linear regression that prevents overfitting
model = Ridge().fit(X, y)

# Save the model to a file
joblib.dump(model, "model_ridge.pkl")
print("Model saved successfully!")
Let’s break this down:
- Import statements: We import the tools we need
joblib: For saving/loading modelsload_diabetes: Sample dataset about diabetesRidge: The machine learning algorithm
- Load data:
load_diabetes(return_X_y=True)gives us:X: Features (patient measurements like age, BMI, blood pressure)y: Target (disease progression after one year)
- Train model:
Ridge().fit(X, y)trains the model on the data.fit()is where the actual learning happens- The model learns the relationship between X and y
- Save model:
joblib.dump()saves the trained model to a file- Creates
model_ridge.pklfile - This file contains all the learned patterns
- Creates
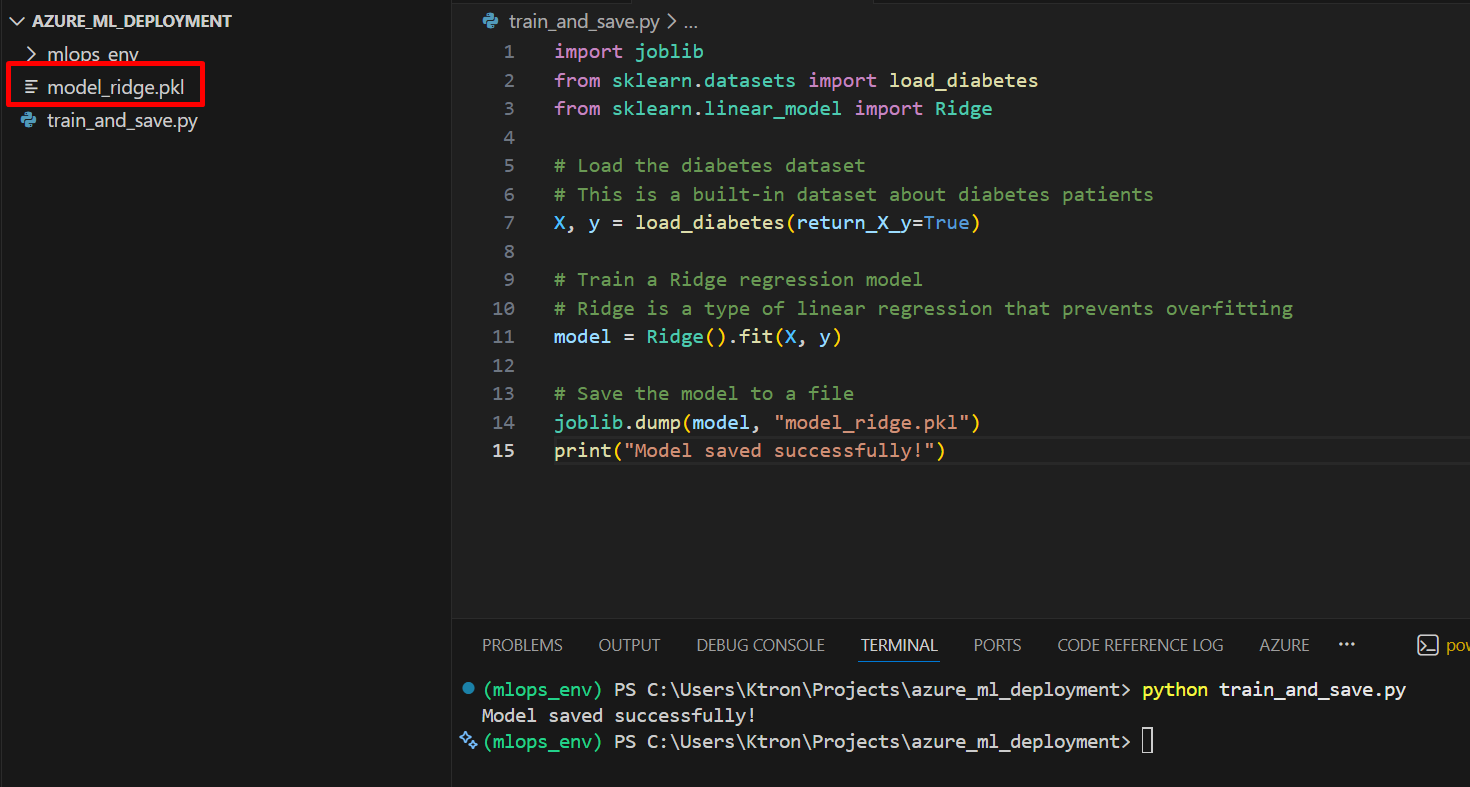
Step 2.2: Run the Training Script
python train_and_save.py
You should see:
Model saved successfully!
And a new file model_ridge.pkl will appear in your folder.
What’s in the .pkl file? It’s a “pickled” (serialized) version of your trained model – all the weights, parameters, and settings stored in binary format. Think of it as a snapshot of your model’s brain.
Part 3: Creating the Scoring Script
The scoring script is the bridge between the outside world and your model. It receives data, passes it to your model, and returns predictions.
Step 3.1: Create score.py
Create a file called score.py:
import joblib
import json
import numpy as np
import os

def init():
    """
    This function runs once when the container starts.
    It loads the model into memory.
    """
    global model

    # Get the path where Azure stores your model
    model_path = os.path.join(
        os.getenv("AZUREML_MODEL_DIR"),
        "model_ridge.pkl"
    )

    # Load the model
    model = joblib.load(model_path)
    print("Model loaded successfully")

def run(raw_data):
    """
    This function runs every time someone calls your API.
    It receives data, makes predictions, and returns results.
    """
    try:
        # Parse the incoming JSON data
        data = json.loads(raw_data)['data']

        # Convert to numpy array (format the model expects)
        data = np.array(data)

        # Make predictions
        predictions = model.predict(data)

        # Return predictions as JSON
        return {"predictions": predictions.tolist()}

    except Exception as e:
        # If something goes wrong, return the error
        error_msg = str(e)
        return {"error": error_msg}

Let’s understand each part:
The init() function:
- Runs once when the deployment starts
global model: Makes the model variable accessible everywhereos.getenv("AZUREML_MODEL_DIR"): Azure sets this environment variable to tell you where your model file isjoblib.load(): Loads your trained model into memory- Why separate init and run? Loading the model once (init) is faster than loading it every time someone makes a prediction (run)
The run() function:
- Runs every time someone sends data to your API
json.loads(raw_data): Converts the incoming JSON string to Python dictionary['data']: Extracts the actual data arraynp.array(data): Converts to NumPy array (what scikit-learn expects)model.predict(data): Gets predictions from the model.tolist(): Converts NumPy array back to regular Python list (so it can be JSON serialized)- The try-except ensures errors are caught and returned gracefully
Part 4: Creating the Environment Configuration
The environment defines what Python packages your deployment needs.
Step 4.1: Create conda.yml
Create a file called conda.yml:
name: ridge-deployment-env
channels:
  - conda-forge
  - defaults
dependencies:
  - python=3.10
  - pip:
    - azureml-defaults==1.61.0
    - inference-schema==1.8
    - joblib==1.2.0
    - numpy==1.22.4
    - scikit-learn==1.1.3

Understanding this file:
- name: Name of your environment (you’ll reference this later)
- channels: Where to download packages from
conda-forge: Community-maintained packagesdefaults: Official Anaconda packages
- dependencies: What your code needs to run
python=3.10: The Python version- pip packages:
azureml-defaults: Required for Azure ML integrationinference-schema: Helps with API documentationjoblib: To load your saved modelnumpy: For numerical operationsscikit-learn: The ML library
Why exact versions? If you use numpy instead of numpy==1.22.4, you might get a newer version that’s incompatible with how your model was saved. This is the #1 cause of deployment failures!
Part 5: Setting Up Azure Machine Learning
Now we move to the cloud!
Step 5.1: Access Azure Portal
- Go to portal.azure.com
- Sign in with your Microsoft account
- If you don’t have a subscription, you can create a free trial
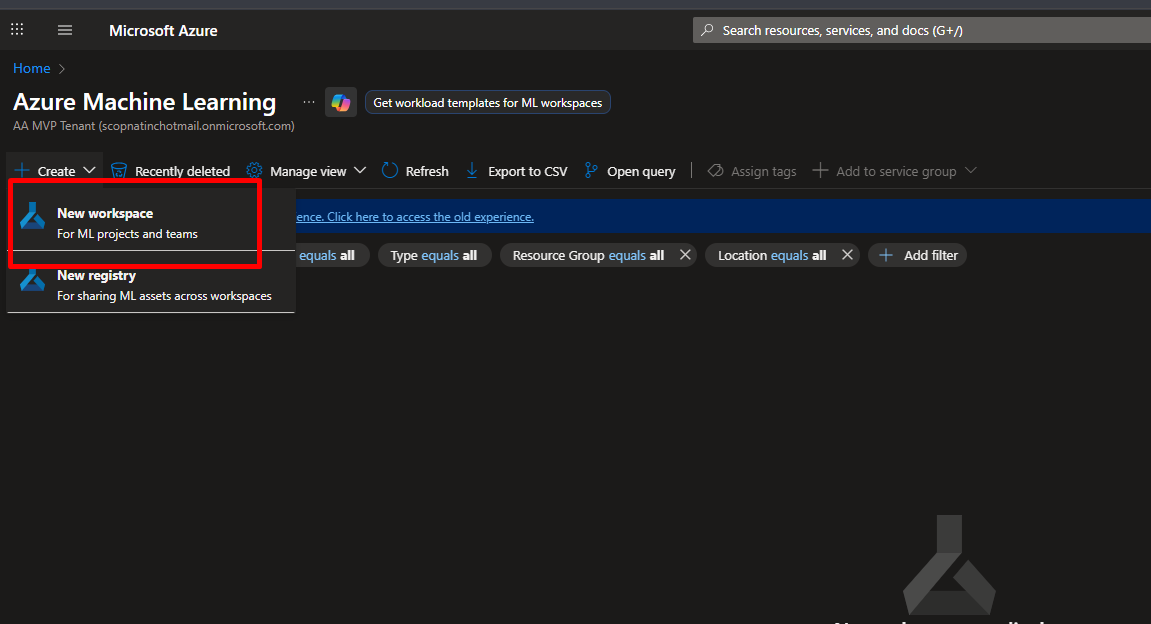
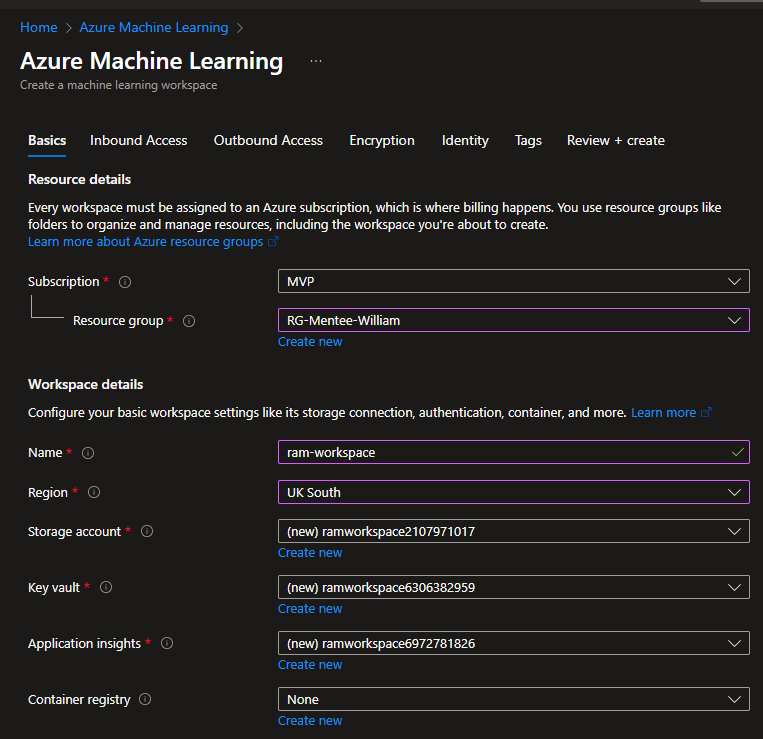
Step 5.2: Create Azure ML Workspace (If you don’t have one)
- In the Azure Portal search bar, type “Machine Learning”
- Click “Create” → “New workspace”
- Fill in:
- Subscription: Select your subscription
- Resource group: Click “Create new” → Name it
ml-deployment-rg - Workspace name:
my-ml-workspace(must be unique) - Region: Choose closest to you (e.g., East US, West Europe)
- Click “Review + Create” → “Create” (leaving every other thing as default)
- Wait 2-3 minutes for deployment
What’s an Azure Machine Learning workspace?
It’s a central hub that organizes and manages all your machine learning resources in Azure. When you create an Azure ML workspace, it automatically sets up and connects required resources like a resource group, storage account, Application Insights, Azure Container Registry, and Key Vault to securely store data, track experiments, manage models, and handle deployments.
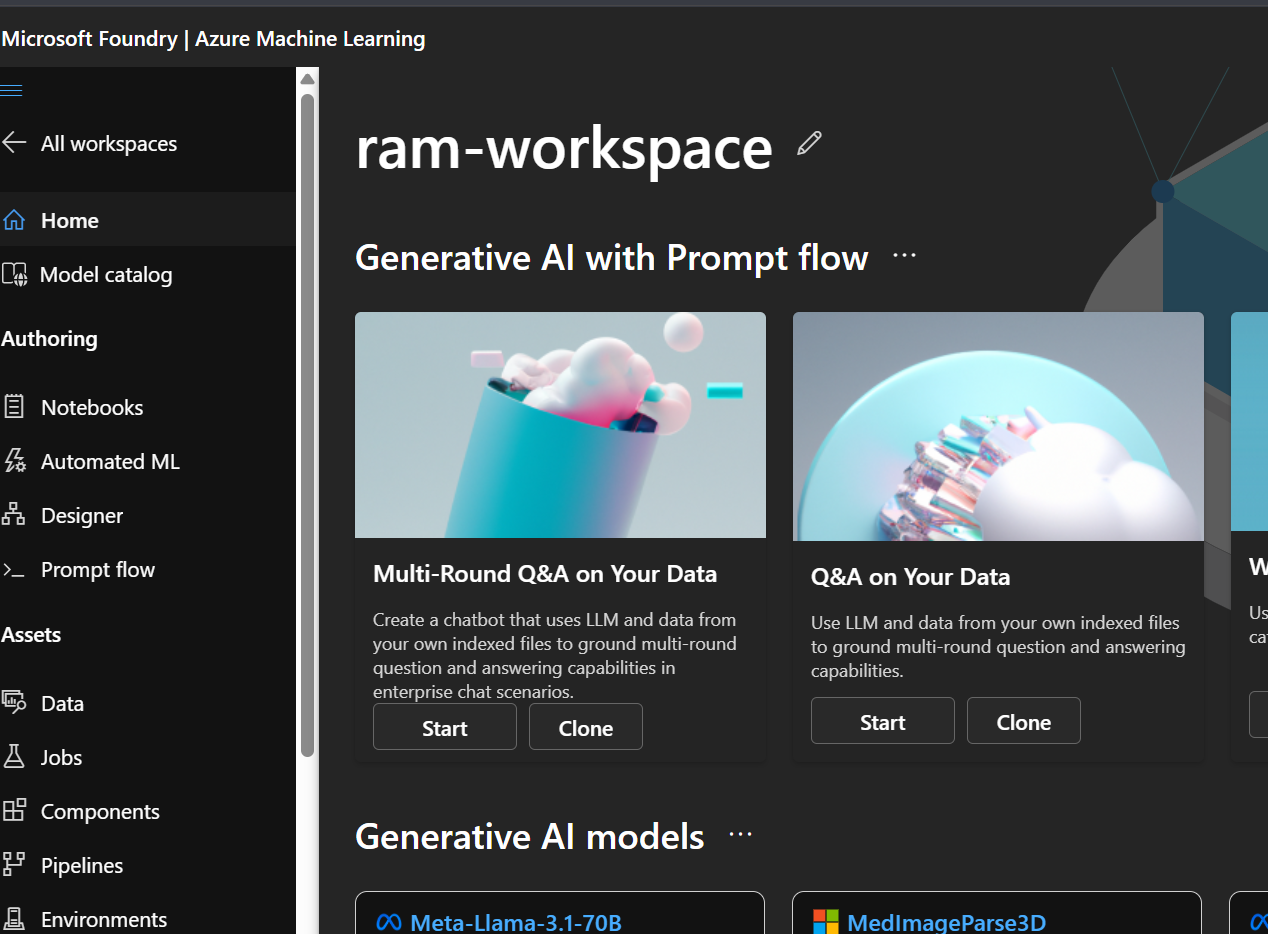
Step 5.3: Open Azure ML Studio
- Once created, click “Go to resource”
- Click “Launch studio” button
- Or go directly to ml.azure.com
What is Azure ML Studio? It’s the web interface for Azure Machine Learning – think of it as the control panel where you’ll do all your deployment work.
Part 6: Registering Your Model
Model registration stores your model file in Azure and tracks its version.
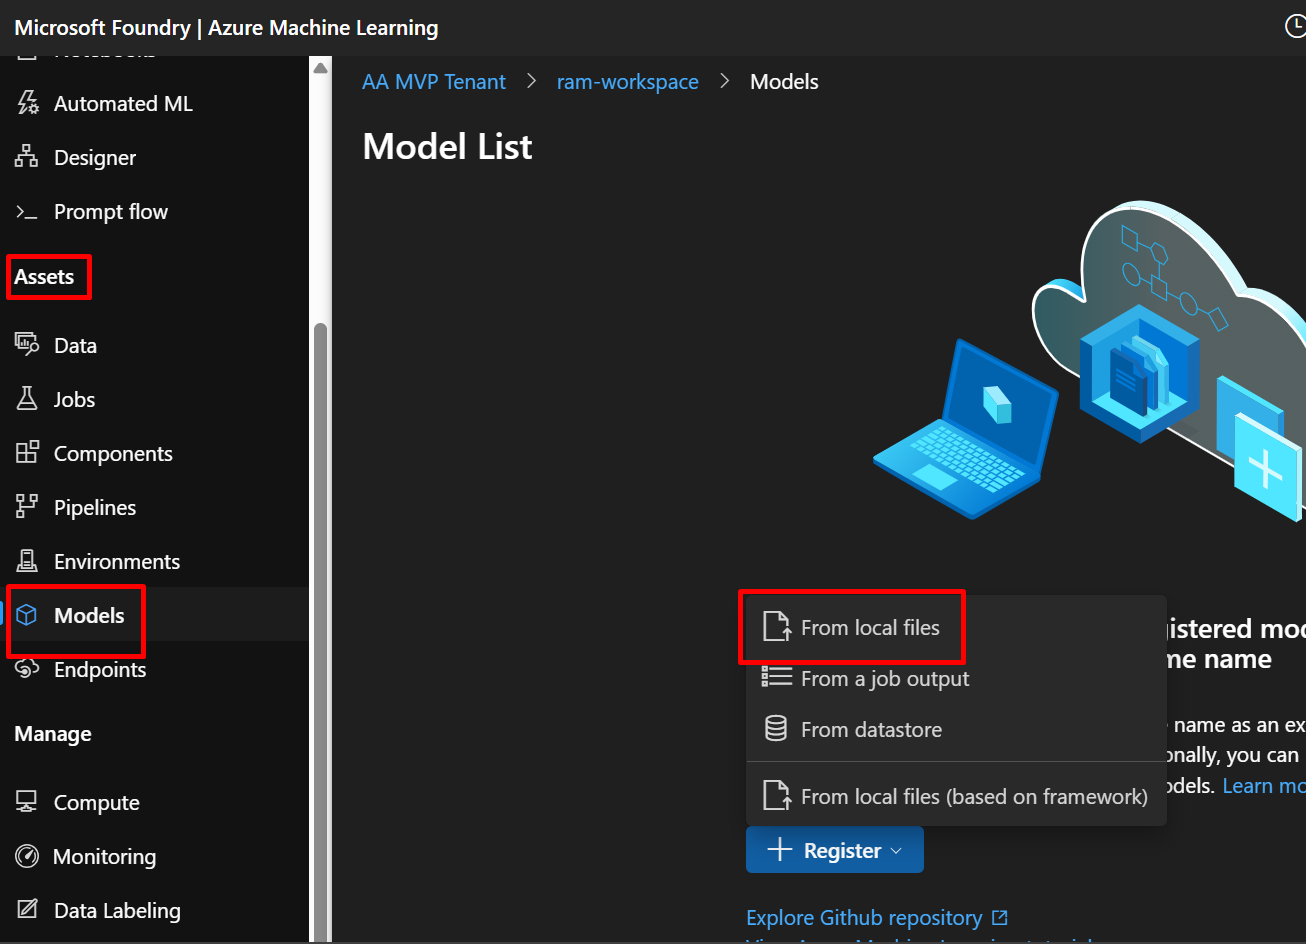
Step 6.1: Navigate to Models
- In Azure ML Studio, look at the left sidebar
- Under “Assets”, click “Models”
- Click the “+ Register” button at the top
- Select “From local files”
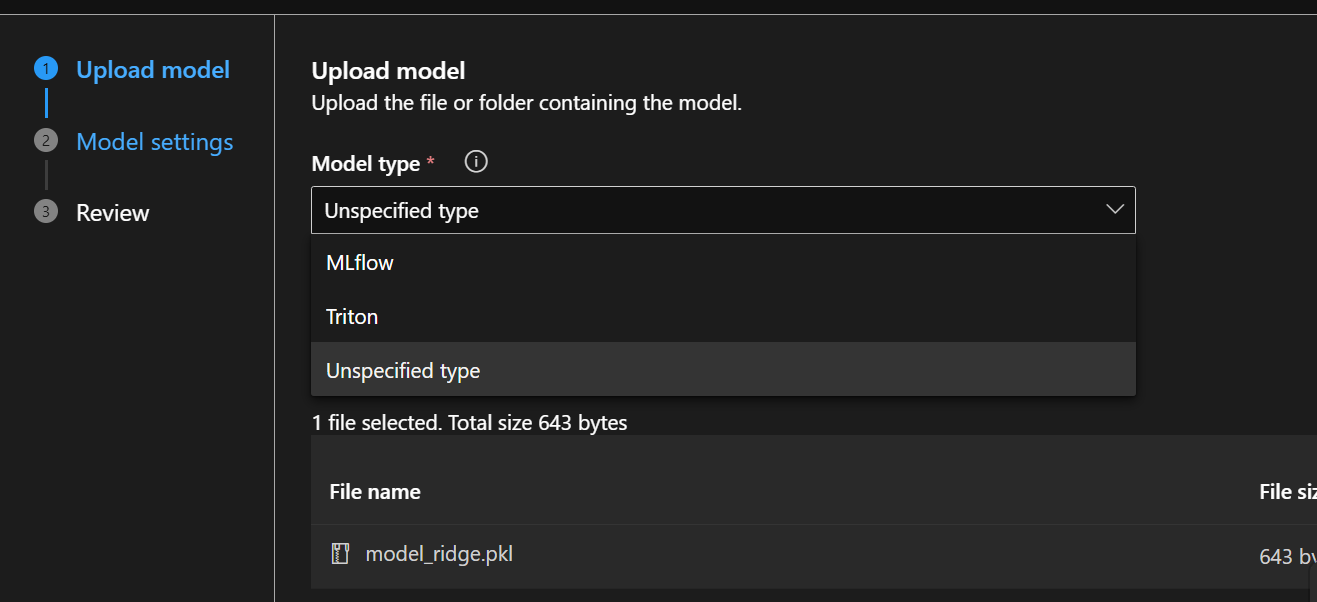
Step 6.2: Fill in Model Details
Basic Information:
- Model type: Select “Unspecified type” or “Custom”
- Name:
model-ridge- Use lowercase and hyphens (Azure requirement)
- This name must be unique in your workspace
- Click “Browse” under “Select file or folder”
- Navigate to your project folder
- Select
model_ridge.pkl - Click “Upload”
- Version: Leave as “Auto generate” (it will create version 1)
- Description:
Ridge regression model for diabetes prediction
Why name it “model-ridge”?
- Descriptive names help you identify models later
- If you register again with the same name, it creates version 2, 3, etc.
- Version control helps track model improvements

What’s happening behind the scenes? Azure is uploading your model file to Azure Blob Storage (cloud storage) and registering it in the Model Registry. The Model Registry is like a database that tracks all your models.
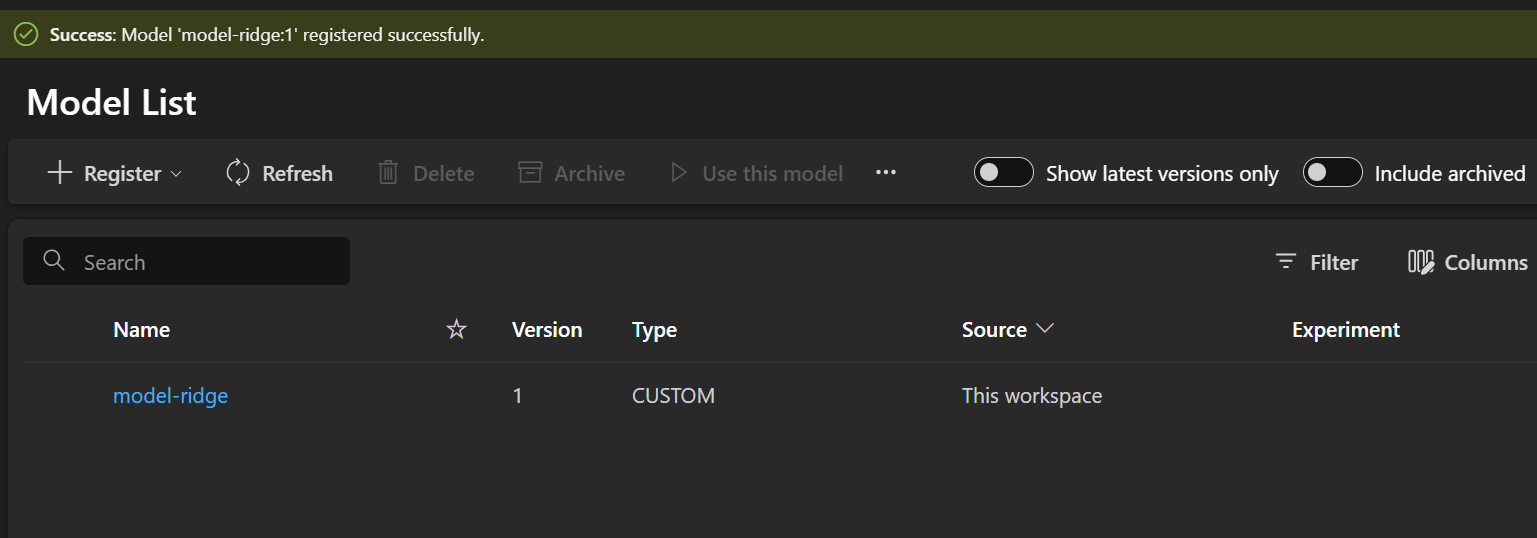
Step 6.3: Complete Registration
- Click “Next”
- Review the summary
- Click “Register”
You’ll see a notification when registration completes (10-30 seconds). Now your model is safely stored in Azure!
Part 7: Creating the Environment
Environments define the software dependencies your model needs.
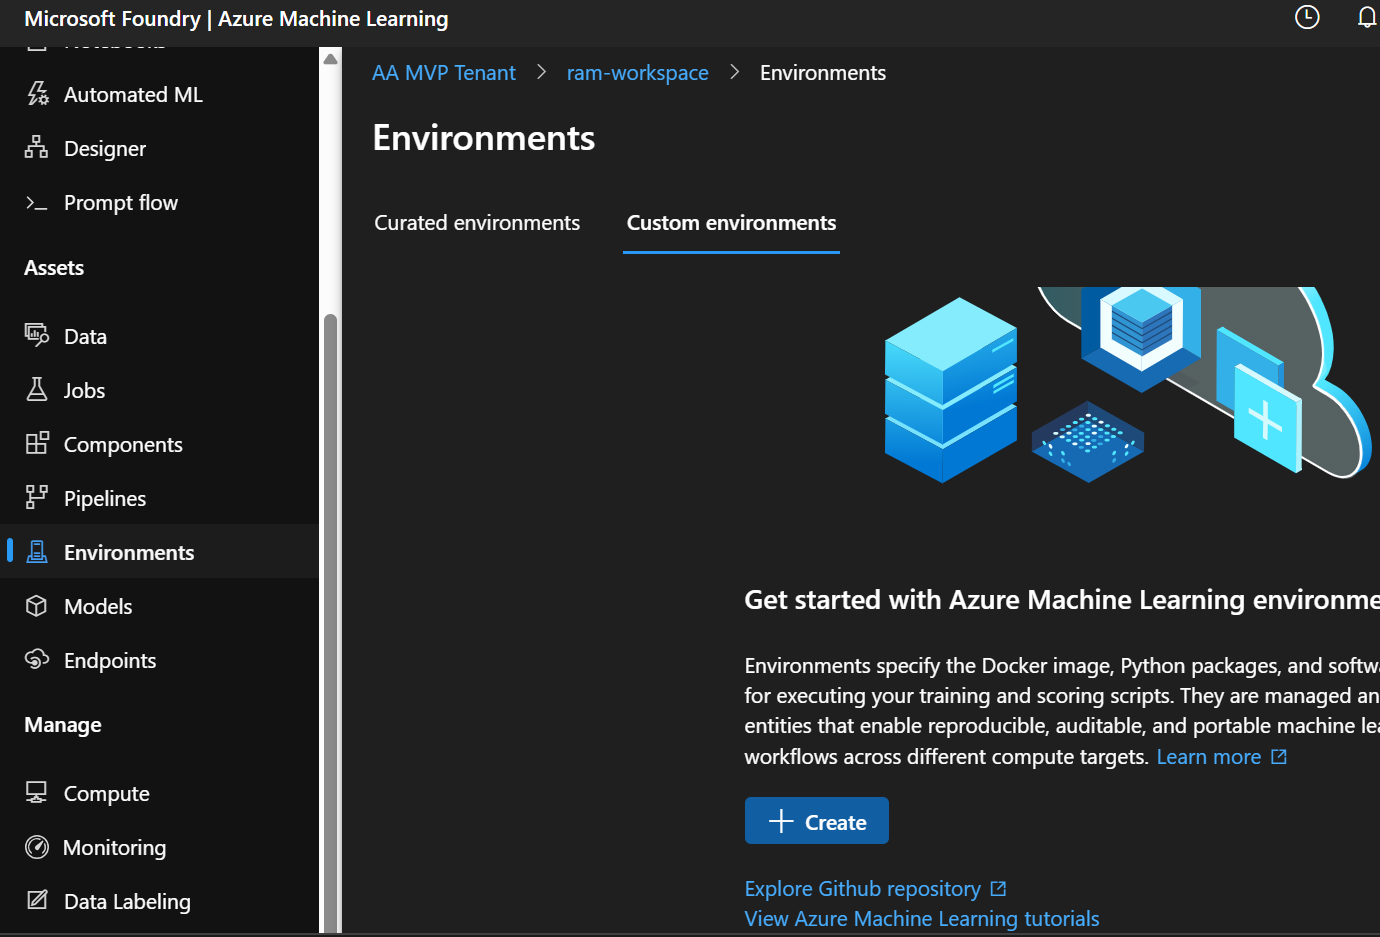
Step 7.1: Navigate to Environments
- In the left sidebar, click “Environments” (under Assets)
- Click “+ Create” button
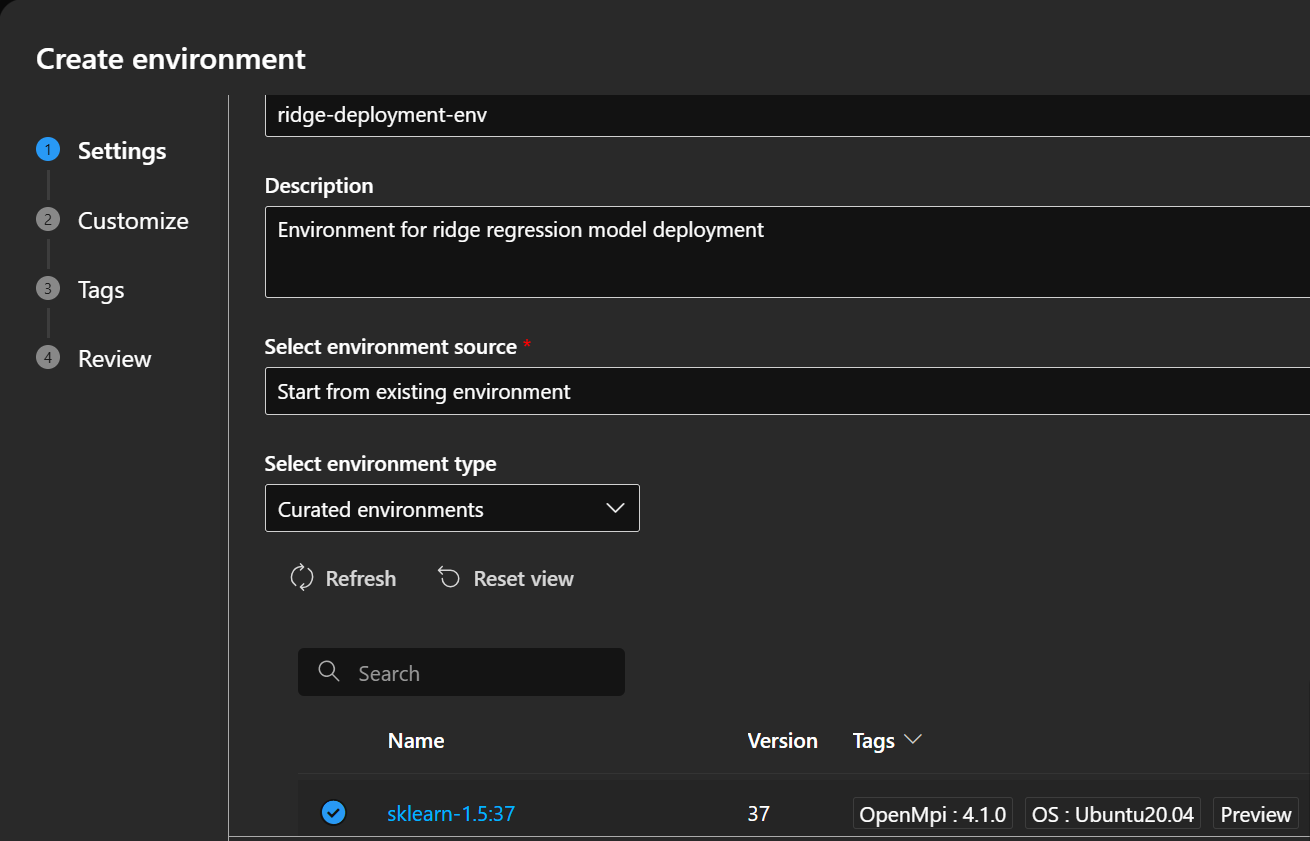
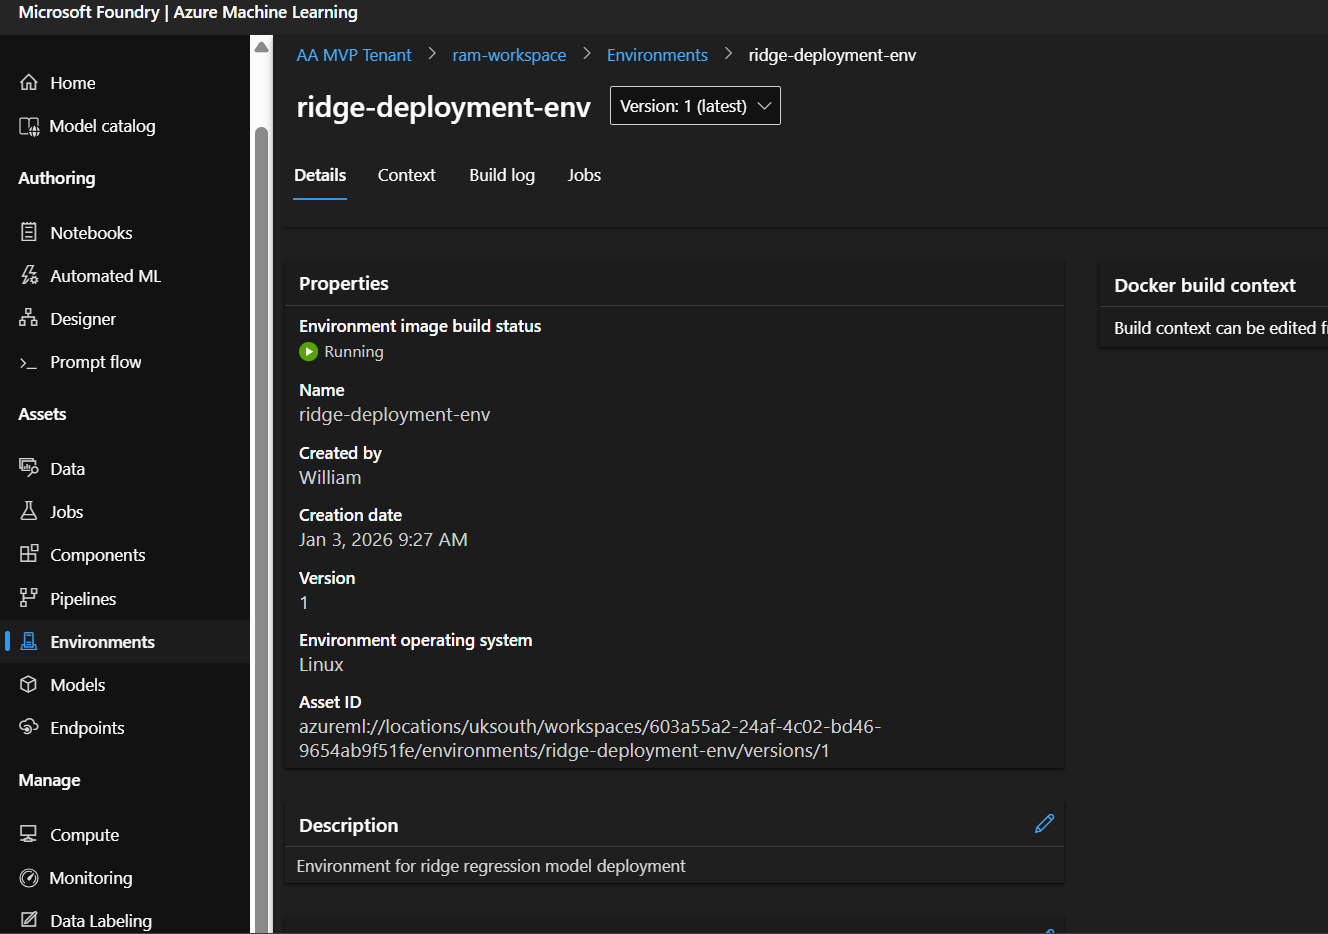
Step 7.2: Configure Environment
Basic Settings:
- Name:
ridge-deployment-env- Must match the name in your conda.yml
- Lowercase and hyphens only
- Description:
Environment for ridge regression model deployment - Select environment source: Choose “Upload existing conda file”
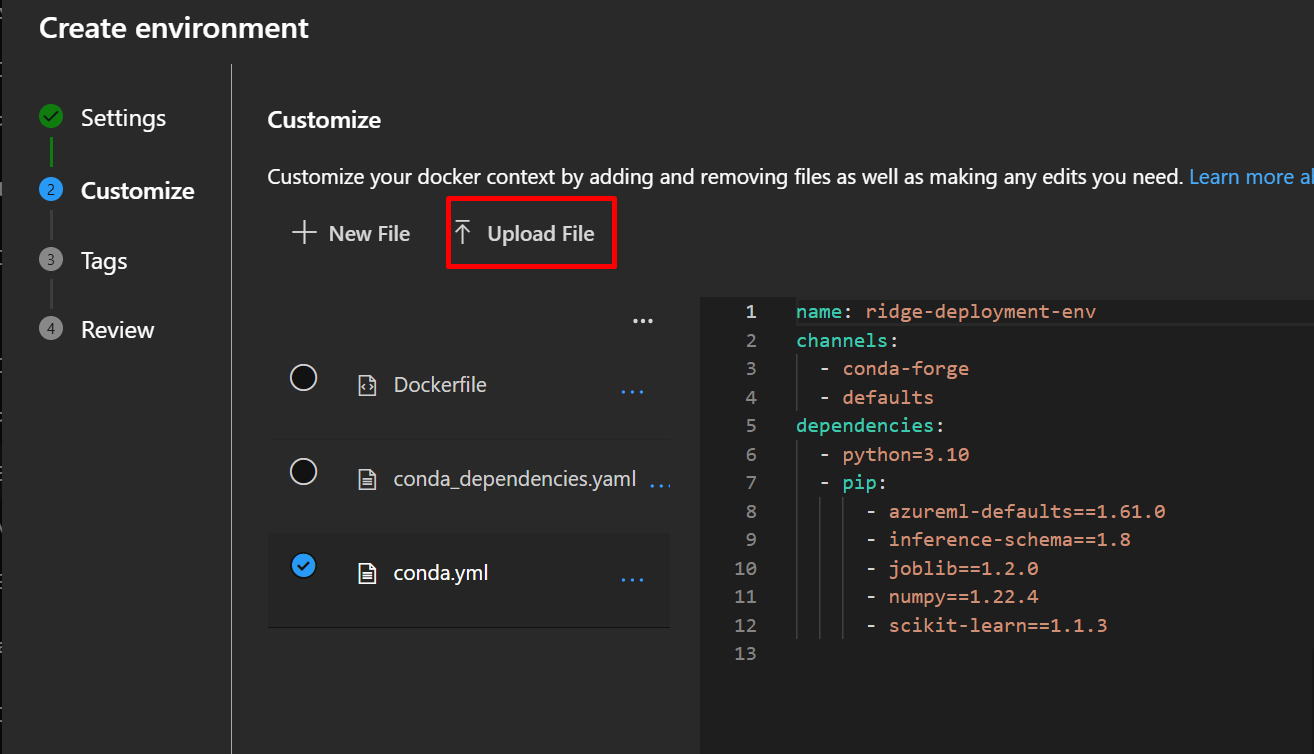
Step 7.3: Upload Conda File
- Click “Browse”
- Select your
conda.ymlfile - Click “Upload”
Azure will parse the file and show you the dependencies.
Step 7.4: Create Environment
- Click “Next”
- Review the dependencies list
- Click “Create”
What’s happening now? Azure is building a Docker container image with all your dependencies. This takes 5-10 minutes. The container is like a mini-computer with Python and all your packages pre-installed.
Status indicators:
- Creating: Building the container image
- Succeeded: Ready to use
You can click on your environment name to see build logs if you’re curious!
Part 8: Creating an Online Endpoint
An endpoint is the URL where your model will be accessible.
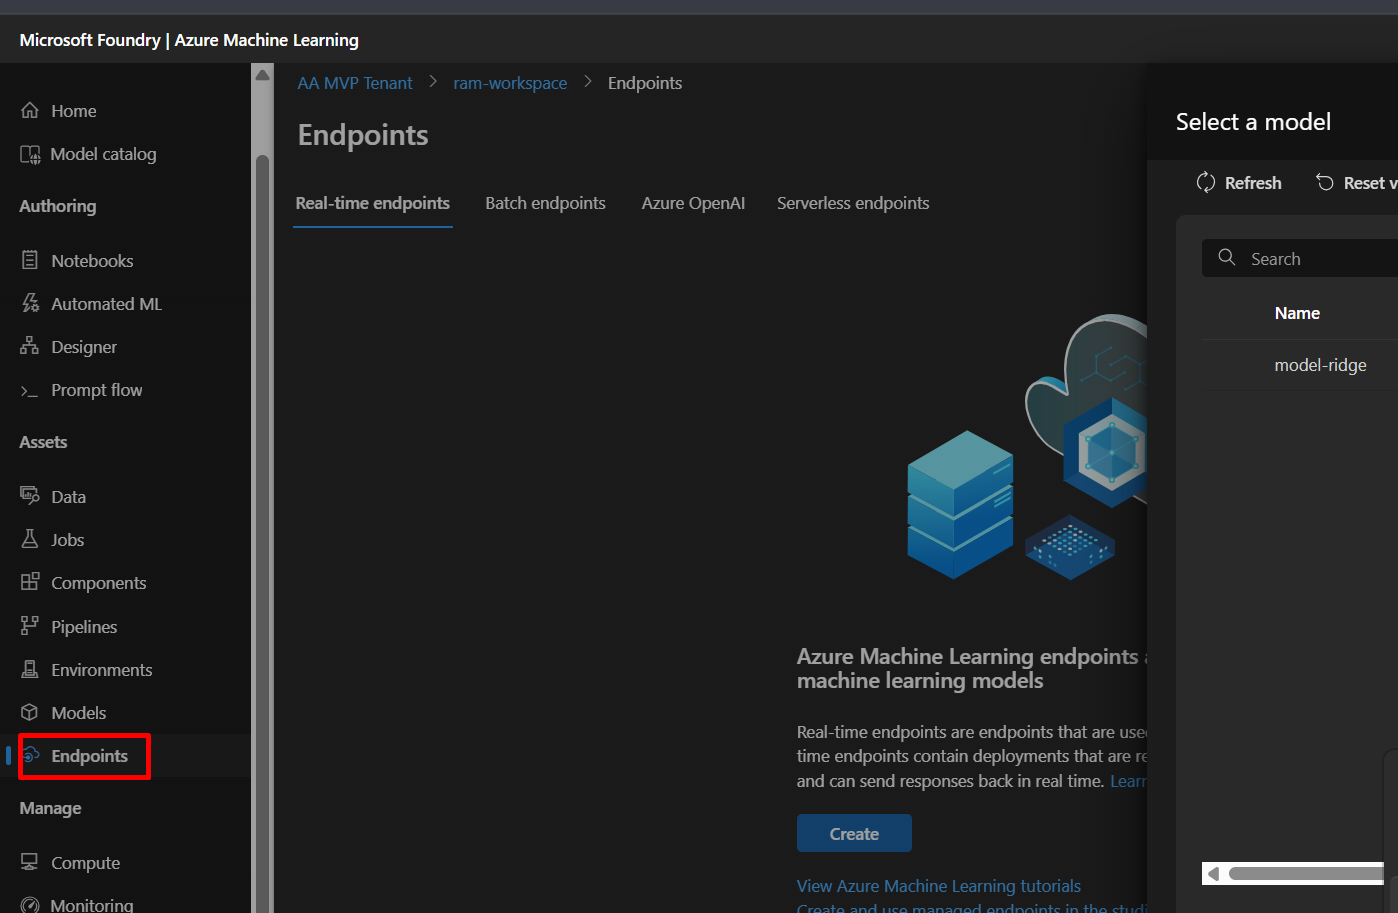
Step 8.1: Navigate to Endpoints
- In the left sidebar, click “Endpoints” (under Assets)
- Click “+ Create” button
- Select “Real-time endpoint”
Step 8.2: Configure Endpoint – Page 1 (Basics)
Endpoint Name:
- Enter:
ridge-endpoint-demo(or add numbers if taken, likeridge-endpoint-demo123) - Must be globally unique across all Azure users
- Only lowercase letters, numbers, and hyphens
- Like a website domain name
Other Settings:
- Description:
REST API endpoint for diabetes predictions - Authentication type: Select “Key-based authentication”
- Requires an API key to call your endpoint (secure!)
- Alternative is “Azure AD” for enterprise scenarios
- Compute type: Select “Managed”
- Azure manages the infrastructure for you
- Alternative is “Kubernetes” for advanced users
Click “Next”

Step 8.3: Configure Endpoint – Page 2 (Model)
Select Model:
- Click “Select from registered models”
- Find your “model-ridge” model
- Check the box next to version 1
- Click “Select” button
What if I have multiple versions? Always select the version you want to deploy. Version 1 is your first upload, version 2 would be if you re-registered the model, etc.
Click “Next”
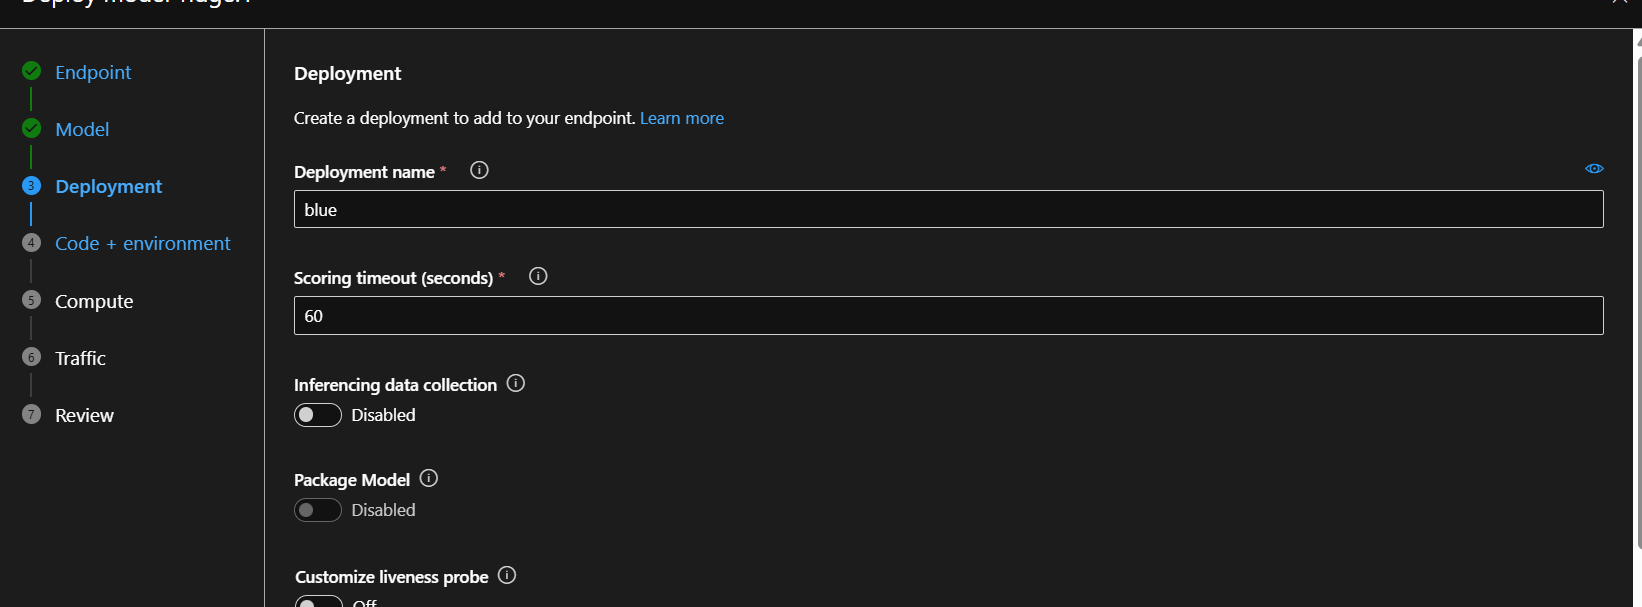
Step 8.4: Configure Endpoint – Page 3 (Deployment)
This is where you configure the compute resources.
Deployment Configuration:
- Deployment name:
blue- This allows blue-green deployments (advanced topic)
- For now, just use “blue” as the default name
Compute Settings:
- Virtual machine: Click the dropdown
- Recommended:
Standard_DS2_v2- 2 CPU cores
- 7 GB RAM
- 14 GB temporary storage
- Costs ~$0.14/hour
- Why this size? It’s reliable for small-medium models and has enough disk space
- Recommended:
- Instance count:
1- Number of copies of your model running
- Start with 1 for testing
- Increase for high traffic scenarios
Cost Calculation:
- 1 instance × $0.14/hour = $0.14/hour
- ~$100/month if running 24/7
- Tip: Delete when not in use to save money!
Click “Next”
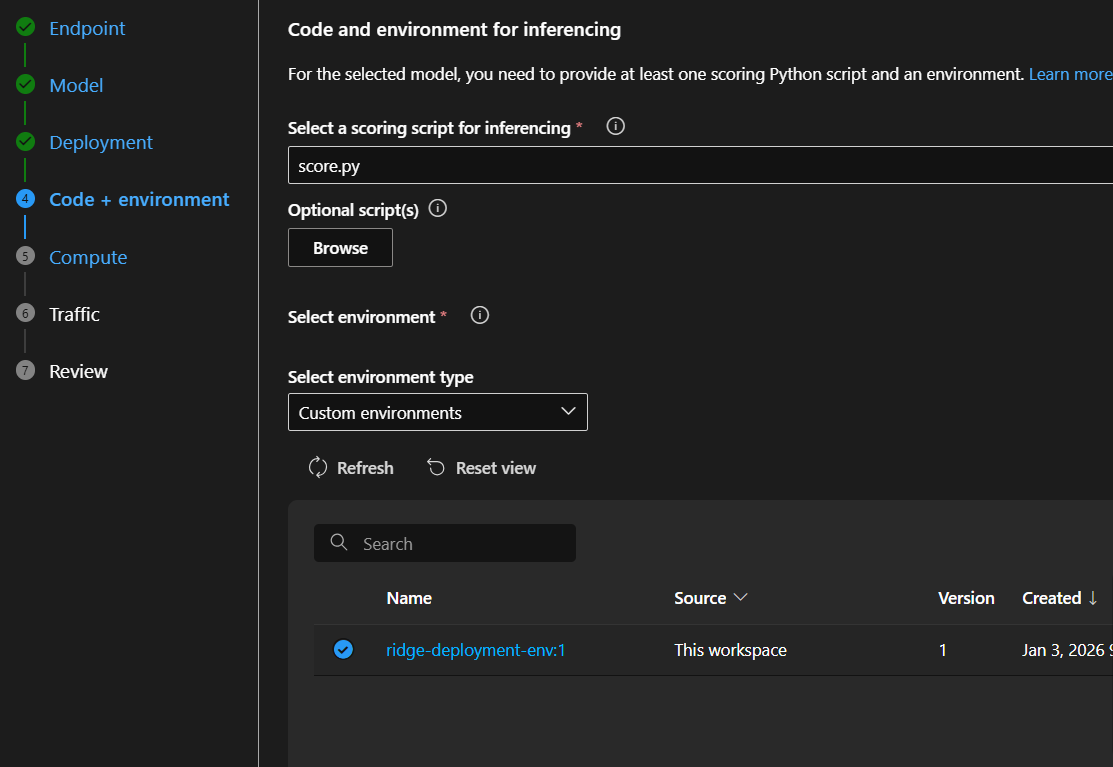
Step 8.5: Configure Endpoint – Page 4 (Code + Environment)
Scoring Script:
- Click “Browse”
- Select your
score.pyfile - Click “Upload”
Environment:
- Select “Use existing environment”
- Click the Environment dropdown
- Find “ridge-deployment-env”
- Select the latest version (version 1)
Why link these? The scoring script tells Azure what to do with incoming data, and the environment provides all the packages it needs to run.
Click “Next”
Step 8.6: Review and Create
- Review all your settings:
- Endpoint name
- Model
- VM size
- Environment
- Click “Create”
Now wait for deployment…
Part 9: Monitoring Deployment Progress
Deployment takes 10-25 minutes. Here’s what’s happening behind the scenes:
Step 9.1: Deployment Stages
Stage 1: Creating Endpoint (1-2 minutes)
- Azure creates the endpoint URL
- Sets up load balancing
- Configures authentication
Stage 2: Provisioning Compute (3-5 minutes)
- Allocates a virtual machine
- Sets up networking
- Prepares storage
Stage 3: Pulling Container Image (3-7 minutes)
- Downloads the environment container
- Can be fast if image is cached
- Slower for first-time deployments
Stage 4: Starting Container (2-5 minutes)
- Runs your init() function
- Loads the model
- Starts the web server
Stage 5: Health Checks (1-3 minutes)
- Azure tests if the endpoint responds
- Verifies the scoring script works
- Confirms the model loads successfully
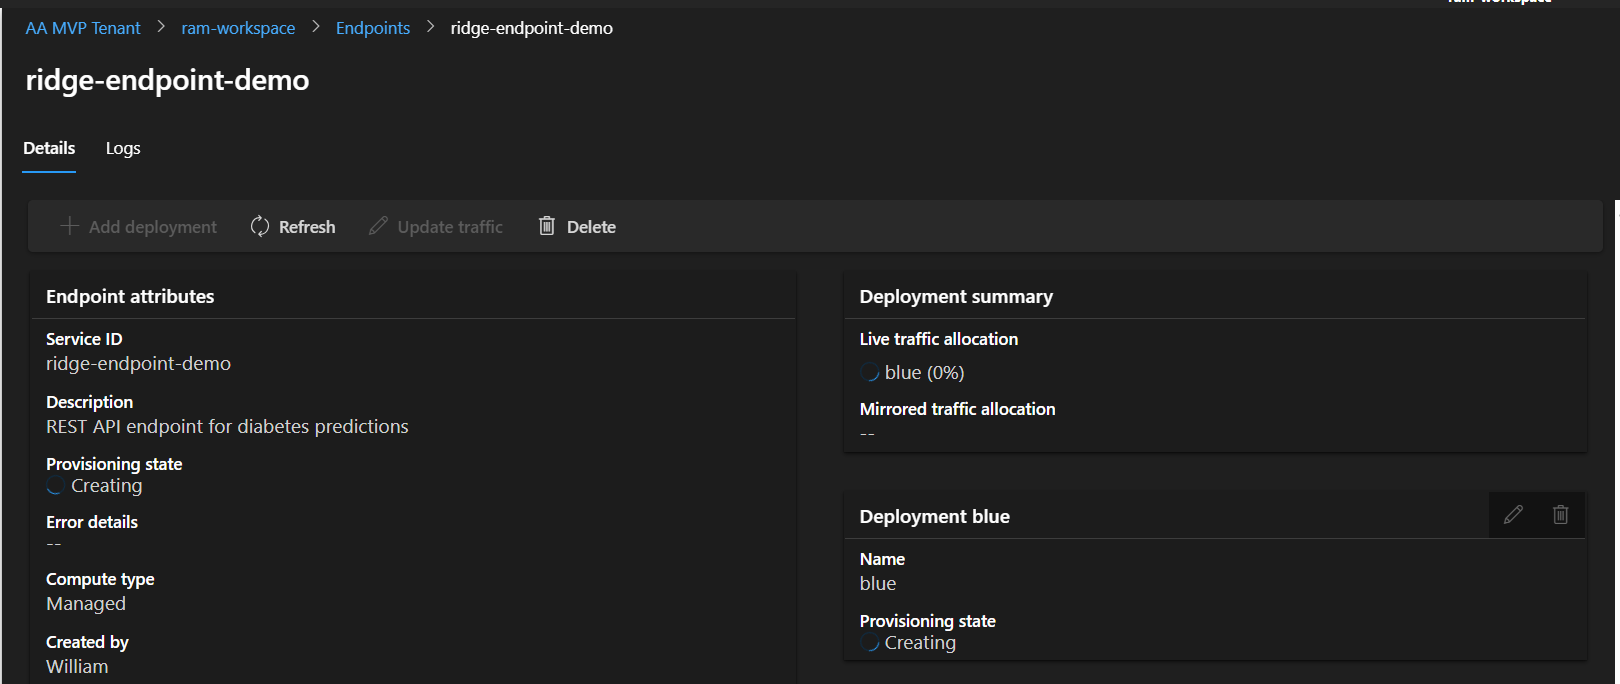
Step 9.2: Checking Status
- Click on your endpoint name in the Endpoints list
- Look for “Provisioning state”
- Creating: In progress (stay patient!)
- Updating: Making changes
- Succeeded: ✅ Ready to use!
- Failed: ❌ Check logs
- Under “Deployments” tab, you’ll see:
- Deployment name: blue
- Status: Creating → Succeeded
- Live traffic: 0% → 100% (when ready)
Step 9.3: Viewing Logs
To see what’s happening in real-time:
- Click on your deployment name (“blue”)
- Click the “Logs” tab
- You’ll see output like:
   Starting AzureML Inference Server...
   Loading model from /var/azureml-app/azureml-models/model-ridge/1
   Model loaded successfully
   Listening at http://0.0.0.0:31311
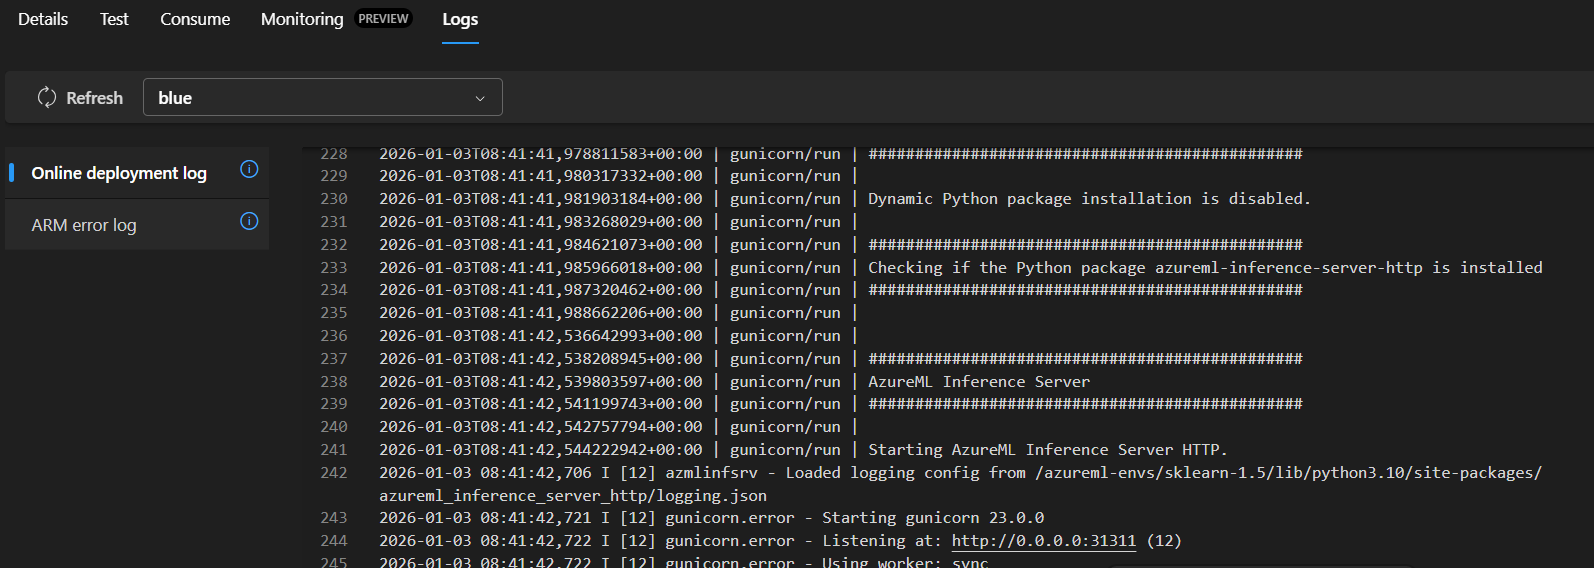
Understanding the logs:
- Container startup messages
- Your
init()function output - Any errors (red text)
- Server listening confirmation
Step 9.4: Common Issues During Deployment
Issue: “Creating” for 30+ minutes
- Solution: Check logs for errors, might need to cancel and redeploy
Issue: “ModuleNotFoundError” in logs
- Cause: Missing package in conda.yml or version mismatch
- Solution: Update conda.yml and create new environment
Issue: “Model file not found”
- Cause: Wrong path in score.py
- Solution: Verify
AZUREML_MODEL_DIRusage
Issue: “Out of quota” error
- Cause: Not enough disk space on VM
- Solution: Use larger VM like Standard_DS3_v2
Part 10: Testing Your Deployed Model
Once status shows “Succeeded”, your model is ready to receive predictions!
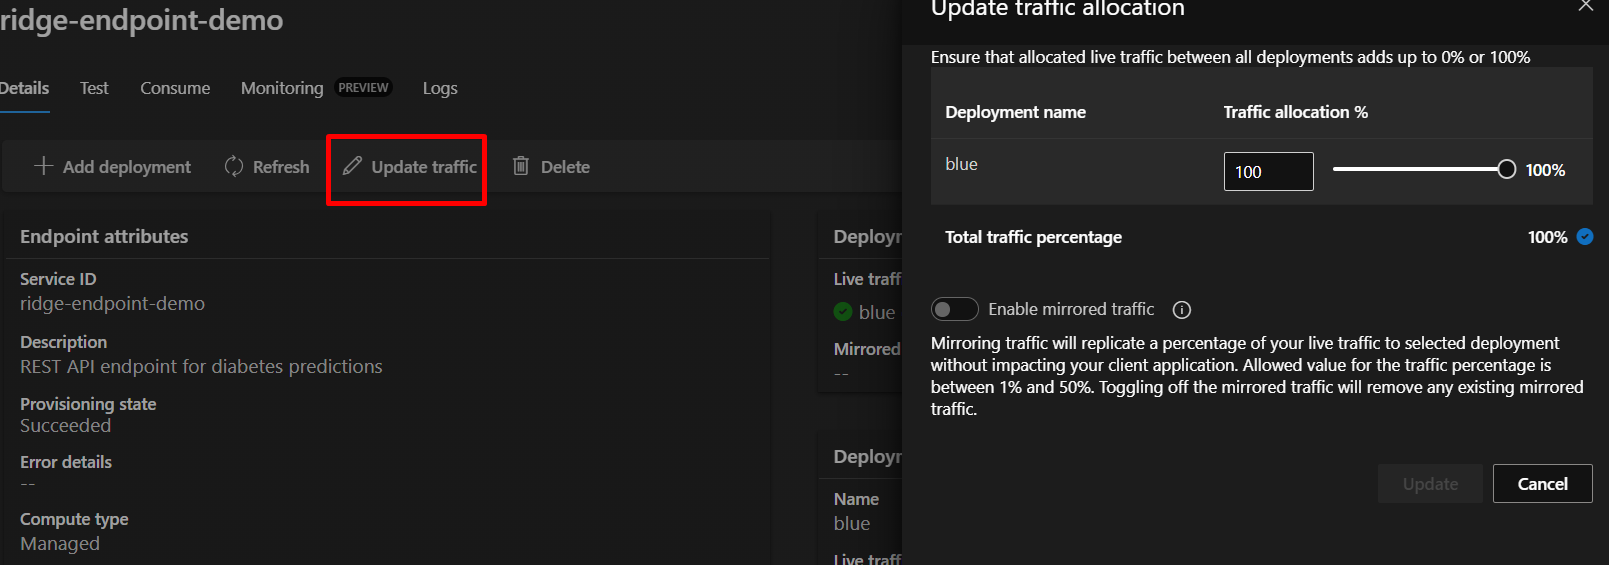
Step 10.1: Update Traffic Allocation
Before testing, ensure traffic is directed to your deployment:
- On the endpoint details page
- Click “Update traffic” button
- Set blue deployment to 100%
- Click “Update”
What is traffic allocation? It controls which deployment receives requests. Useful when you have multiple versions running (e.g., 80% to stable version, 20% to new version for testing).
Step 10.2: Test in Azure Portal
Quick Test:
- Click the “Test” tab on your endpoint page
- In the input box, paste this JSON:
{
  "data": [
    [0.03807591, 0.05068012, 0.06169621, 0.02187235, -0.0442235, -0.03482076, -0.04340085, -0.00259226, 0.01990842, -0.01764613],
    [-0.00188202, -0.04464164, -0.05147406, -0.02632783, -0.00844872, -0.01916334, 0.07441156, -0.03949338, -0.06832974, -0.09220405]
  ]
}
- Click “Test” button
- You should see output like:
{
  "predictions": [182.67357342863968, 90.99902728640282]
}

What just happened?
- You sent two patients’ data (10 features each)
- The model predicted disease progression for each
- Higher numbers = more severe progression
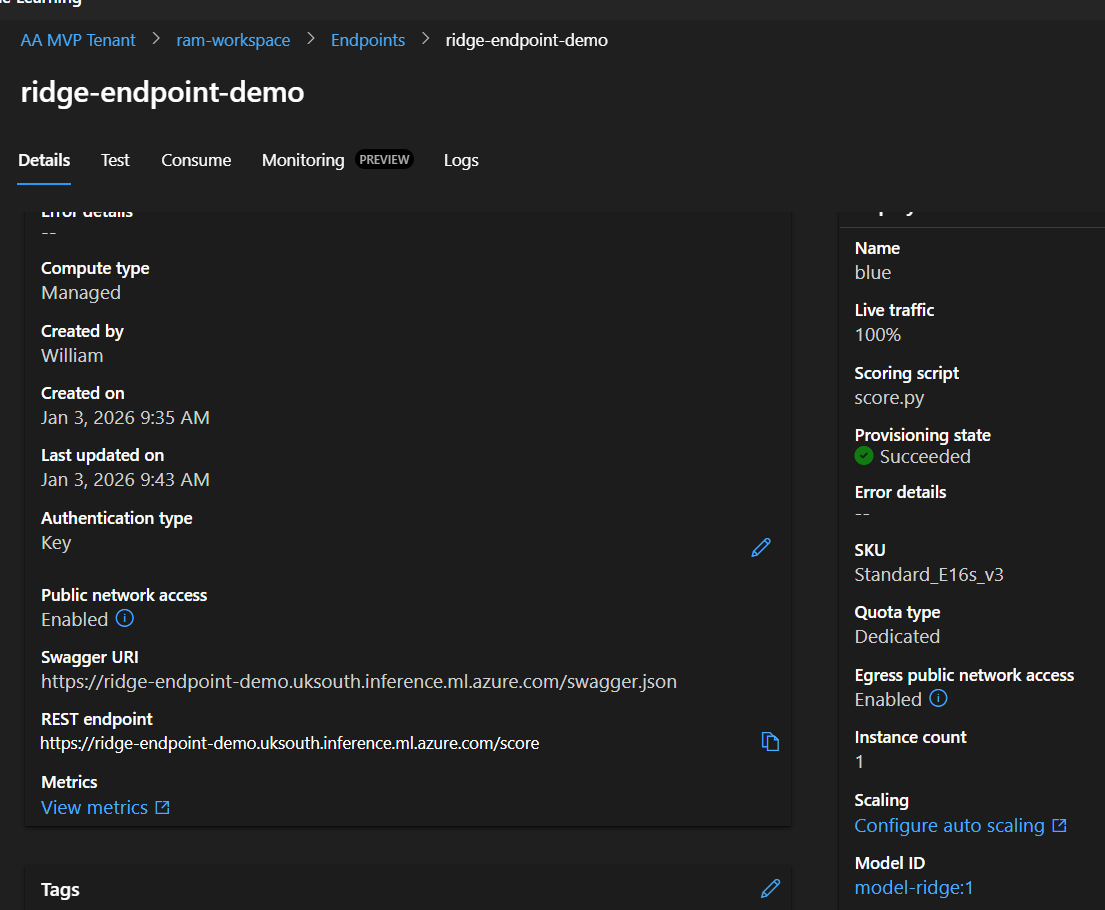
Step 10.3: Get API Credentials
To call your endpoint from outside Azure:
- Click the “Consume” tab
- You’ll see three important pieces of information:
REST endpoint:
https://ridge-endpoint-demo.westeurope.inference.ml.azure.com/score
- This is your API URL
- Copy it carefully (you’ll need it for testing)
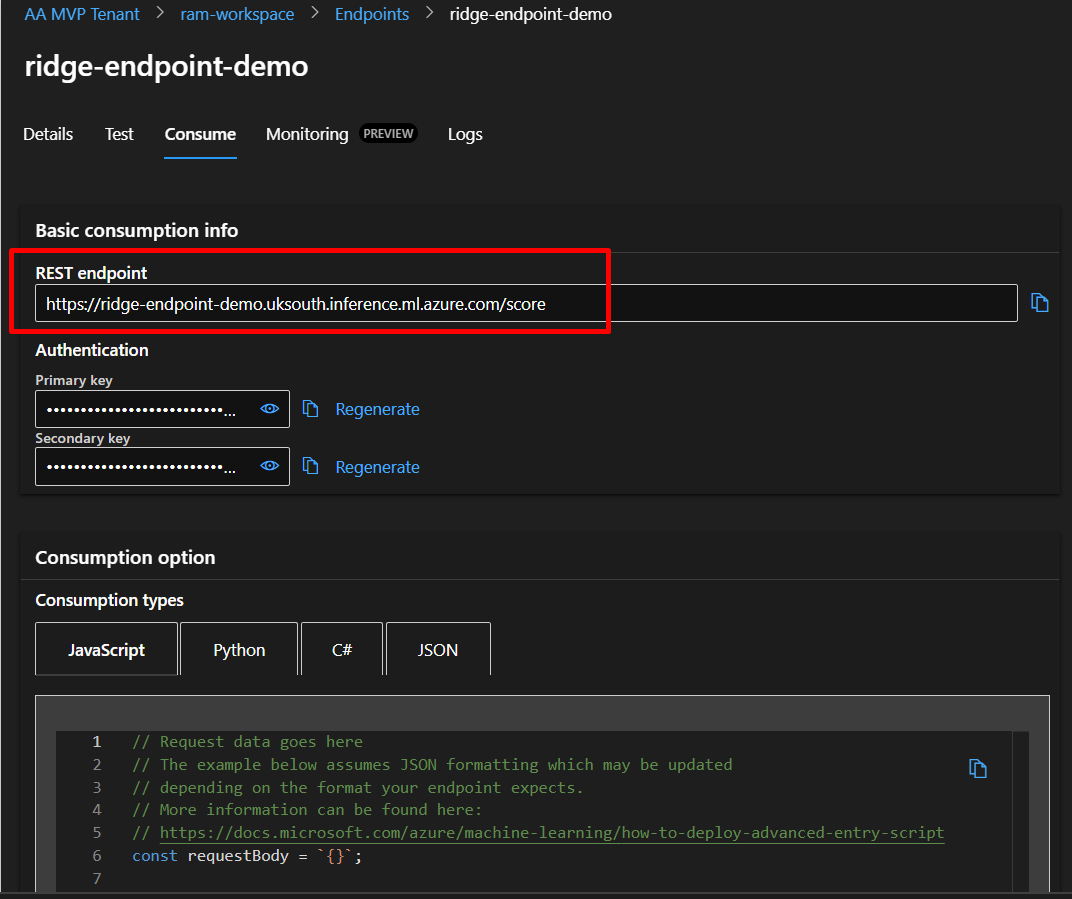
Primary key:
- Click “Show” to reveal
- Copy this key (it’s like a password)
- Anyone with this key can use your endpoint
Secondary key:
- Backup key in case primary is compromised
- Can regenerate keys without downtime
Important: Never share these keys publicly or commit them to GitHub!
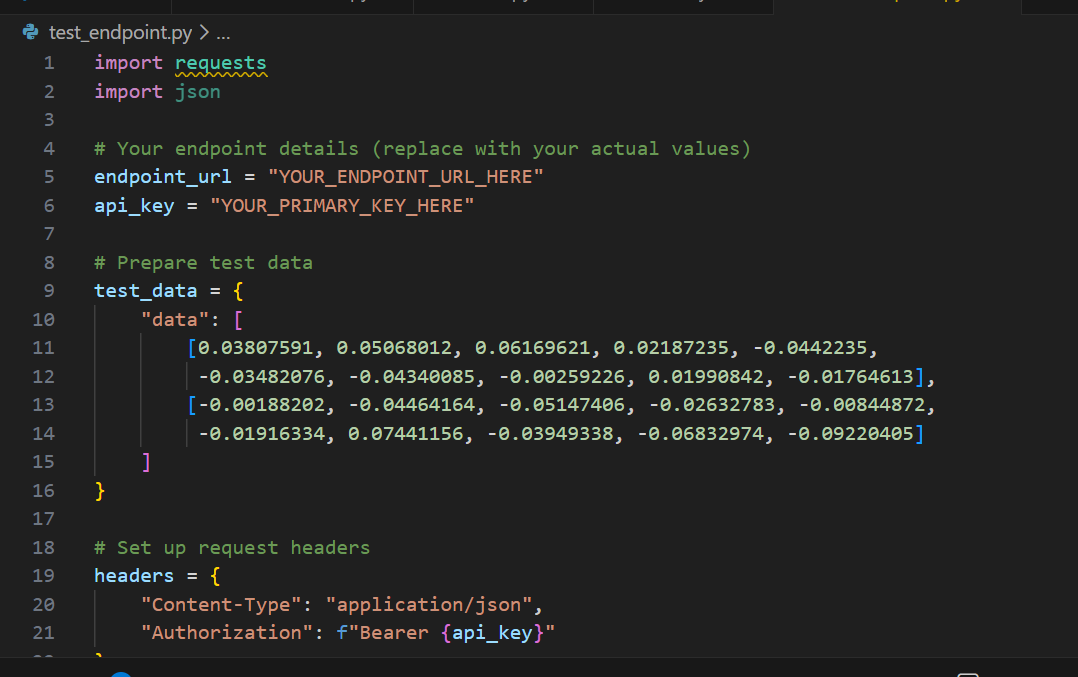
Step 10.4: Test from Python
Create a new file called test_endpoint.py:
import requests
import json

# Your endpoint details (replace with your actual values)
endpoint_url = "YOUR_ENDPOINT_URL_HERE"
api_key = "YOUR_PRIMARY_KEY_HERE"

# Prepare test data
test_data = {
    "data": [
        [0.03807591, 0.05068012, 0.06169621, 0.02187235, -0.0442235,
         -0.03482076, -0.04340085, -0.00259226, 0.01990842, -0.01764613],
        [-0.00188202, -0.04464164, -0.05147406, -0.02632783, -0.00844872,
         -0.01916334, 0.07441156, -0.03949338, -0.06832974, -0.09220405]
    ]
}

# Set up request headers
headers = {
    "Content-Type": "application/json",
    "Authorization": f"Bearer {api_key}"
}

# Make the request
try:
    response = requests.post(endpoint_url, json=test_data, headers=headers)
    response.raise_for_status()  # Raise error for bad status codes

    print(f"Status Code: {response.status_code}")
    print(f"Response: {response.json()}")

except requests.exceptions.RequestException as e:
    print(f"Error: {e}")
Understanding the code:
- endpoint_url: Where to send the request
- api_key: Authentication (like a password)
- test_data: Two patient records
- headers:
Content-Type: Tells server we’re sending JSONAuthorization: Provides the API key
- requests.post(): Sends data to your endpoint
- response.json(): Parses the response
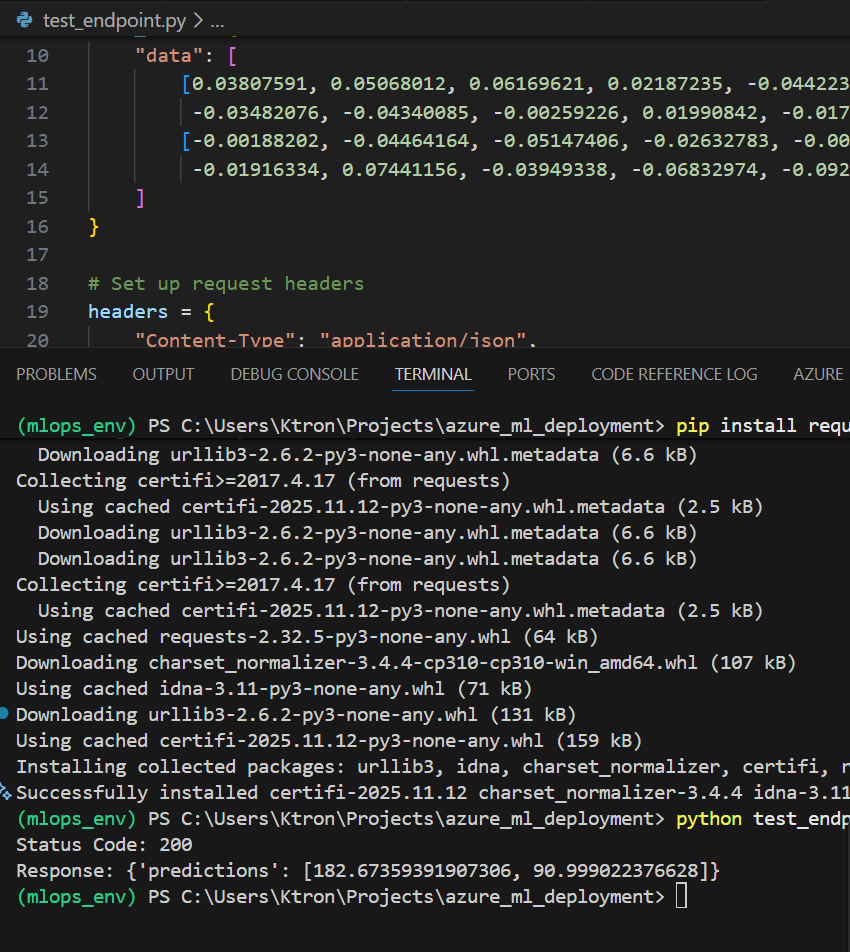
Run it:
pip install requests
python test_endpoint.py
Expected output:
Status Code: 200
Response: {'predictions': [182.67357342863968, 90.99902728640282]}
Status codes:
- 200: Success!
- 401: Authentication failed (check API key)
- 400: Bad request (check data format)
- 500: Server error (check deployment logs)
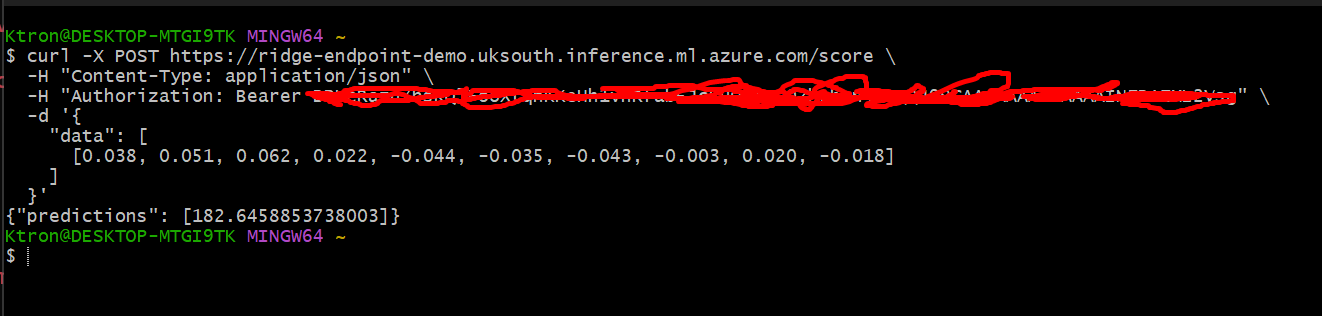
Step 10.5: Test from Command Line (curl)
For quick testing without Python:
curl -X POST YOUR_ENDPOINT_URL \
  -H "Content-Type: application/json" \
  -H "Authorization: Bearer YOUR_API_KEY" \
  -d '{
    "data": [
      [0.038, 0.051, 0.062, 0.022, -0.044, -0.035, -0.043, -0.003, 0.020, -0.018]
    ]
  }'
Replace YOUR_ENDPOINT_URL and YOUR_API_KEY with your actual values.
Part 11: Understanding the Deployment Architecture
Let’s visualize what you’ve built:
Internet Request
      ↓
[Azure Load Balancer]
      ↓
[Endpoint Authentication] ← Checks API key
      ↓
[Container Instance]
      ├── Web Server (Gunicorn)
      ├── Inference Server (AzureML)
      ├── Your score.py
      └── Your model.pkl
      ↓
Prediction Response
Components explained:
- Load Balancer: Distributes requests if you have multiple instances
- Authentication Layer: Validates API keys
- Container: Isolated environment with your code
- Web Server (Gunicorn): Handles HTTP requests
- Inference Server: Azure’s wrapper around your scoring script
- score.py: Your custom prediction logic
- model.pkl: Your trained model
Part 12: Monitoring and Maintenance
Step 12.1: View Metrics
Monitor your endpoint’s performance:
- Go to your endpoint page
- Click “Metrics” tab
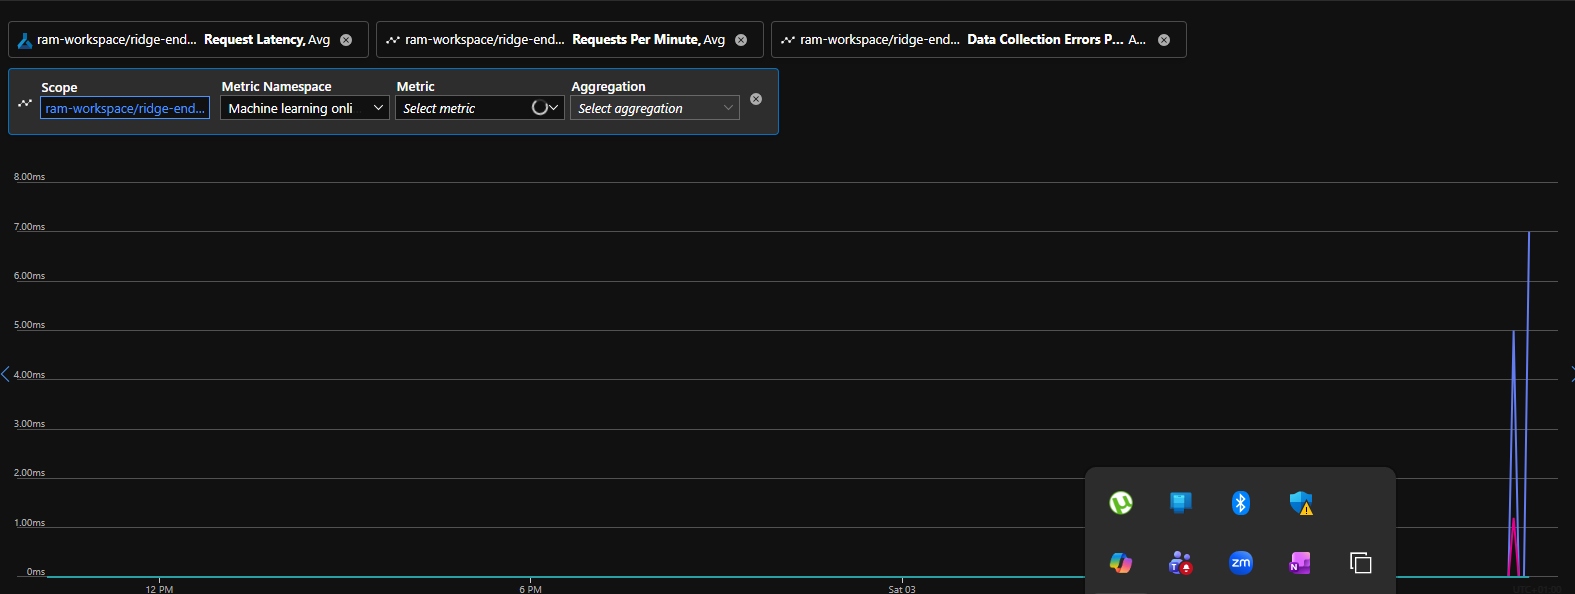
- You’ll see charts for:
- Request per minute: How many predictions made
- Request latency: How fast predictions return
- Data Collection Error rate: Percentage of failed requests
- CPU usage: Compute utilization
- Memory usage: RAM consumption
Healthy metrics:
- Latency: Under 1 second for simple models
- Error rate: Below 1%
- CPU: Below 80% average
Warning signs:
- Latency increasing over time → Need more compute
- High error rate → Check logs for issues
- CPU constantly at 100% → Scale up or out
Step 12.2: View Logs
Debug issues by examining logs:
- Click “Logs” tab
- See real-time output from your container
- Filter by:
- Time range
- Log level (Info, Warning, Error)
- Search keywords
Useful log searches:
- “error” → Find all errors
- “init” → See model loading
- “prediction” → Track inference calls
Step 12.3: Scale Your Deployment
Scale Up (Bigger VM):
- Click your deployment name
- Click “Edit”
- Change VM size to larger (e.g., Standard_DS3_v2)
- Click “Update”
Scale Out (More Instances):
- Click deployment → “Edit”
- Change instance count to 2, 3, or more
- Load balancer automatically distributes requests
When to scale:
- Up: Model is slow, need more CPU/RAM
- Out: Getting many concurrent requests
Step 12.4: Update Your Model
When you improve your model:
- Train new version locally
- Register as new version in Azure
- Create new deployment (e.g., “green”)
- Test the new deployment
- Shift traffic: 50% blue, 50% green
- If good, shift 100% to green
- Delete old deployment
This is called blue-green deployment – zero downtime updates!
Part 13: Cost Management
Step 13.1: Understanding Costs
What you pay for:
- Compute time (per hour VM is running)
- Storage (model files, logs)
- Outbound data transfer (predictions sent)
Example costs (Standard_DS2_v2):
- $0.14/hour × 24 hours = $3.36/day
- $3.36/day × 30 days = $100.80/month
Batch processing alternative: If you don’t need real-time predictions, use Batch Endpoints:
- Much cheaper (only pay when processing)
- Good for processing large datasets overnight
Step 13.2: Saving Money
During Development:
- Delete deployment when not testing
- Use smallest VM that works
- Keep only 1 instance
For Production:
- Set up auto-scaling (scales down during low traffic)
- Use reserved instances (commit to 1-3 years for discount)
- Monitor and right-size VMs
To stop incurring costs:
1. Delete Deployment → Stops compute charges
2. Endpoint still exists (free)
3. Model still registered (minimal storage cost)
4. Can redeploy anytime
Part 14: Cleanup
When you’re done with this tutorial:
Step 14.1: Delete Deployment
- Go to your endpoint
- Click deployment “blue”
- Check the box
- Click “Delete”
- Confirm deletion
This stops all compute charges immediately.
Step 14.2: Delete Endpoint
- Go to Endpoints list
- Check box next to your endpoint
- Click “Delete”
- Confirm
Step 14.3: Delete Other Resources (Optional)
If you’re done with Azure ML completely:
- Models: Can delete to free storage
- Environments: Delete custom environments
- Workspace: Only if not using for other projects
- Resource Group: Deletes EVERYTHING (use carefully!)
To delete resource group:
- Go to Azure Portal
- Search for your resource group
- Click “Delete resource group”
- Type the name to confirm
- Wait 5-10 minutes for deletion


Leave a comment